Create quiz questions
Now that you have created a quiz, it's time to start considering the questions.
There are two main ways to create and store quiz questions:
- Directly in the quiz.
- In the Question Library, organized into sections. (Recommended)
You should first determine which workflow will work best for you, and review the tutorials on each method for more details.
Why create questions in a quiz?
If your quiz is quite simple, and you have no need to reuse or randomize questions, you may want to try this method first.
- More efficient
- All students will get the same questions - but they can be shuffled to randomize the order.
- It can be quicker to set up a quiz with the questions created directly within.
Why create questions in the Question Library?
Creating sections of questions in the Question Library offers some added flexibility that make it possible to create random quizzes, organize questions based on topic or difficulty, reuse questions, etc.
- More flexibility
- A random selection of questions can be pulled from a larger pool of questions, ensuring students each get a unique quiz.
- Questions can easily be organized and grouped by topic and difficulty.
- Questions can easily be reused in a number of quizzes.
Find the Quizzes tool in the top menu bar, under Assessment. If it isn't there, review how to enable course tools.
Three steps to creating a quiz:
Start by creating a quiz. If you haven't done this yet, please review the "Create a quiz" documentation page.
Please see the "Use pools and sections to organize groups of questions" section below to learn more about when you may wish to create a Section before creating questions, to divide your questions into separate "folders".
Please see the "Use pools and sections to organize groups of questions" section below to learn more about creating a Question Pool before creating questions. A Question Pool can only be used if you create your questions in the Question Library first.
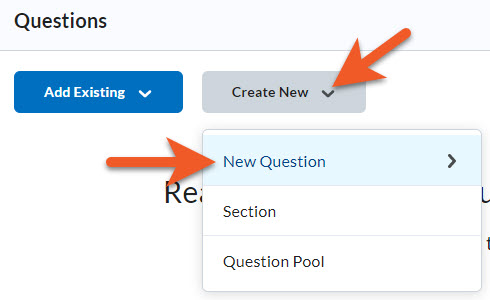
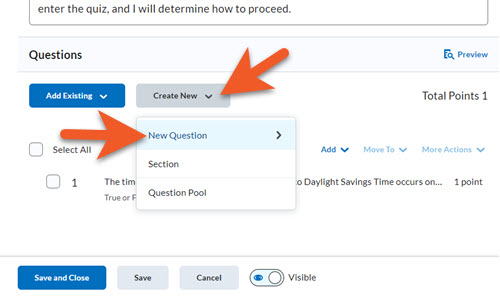
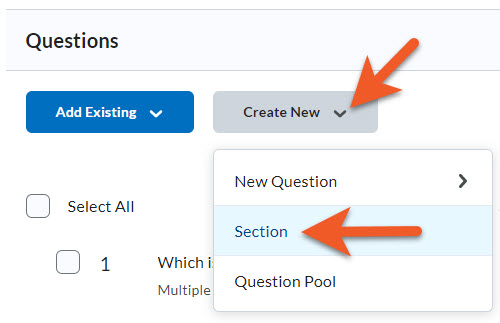
When you are ready to create the quiz questions, edit the quiz, scroll down to the Questions section, then click on Create New > New Question > and then the question type you would like to create.
Please see the "Question Types" section near the bottom of this page, for a detailed description of all available question types, and some tips for filling out the fields for your questions. Question types include True or False, Multiple Choice, Written Response, and more.
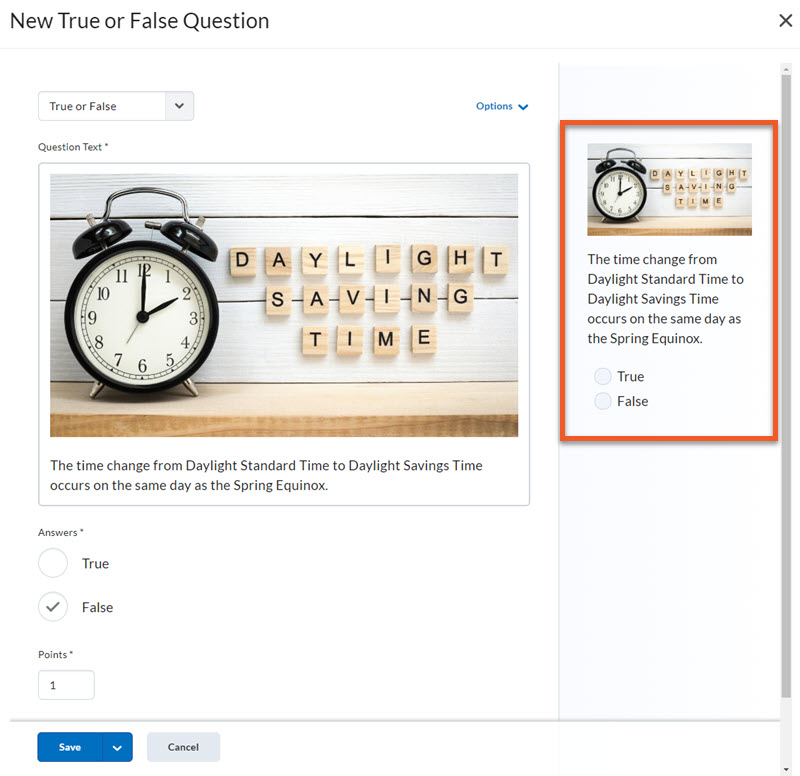
If you are creating questions on a device with a high screen resolution (such as a laptop or larger screen), you will be able to see a preview of your question on the right side of the page, as you make changes.
Once you have saved your question, you can see the list of questions in this quiz, and decide how to proceed.
If you wish to create another question, click on Create New > New Question, and select the question type again.

If it is taking you a while to enter questions, it’s a good idea to occasionally click on Save, at the bottom of the page, to ensure you don’t lose any of your work. Brightspace does not automatically save as you add questions.
If you are done adding questions and making changes to your quiz for now, click on the blue Save and Close button at the bottom of the page.
If necessary, anytime before students start taking the quiz, you can return and make changes or add more questions.
NOTE: If you discover a problem with a question after students have started taking the quiz, please do not change the questions. The questions need to remain as they appeared when the student took the test. You will need to regrade afterwards.
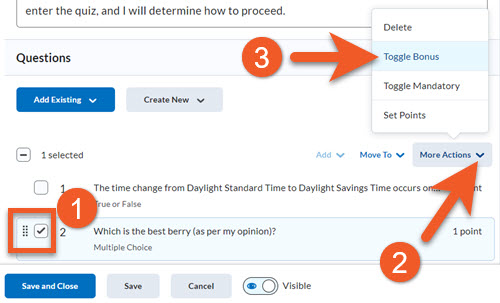
There are a few question settings that you cannot adjust on the Create/Edit Question page for each question, so you need to set those from the main Edit Quiz page. These include Toggle Bonus, Toggle Mandatory and Set Points. Other things you can do from this page include deleting a question, or moving a question to the top or bottom of the quiz, or to a particular section (if you have created sections).
Bonus Points
If a question will count as “bonus points”, above and beyond the total points for the quiz, you need to toggle this setting on for that question.
For example, the quiz could be graded out of 10, with 10 regular questions, and 1 bonus question. This would make it possible for a student to score 11/10 on that quiz.
Go to the Edit Quiz page, and scroll down to the Questions section.
Select the checkbox in front of the question that will be a “bonus” question.
Click on More Actions > Toggle Bonus.
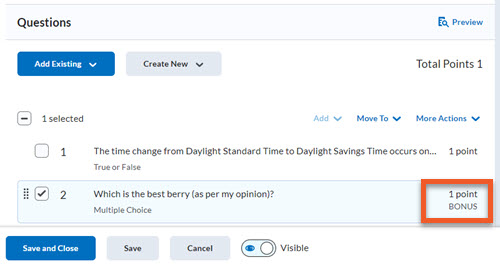
You will notice that “BONUS” now appears just below the points value for that question.
The points for this question are not included in the “Total Points” for the quiz.
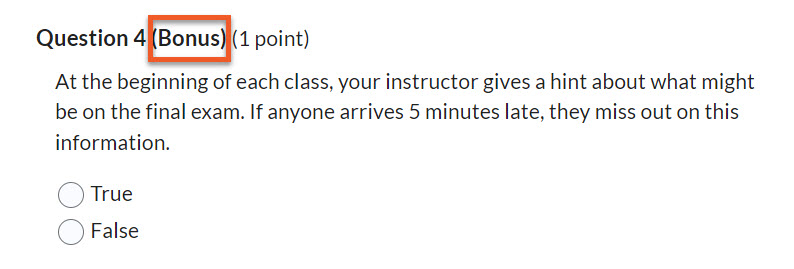
When a student is writing their quiz, any bonus questions will be noted with "(Bonus)" indicated beside the question number.
You can also see this when previewing the quiz.
Mandatory Questions
You can set a question as mandatory, which means that students must answer that question, and that if you are selecting a number of questions from a pool, a question tagged as mandatory will always appear in the selection.
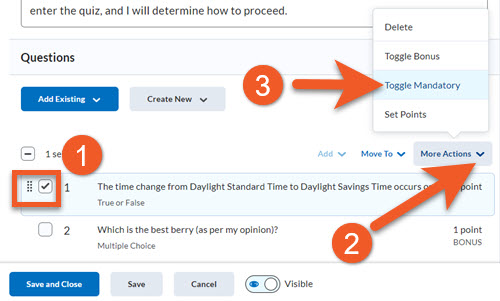
Go to the Edit Quiz page, and scroll down to the Questions section.
Select the checkbox in front of the question that will be a “bonus” question.
Click on More Actions > Toggle Mandatory.
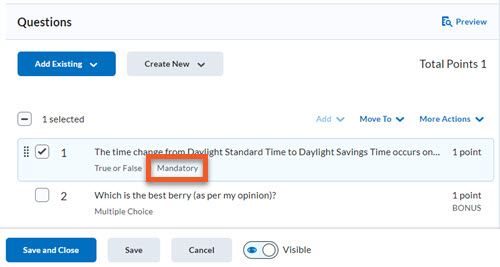
You will notice that “Mandatory” now appears just below the question preview text, to the right of the question type.
If a student tries to submit their quiz without answering a question that has been tagged as mandatory, they will see a warning that they have 1 unanswered mandatory question. If there is still time on the clock, they will have an opportunity to go back and answer that question. If the quiz has not been set up to auto-submit their quiz attempt, the student will not be able to submit their quiz without answering the question, which means that if they do not submit, you will need to submit on their behalf, before you can grade the student’s quiz attempt.
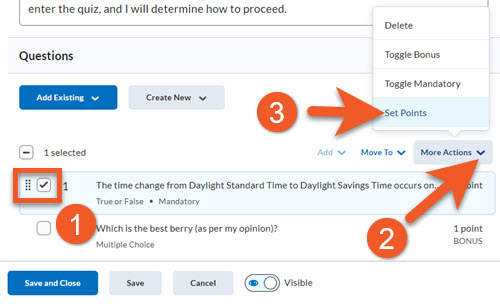
Set Points
Use "Set points" to set the same point value for all selected questions. This will set the point value for all selected questions to a number entered in the pop-up.
Go to the Edit Quiz page, and scroll down to the Questions section.
Select the checkbox in front of the question(s) for which you need to change the points.
Click on More Actions > Set Points

In the popup window that appears, enter the Points (whole number or decimal) that you want to assign to the question(s), then click on Save.
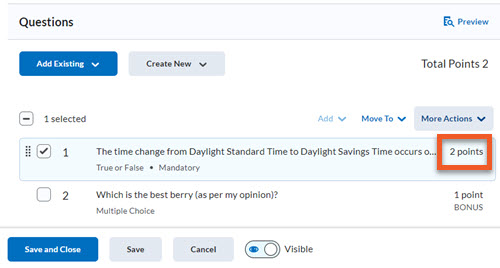
You will notice that the points value has been updated for the selected question(s), to the right of the question preview text.
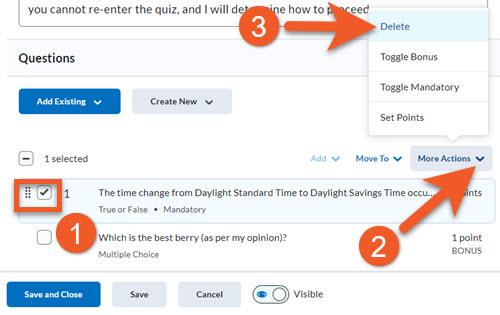
Delete question(s)
If you want to delete one or more questions (or entire sections) from your quiz, you can do this from the Edit Quiz screen.
Please note that it is not possible to undo this action, so take great care to be sure you are deleting the correct content.
Select the checkbox in front of the question(s) for which you need to change the points.
Click on More Actions > Delete
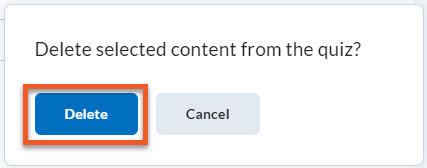
In the popup window that appears, click on Delete.
The selected question(s) will disappear from the list of questions.
There are a number of ways that you can organize groups of questions within a quiz.
The most common is to create a Section or a Question Pool.
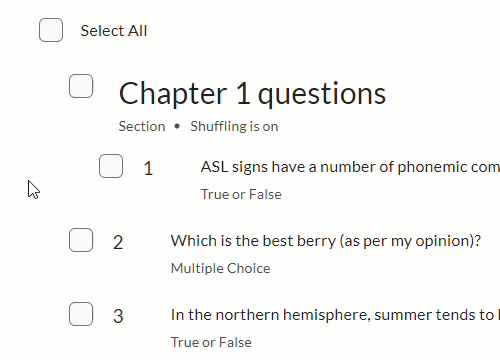
A section is a way to group questions together (like a file folder). This may be because the questions cover similar material, such as a particular chapter from the textbook, or perhaps the questions are of a similar type or difficulty level. You can also organize your quiz so that each section of questions appear on one page together (see the Paging setting, under Timing & Display)..
A question pool is an excellent way to organize questions if you only want students to see a selection of questions from a larger pool, or if you want students to see questions from a pool in random order, to reduce the chance of cheating. If you are showing students a selection of questions from a larger pool, it is recommended that you make those questions all of a similar difficulty level, so that the experience will be fair for all students taking the test (some won't experience a more difficult test than others).
Create a section in a quiz
If you want to organize questions in a section, it’s more efficient if you create the section first.
Go to the Edit Quiz page, and scroll down to the Questions section.
Click on Create New > Section.
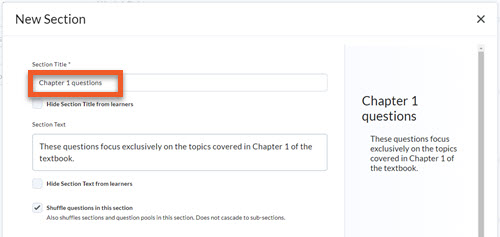
In the popup window that appears, you can adjust various settings for the section you are creating.
The only required setting is that you must fill in the Section Title.
If the name of the section is only for your own purposes, you can select the checkbox to Hide Section Title from learners.
If you wish to provide a description of the section, you can type it in the Section Text field. You can also choose to Hide Section Text from learners, if this information is only for you.
You can also select Shuffle questions in this section, if you wish to present questions in a different order to each student. Unfortunately, the shuffling does not cascade to subsections.
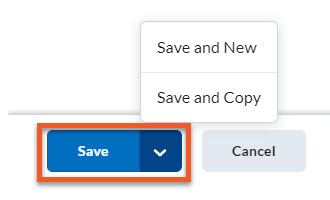
Click on Save to create the section and save your work.
You can also click on the down arrow to choose “Save and New” or “Save and Copy”, if you need to create multiple sections.
Edit a section
If you need to edit a section name or other settings for that section, go to the Edit Quiz page, scroll down to the Questions section, then simply click on the name of the section.
The Edit Section page will open in a popup window. See the “Create a section in a quiz” section above, for an explanation of the settings.
Make your changes, then click on Save to save your work.
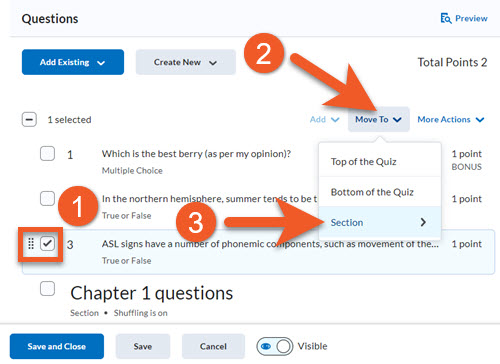
Move a question into a section
Go to the Edit Quiz page, and scroll down to the Questions section.
Select the checkbox in front of the question(s) for which you need to move into a section.
Click on Move To > Section.
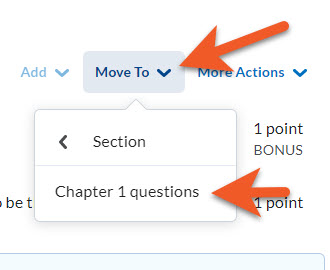
Select the section you wish to move the question(s) into.
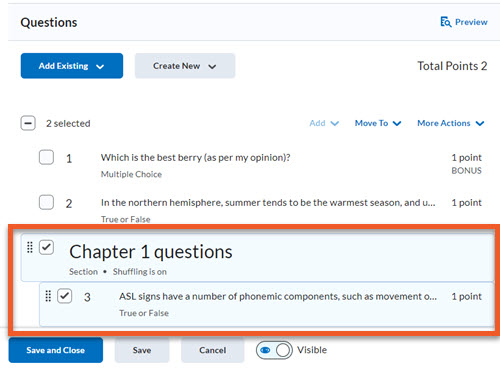
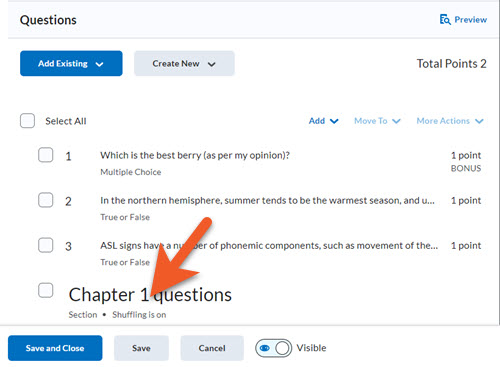
You will now notice that the question list reloads, and the question(s) now appear indented, below the section.
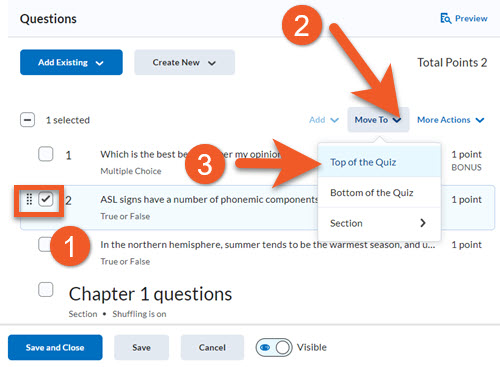
Move a question to the top of the quiz
Go to the Edit Quiz page, and scroll down to the Questions section.
Select the checkbox in front of the question(s) for which you need to move into a section.
Click on Move To > Top of the Quiz.
You will notice that the question list reloads, and the question(s) now appears at the very top of the list of questions.
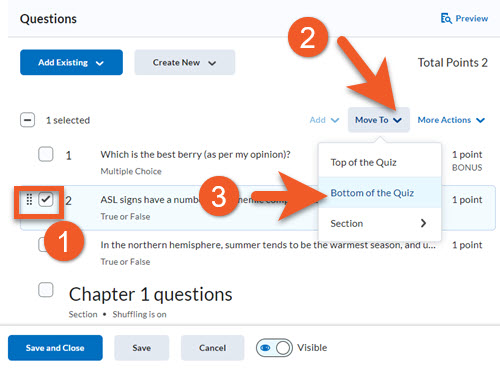
Move a question to the bottom of the quiz
Go to the Edit Quiz page, and scroll down to the Questions section.
Select the checkbox in front of the question(s) for which you need to move into a section.
Click on Move To > Bottom of the Quiz.
You will notice that the question list reloads, and the question(s) now appears at the very bottom of the list of questions.
Move a question, section or question pool
Or, there is another way to change the order of items in the Questions section.
You can easily move questions or sections around by holding the cursor down on the “handle” for that item, and dragging it. You will see a dark blue bar that indicates where the item will go. Then release the mouse button to leave the item in the new location.
Move multiple questions, sections and/or question pools
If you need to change the order of multiple items, you can select them using the checkbox to the left of any questions, sections or question pools.
Then, hold the cursor down on the "handle" for one of the items, and drag the items to the new location. You will see a dark blue bar that indicates where the items will go. Then, release the mouse button to leave the items in the new location.
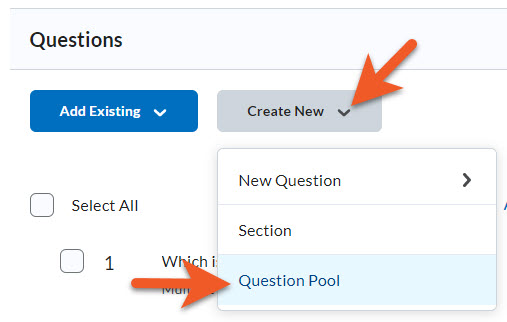
Create a Question Pool in your quiz
If you want to use a question pool to show students a smaller random selection of questions from a larger pool of questions, you’ll need to first create those questions in the Question Library. It’s not possible to do this entirely inside the quiz. To create questions in the Question Library, see the section called “Create a section of questions in the Question Library” further down on this page.
To create the Question Pool, go to the Edit Quiz page, and scroll down to the Questions section.
Click on Create New > Question Pool
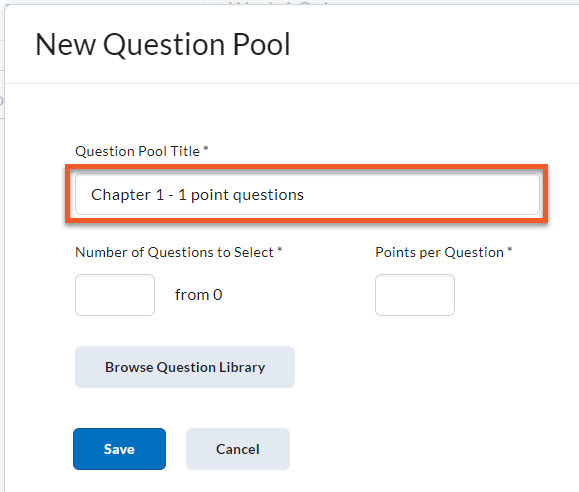
First, type in a Question Pool Title. Students do not see this, so it should be something meaningful to you, like “Chapter 1 - 1 point questions”.
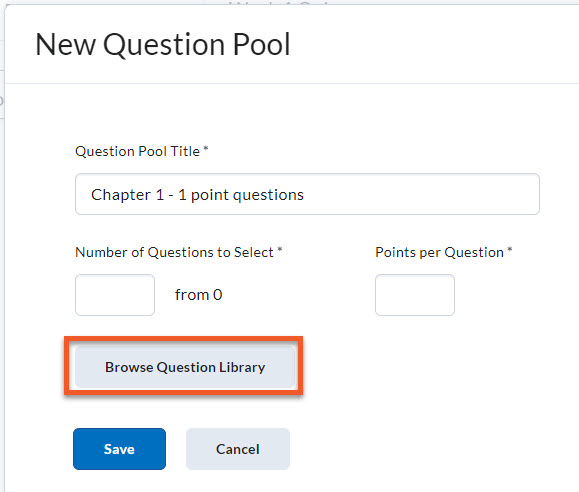
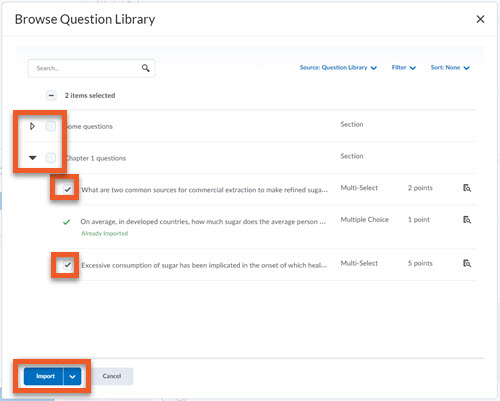
Next, skip down to select the questions in the pool. Click on Browse Question Library.

A side panel will expand, which displays the Question Library.
Select questions and/or entire sections of questions, as desired. If needed, you can click on the triangle to expand a section, to select individual questions from that section.
Note: Keep in mind that all questions in a question pool MUST have the same points value, because each student will receive a different selection of questions, and every student’s quiz must be out of the same total.
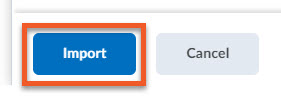
Click on Import to add the selected questions to the question pool.
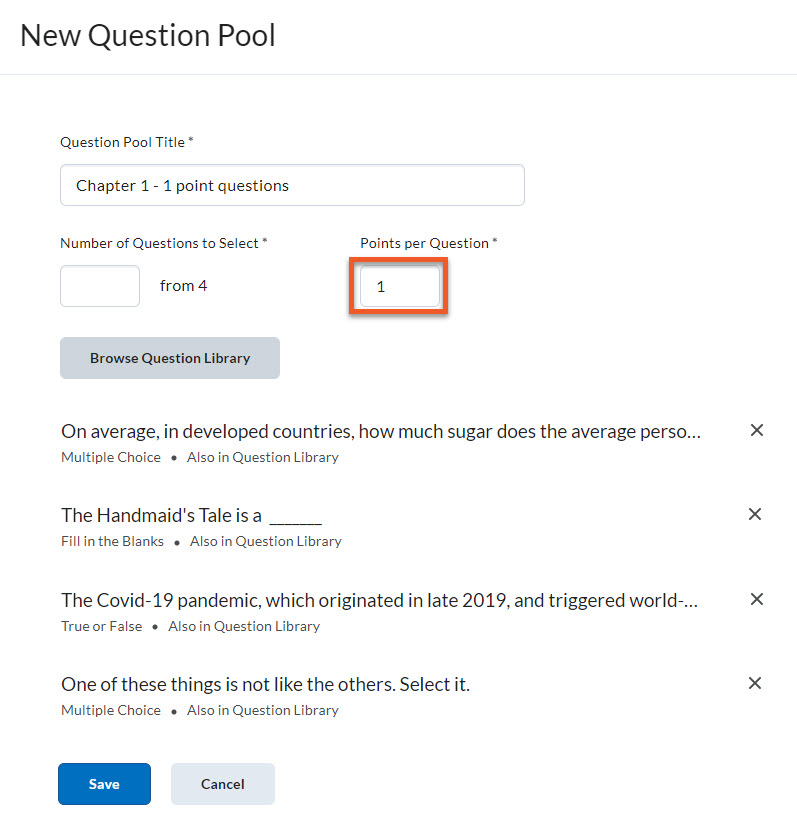
You will now see that the questions are listed on the New/Edit Question Pool page.
Please note that all questions in a question pool must have the same points value, so check the Points per Question field, to make sure this value is correct.
If you have questions of differing points values, make separate question pools for each.
If you need to remove questions from this question pool, click on the X to the right of the question text.
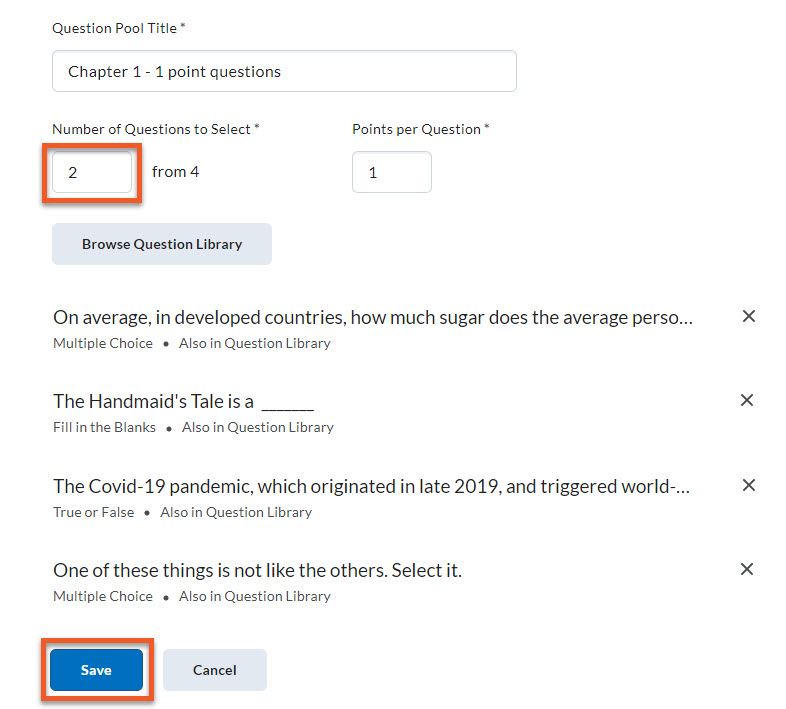
Fill in the Number of Questions to Select. This is the number of questions from the pool that each student will see in their quiz.
We recommend typing in this number after you add questions to the pool, and correct any points problems.
If you want students to see all of the questions from this pool, the number will be the same as the total to the right of this box. If you want students to see a smaller selection from the pool, it will be a smaller number than the total.
Click on Save to finish setting up your Question Pool.
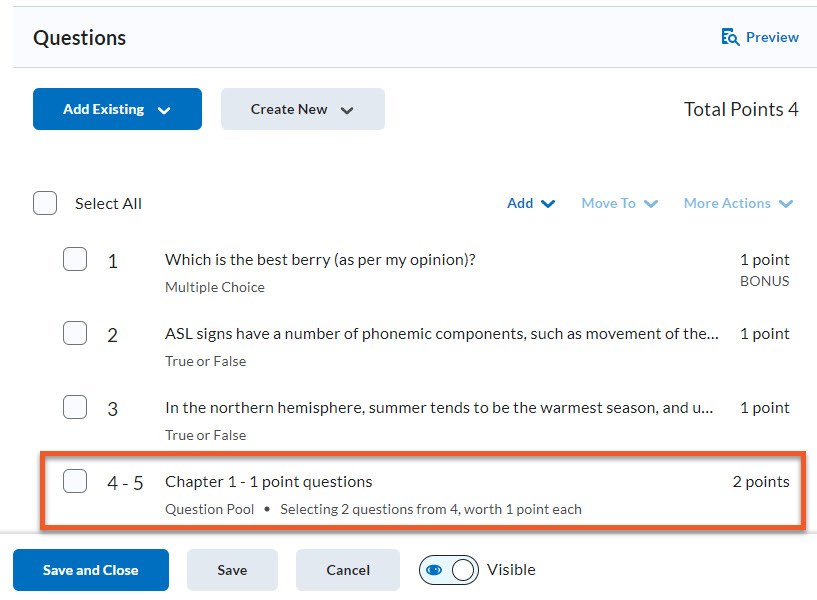
On the Edit Quiz page, you will now see the Question Pool at the bottom of the Questions section.
Make sure to either Save or Save and Close after making significant changes, to ensure you don’t lose any of your work.
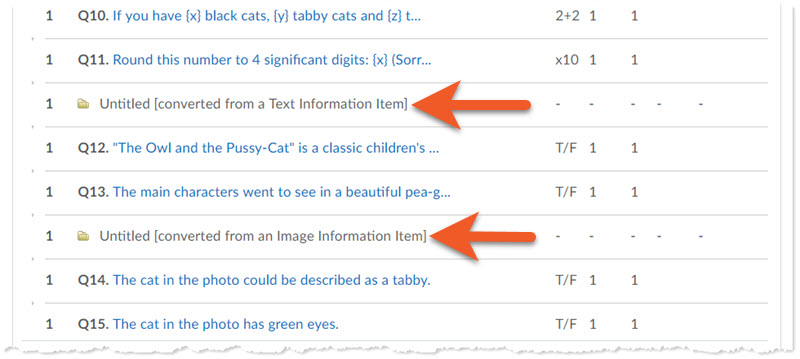
Please note: Text Information Items and Image Information Items have been deprecated.
If you have copied quizzes from previous course shells, and those quizzes used these items, they have now been converted to sections, and you will need to edit the title to something more appropriate (see screenshot). We recommend previewing your quiz to ensure that these items appear appropriately.
In the future, when creating new questions, it's recommended that you use the WYSIWYG editor in each question to include text or image information.
Find the Quizzes tool by clicking on Assessment > Quizzes in the top nav, then click on Question Library.
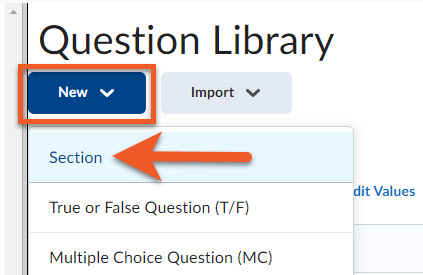
From the Question Library page, click New > Section.
You can adjust various settings for the section you are creating.
The only required setting is that you must fill in the Section Title.
If the name of the section is only for your own purposes, you can select the checkbox to Hide Section Title from learners.
If you wish to provide a description of the section, you can type it in the Section Text field. You can also choose to Hide Section Text from learners, if this information is only for you.
You can also select Shuffle questions in this section, if you wish to present questions in a different order to each student. Unfortunately, the shuffling does not cascade to subsections.
Click on Save to create the section and save your work.
You can also click on the down arrow to choose “Save and New” or “Save and Copy”, if you need to create multiple sections.
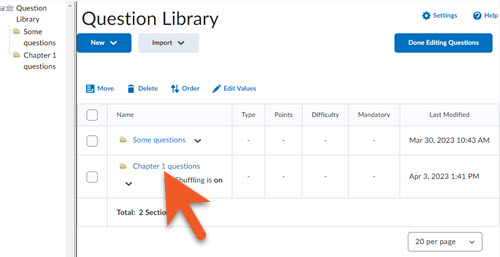
Back on the Question Library page, click on the section name to open the section you just created.
From here, you add new questions by clicking New and selecting the type of question you will add. Keep in mind, if you are creating this section for a random section in a quiz, the types of questions should be similar and of similar difficulty (since D2L will pull x number of questions from the section randomly).
You can also import questions from an existing quiz by clicking Import.
Note: Questions cannot be imported from a question pool already created in a quiz.
When you're done adding your questions, click Done Editing Questions.
If you have created questions in the Question Library and would like to use them in a quiz, follow these steps to import them into the quiz.
Start by creating a quiz. If you haven't done this yet, please review the "Create a quiz" documentation page.
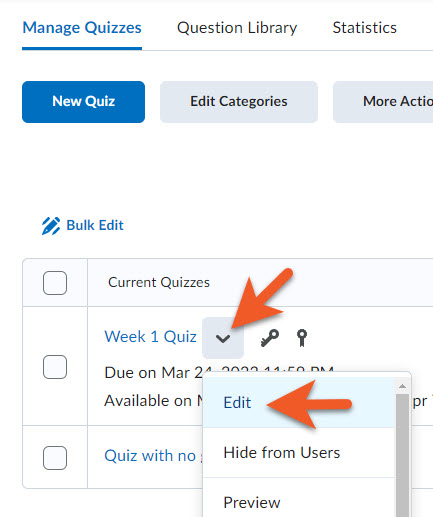
If you are not already on the Edit Quiz page, go to Assessment > Quizzes, click on the down arrow to the right of the quiz name, and select Edit.
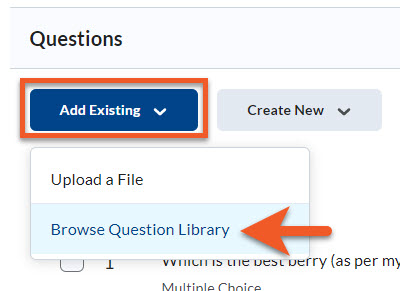
Scroll down to the Questions section, then click on Add existing > Browse Question Library.
You will see the list of existing questions that are in the Question Library in a popup window.
You can click on the arrow to expand a section, to see the questions in that section.
Select the checkboxes beside a section to select all questions, or select individual questions.
If a question already exists in the quiz, you will see a green “Already Imported” message beside the question.
To import from the Question Library, click on Import.

The questions from the Question Library now appear at the bottom of the questions list.
You can select and move the questions around, if you prefer a different order.
Make sure to Save or Save and Close after making any changes, to ensure you do not lose your work.

Tip:
If your question library is large, or you want to search for a particular type of question, you can use the search box in the upper-left, or the filter options in the upper-right of the screen to find what you are looking for.
It is a good idea to create or save all quiz questions within the Question Library. This enables you to reuse questions in various quizzes, question pools, surveys, and self assessments.
To create a question in the Question Library, see the steps above.
However, if you have inadvertently created questions inside a quiz, and now realize you need them in the Question Library, it’s not too late. You can easily copy them into the Question Library.
From the Quizzes page (Assessment > Quizzes), select "Question Library".

Click Import > Browse Existing Questions to copy questions from a quiz into the main folder of the Question Library.
If you wish to import questions into a particular section within the Question Library, click on that section name, and then click Import.
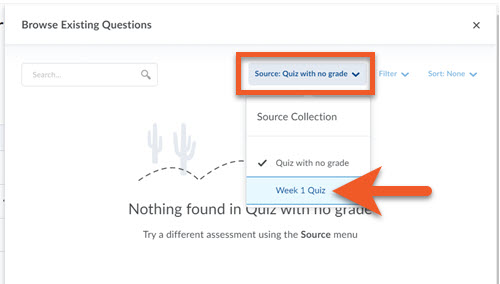
In the Browse Existing Questions popup window that appears, click on the filters in the upper-right of the page, and select the quiz you wish to copy questions from.
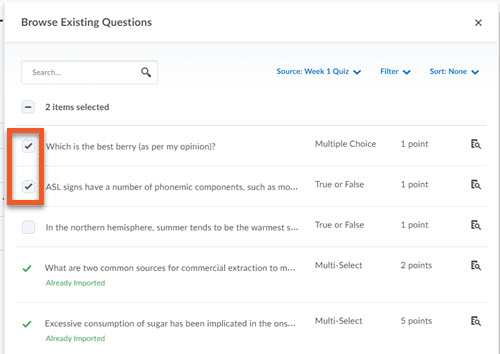
Select the checkboxes for the questions you wish to import to the Question Library.
Note that any questions which already exist in the Question Library will be tagged with a green “Already Imported” note, and are not selectable.

Click on Import to complete the copy process.
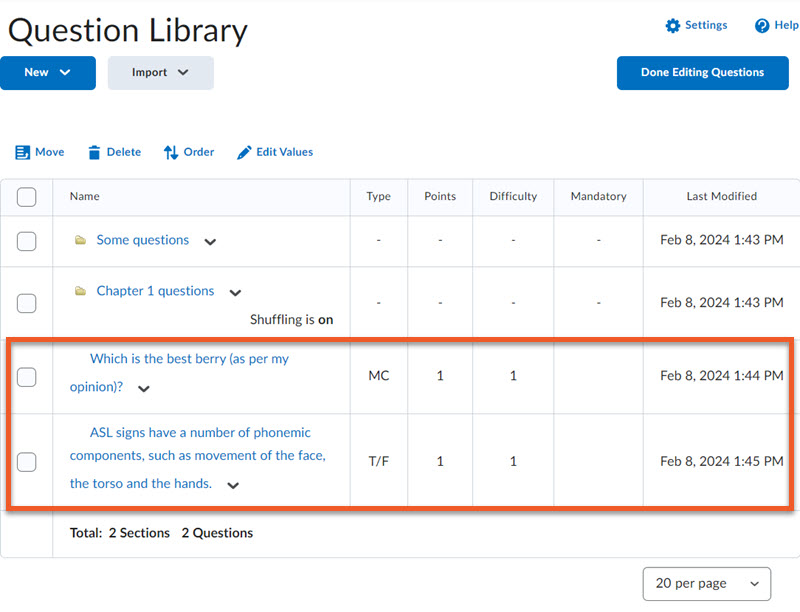
The imported questions now appear at the bottom of the list in the Question Library.
If you have multiple pages of sections and/or questions, navigate to the last page, to see the newly added questions.
You can now reorganize the questions, if you wish, and use them in other quizzes, etc.
Before creating questions in D2L Brightspace, it’s a good idea to type out your questions, answer options, and other details in a document, such as a Word or Google Doc. This makes it easy to edit/spellcheck or collaborate/share with colleagues. Also, once you’re in Brightspace, you only need to copy/paste the text. This also ensures that you maintain a copy of the questions, in case you need to use the questions somewhere outside of Brightspace (ie. for an “on paper” test, or if the questions require department approval).
For this example, we will take a closer look at the Multiple Choice question type.

Question answer options
Enter the possible answers to the question, making sure that you indicate the correct answer by selecting it. These can also include images, short videos, quicklinks, equations and some basic formatting.
To add another answer option, click Add Answer below the answers to add another one.
Below this, you can select the checkbox for Randomize answer order to ensure that each student sees the answer options in a different order.
Assign values to the answers
If the question has definitive correct and incorrect answers, like a True/False or Multiple Choice question, assign the appropriate values to each answer.
If your question looks like the example here, you will need to assign the value of each answer. Incorrect answers should be given a 0, correct answers should be given 100. Partial marks may also be given. This is called "Custom Weights".
If this "Custom Weights" view is not enabled in the question Options, you will simply have to identify the correct answer. (Custom Weights can be turned on/off by going to "Options").
The Points field shows how many points this question is worth.

Additional options
When editing a quiz question, you can enable some added options by clicking the "Options" link at the top of the page.
Those marked with a check are enabled for your question.
- Add feedback fields for each answer option, as well as for the whole question.
- Add hint to provide the students with a guide to the correct answer.
- Add short description
- Add custom weights to provide full/partial credit on different answer options. 100% identifies a correct answer.
- Add enumeration adds a symbol next to each answer option (i.e. a, b, c, d). This is not recommended if you will be randomizing the answers.

True or false questions present a statement. The student needs to decide if the statement is true or false.
Required: question text, whether the answer is true or false, points
Optional: feedback, hint, short description, enumeration

Multiple choice questions provide a statement or question with a list of possible answers. The student must choose the best answer. Multiple choice questions are different from multi-select questions because you can only pick one answer for each multiple choice question.
Required: question text, answers (ideally 3 or more), default points
Optional: ability to randomize answers, feedback, hint, short description, custom weights (partial points), enumeration (a, b, c vs i, ii, iii)

Multi-select questions provide a statement or question, and require the student to identify one or more correct answers within a list of possible answers. Multi-select questions are different from multiple choice (MC) questions because multi-select questions enable students to select more than one answer, and have grading options to structure points awarded based on how many of the correct answers are chosen.
Required: default points, question text, How are points assigned to blanks (all or nothing vs right minus wrong, etc), answer text
Optional: short description, enumeration, randomize answer order, overall feedback, answer feedback text, question hint

Written response questions require students to write detailed answers to open-ended questions. Answers can be in the form of sentences, paragraphs, programming languages, HTML code, or even mathematical formulas or explanations. Written response questions must be graded manually by the instructor, as many types of long answers can be subjectively judged.
If desired, instructors can include initial text for the student's response.
Required: question text, points
Optional: enable HTML editor, feedback, hint, short description, answer key, custom response box size (doesn't limit the text students can type, but does provide a visual indication of what's expected), allow learners to insert images and add attachments, initial text (for learner responses)

Short answer questions require students to provide brief answers to open-ended questions. Short answer questions can be auto-graded, as the system searches for matching character patterns.
Note that while short answer questions can be auto-graded, if you have some flexibility regarding spelling, capitalization, punctuation, etc, you may need to manually grade these questions, to avoid false negatives.
Required: question text, answer text (can be text, case-sensitive text or a regular expression), default points
Optional: feedback, hint, short description

Multi-short answer questions require students to answer a question that requires multiple answers and input their answers into individual input boxes. These questions can be auto-graded, as the system searches for matching character patterns in the submitted answer text, 'though we strongly recommend reviewing student submissions, if you're willing to accept non-exact matches as correct. Each submitted answer is compared to each possible answer stored in the answer fields.
Required: points, difficulty (1-5), question text, input box options (#, row, column), answers, answer weights, evaluation type (case insensitive, case sensitive, regular expression)
Optional: title, image, alternative text (for image), question hint, question feedback

Fill in the blanks questions require students to fill in a word or phrase for an incomplete sentence, statement, phrase, or list. These questions can be auto-graded, as the system searches for matching character patterns in the submitted answer text. As a best practice, D2L recommends that answers in blank fields are no more than one or two words to ensure auto-grading accuracy. The listed order of blank and text fields needs to correspond with the sequence displayed to users.
Required: points, difficulty (1-5), question text options (#blanks, #text boxes), question text, answer text, answer weight, evaluation type (case insensitive, case sensitive, regular expression),
Optional: title, image, alternative text (for image), question hint, question feedback

Matching questions require students to choose from a set of possible match choices from drop-down lists and pair them correctly with related items. This question type enables the instructor to gauge recognition of information and relationships.
Required: points, difficulty (1-5), question text, grading style (equally weighted, all or nothing, right minus wrong, number of answer choices, answer text for each choice, number of matches, text for each match,
Optional: title, image, alternative text (for image), question hint, question feedback

Ordering questions require students to organize a number of items into a particular order.
Required: points, difficulty (1-5), question text, grading options (equally weighted, all or nothing, right minus wrong), number of items, item value, item feedback, item order
Optional: title, image, alternative text (for image), question hint, question feedback

Arithmetic questions allow you to appraise students' understanding of mathematics. You can ensure each respondent receives a unique question by including variables enclosed with curly braces that randomly generate numbers within the problem.
Note: As best practice, it is recommended that you create written response (WR) question types for arithmetic problems that require users to show their work. In some cases, using an Assignment, instead of a Quiz, may be more appropriate. You may need to try each, to determine which is a better fit.
Required: points, difficulty (1-5), question text, formula, tolerance units/percent and amount, evaluation options (case insensitive, case sensitive, regular expression), # of variables, variable values (name, min, max, decimal places, step)
Optional: title, image, alternative text (for image), answer precision (0-10), enforce precision on/off, units field, units worth % of points, question hint, question feedback

Significant figures questions require students to answer in scientific notation and provide solutions that contain a specified number of significant figures. Math and science courses commonly use this question type. You can ensure each student receives a unique question by including variables enclosed with curly braces that randomly generate scientific notations within the problem.
Required: points, difficulty (1-5), question text, formula, significant figures number (1-7), tolerance values (units/percent - to determine required accuracy), evaluation options (case insensitive, case sensitive, regular expression), # of variables, variable values (name, min X x10^Y, max X x10^Y, step X x10^Y)
Optional: title, image, alternative text (for image), allow attachments to support answers, deduct X% of points for incorrect significant figures, units, worth % of points, question hint, question feedback

Likert questions measure responses on a scale. This can be subjective information such as opinions or skill level. You can use this type of question to measure intensity of sentiment toward statements.
Likert questions are not currently an option in the Quizzes tool. However, you can use the Survey tool to gather responses to this type of question.
Required: introductory text, scale type, # of questions, question text
Optional: title, image, alternative text (for image), include n/a option on scale, question feedback