Central File and Print Services (CFAPS)
As of July 1, 2023, CCS permanently closed two general-purpose teaching and drop-in computer labs: KHW-377 and KHW-379.
These labs are no longer available for bookings.
What is CFAPS?
Central File and Print Services (CFAPS) is a service available to administrative and academic departments at Toronto Metropolitan University (TMU).
CFAPS provides: Shared Network printing, Backup Service, Shared Central File Service and Off Campus Access.
How to get access to CFAPS
CFAPS access must be requested by the Department/School CFAPS Liaison via the CFAPs request form in the IT Help Portal. If you do not know who your CFAPs Liaison is, please contact your Manager.
If your Department/School does not have a CFAPs Liaison or it needs to be changed, please have a Senior Manager contact the CCS Helpdesk to setup a CFAPs Liaison by following these steps:
- Submit an incident via ServiceNow https://help.torontomu.ca/sp?id=rye_index , or send an email to help@torontomu.ca
- You’ll need to provide authorization from your Director or Manager indicating that they are giving you authorization to be set up as a CFAPS Liaison.
Once this information has been received, the incident will be moved through the process to add you to the CFAPS database.
When this has been completed, you’ll receive a notification (email) indicating that you have been added as a CFAPS Liaison. At this point you can now access the form and submit your request to access a CFAPS service.
Note: CCS will not be held responsible for any inappropriate use of network printers or shared folders as a result of a CFAPS liaison requesting access for users.
Network printing allows multiple computers to print to the same printer(s). Once a network printer has been set up on CFAPS, any number of users can be granted access to print to it.
To use network printing through CFAPS your computer must have at least Windows 7. MAC users can also access CFAPS network printing. Setting up a printer for use by CFAPS requires:
- a network card for the printer
- TMUnet connection for the printer
- TMUnet connection for each computer
Once you have been set up for CFAPS on your workstation you can access any network printer in your department for which you have been authorized.
Setting Up Your Default Printer
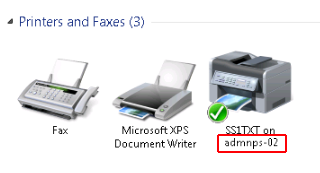
As of October 23, 2016, the CFAPS printer server name will change from TSI-CFAP-03 to admnps-02 . Printer names will remain the same the only difference will be the server name. Your default printer may not remain the same after this change. You may have to re-select the default printer.
Prior to the Change Make Note of Your Default Printer:
Windows 7
- Click on the Windows button and select Devices and Printers from the panel on the right side.

- Search the list of printers for the printer with a green check mark. Make a note of the printer name.
Windows 10
- Click on the Windows button and then the Settings icon.

- Select Devices.
- Search the list of printers for the printer with “Default” under the printer names. Take note of the printer name.
Printer Server Name Before Change

After the Change set a Default Printer:
Windows 7
- Click on the Windows button and select Devices and Printers from the panel on the right side.

- Search the list of printers for the one you want to be your default printer. Right click on the printer and select Set as Default Printer.
Windows 10
- Click on the Windows button and then the Settings icon.

- Select Devices.
- Click on the printer you want as the default printer, click on Manage, and select Set as Default.
Printer Server Name After Change
Through CFAPS, faculty and staff can quickly and easily back-up their data to their personal network folder. This will prevent the accidental loss of data due to hard disk failure or computer theft. The maximum amount of data that staff or faculty can back up is 1 gigabyte (1 GB) on their personal network space. To get personal back-up disk space, your department must have CFAPS in place.
CFAPS personal and departmental folders can be access off campus using TMU-VPN.