iClicker (integration with Brightspace)
What is iClicker?
iClicker incorperates technology into a learning environment. Each student has an iClicker and uses it to respond to questions during class time. Results are captured and displayed immediately.
What are the benefits to using iClicker in your Brightspace Course?
iClicker Cloud Roster & Grade Sync (RGS) allows you to quickly and easily pull your Brightspace roster into iClicker Cloud and send your iClicker Cloud grades directly to your Brightspace gradebook.
Benefits of this integration include:
- Quick and easy setup
- Ability to pull your Brightspace roster into your iClicker Cloud course
- Assistance in getting your students ready to use iClicker before classes start
- No additional linking steps for students
Support
- For instructor support, please email dmp@torontomu.ca.
- For student support, please email clickerhelp@torontomu.ca.
iClicker Student Use
All students must create an iClicker Student account to ensure their grades sync to your iClicker gradebook.
Information for New Instructors
By answering questions and seeing the results right away, students will know how they are doing and where they are with their peers. Using iClickers also allows shy students to participate when normally they will not raise their hands. iClicker can be used either anonymously or for marking.
If any of the conditions below are true in your class, then you may want to consider using clickers for your course:
- Students are falling asleep during your lecture.
- You see students staring at you with blank eyes.
- You have larger class size which makes it harder for you to engage students.
- You know that students are listening and want to contribute, but are shy to participate.
Before you consider using clickers, ask yourself the following questions:
- What is the learning objective of your course or particular week/chapter/topic in your course?
- What ways or methods can you use to achieve that learning objective? Will technology help? If yes, what and how?
- Will clicker help your students learn better?
- And finally, will you be able to set aside additional time to be familiar with the technology?
Answering those questions will help you to avoid a common pitfall of selecting the technology first, just for the sake of the technology, and then try to fit it into your course.
There are two main challenges:
- Learning curve – As with adopting any technology in your course for the first time, you may spend considerable amount of time in learning and familiarizing with the technology. Proper training and asking questions to the DMP (opens in new window) will help you ease the process, but ultimately, the majority of the effort will be from the instructor her/himself. Therefore, you need to acknowledge the amount of work you need to invest at this stage.
- Class preparation – In order to use clickers effectively, you need to prepare the questions to be asked in class. The questions you prepare will correspond to the purpose of why you use clickers, such as to take attendance, to find out whether students understand a particular concept you have just explained, to do a small quiz, etc.
Clickers enable instructors to find out whether students understand a particular concept at a certain moment during lecture. Instructors can ask students a multiple-choice question, and have students respond. The answers can be obtained immediately and be used as a guide for whether to move forward with the lecture, or to spend more time on the topic.
- Promote student’s active and reflective learning: iClickers may be handy in acquiring students’ opinion, especially those related to sensitive, personal information. It works well when the clickers are used in anonymous mode. This activity engages students to participate actively and to reflect upon their opinions in comparison to others.
- Improve student engagement by being active and collaborative: Clickers can be used for peer training, a method that allows students to discuss and collaborate in resolving problems, answering questions, or explaining to each other. This method promotes active and collaborative learning. Instructors prompt questions and students discuss small groups about the problem.
- Taking attendance: Instructors can use iClickers to take class attendance. It can increase students’ motivation to attend, and reduces paperwork and class administration time.
Getting Started
For support using iClicker Classic, please email dmp@torontomu.ca.
Software Download
Sign up to iClicker Cloud (external link, opens in new window) to begin using the software.
Download the iClicker Cloud software (external link, opens in new window) from the website onto your own laptop or desktop. Launch the iClicker Cloud software and login using your personal account credentials previously set up.
To access your iClicker Cloud account online, you can login by going to iclicker.com (external link, opens in new window) .
Course Details
Before running sessions in class, review your iClicker Cloud settings to ensure they meet the specific needs of your course. This ranges from:
- inputting information that will help your students add your course in the iClicker Student app.
- deciding if/how you will be using an LMS with iClicker Cloud.
Settings are customized on a course-by-course basis, so if you are running multiple courses in iClicker Cloud, modify the settings for each individual course.
Learn how to Register and Get Started with your iClicker Cloud Account. (external link)
Attendance
Unlike the polling and quizzing modules, iClicker Cloud’s Attendance module is run entirely from the iClicker Cloud Instructor website and can be set up to automatically run during each class period.
iClicker Cloud’s Attendance module allows you to take attendance using optional geolocation technology that recognizes if students are within range of your classroom when they check-in. However, in a remote teaching setting, this is function is not advised.
Before running an attendance session, ensure you have customized your attendance settings–including the optional geolocation information. For more information about the attendance module, click below:
- Attendance Settings (external link, opens in new window)
- Run an Attendance Session in iClicker Cloud (external link, opens in new window)
- View and Manage Attendance Data (external link, opens in new window)
- How does iClicker Cloud’s Attendance geolocation functionality maintain students’ privacy? (external link, opens in new window)
Polling and Quizzes
Unlike the Attendance module, Polling and Quizzing sessions can only be run from the iClicker Cloud desktop software. In general, running iClicker Cloud sessions is very similar to running iClicker Classic sessions–you can run a session over any presentation software, grade on the fly, ask anonymous questions, and more.
However, there are a few differences regarding question types, polling toolbars, and grading. One notable enhancement is that iClicker Cloud can send students screen shots and results from the questions asked during class to use as a study guide.
Click below for step-by-step guides and more helpful information about running sessions in iClicker Cloud:
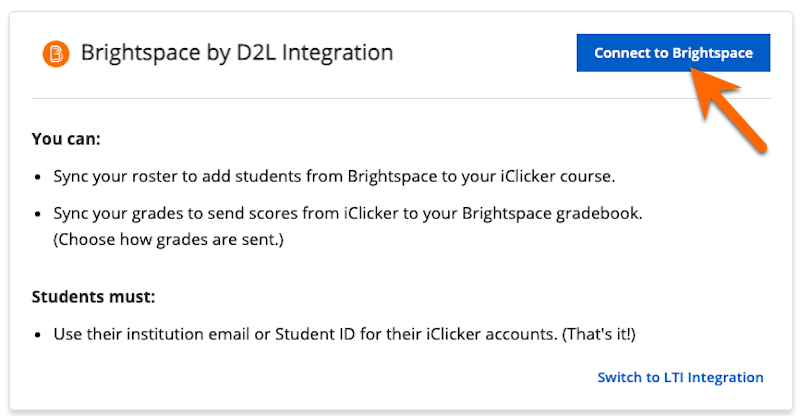
From the iClicker Cloud instructor website (external link) , navigate to your course.
Open the course Settings and go to the Integrations tab.
Then, click the Connect to Brightspace button.
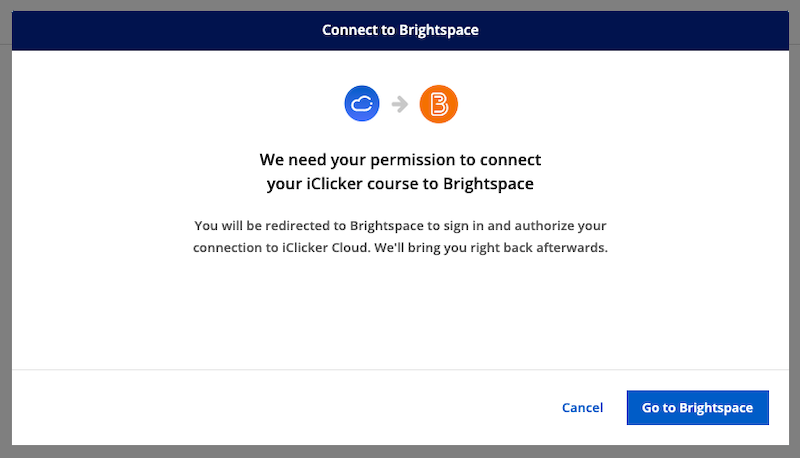
The first time you go through this setup, you’ll see a notification that you need to authenticate with Brightspace.
Select Go to Brightspace.
When prompted, login to your account via CAS (Central Authentication Service), using your Toronto Metropolitan University username and password.
*Note: When first connecting your iClicker Cloud with D2L Brightspace, you may be directed to your D2L course and prompted to click Accept to proceed with the integration process.
From the list of your active Brightspace courses, choose your course and then click Next.
You will be shown a list of sections from your Brightspace course. You must select at least one section to continue. Then, click Connect.
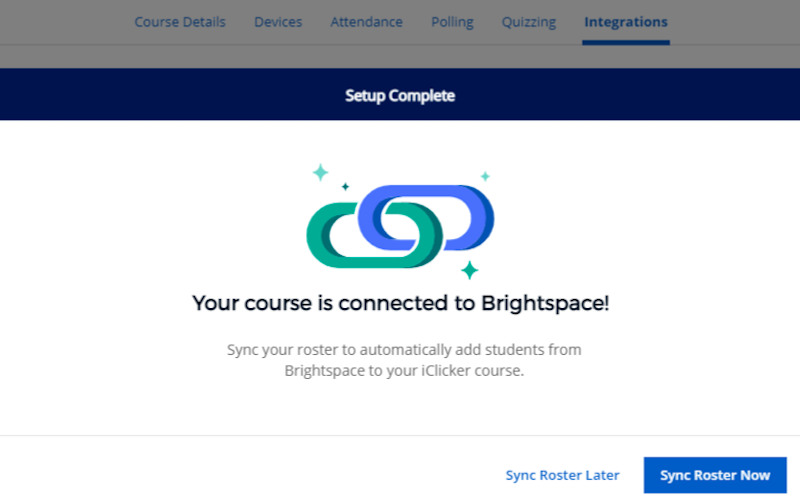
After the connection has been established with your D2L Brightspace course, you will see a “Setup Complete” screen.
You can choose to to synchronize the Roster or complete this step later.
To sync your Roster at a later date, navigate to the People section of your course in iClicker.
On the Students page, click the Sync Roster button to initiate the roster sync.
When the roster sync is complete, a confirmation message will appear.
If some students from your roster did not sync, the dialog will appear as a summary of successful student syncs and a section describing action that you or your students may need to take to successfully sync the rest of your class.
The fix for sync errors is for students to update their iClicker profile (external link) to use the email address that matches their Brightspace account.
If the student has created multiple accounts and needs assistance, please ask them to contact iClicker Support (external link) .
iClicker Cloud grade information can be accessed from either the iClicker Cloud Desktop Software or the online gradebook (external link) , via the iClicker Cloud instructor website.
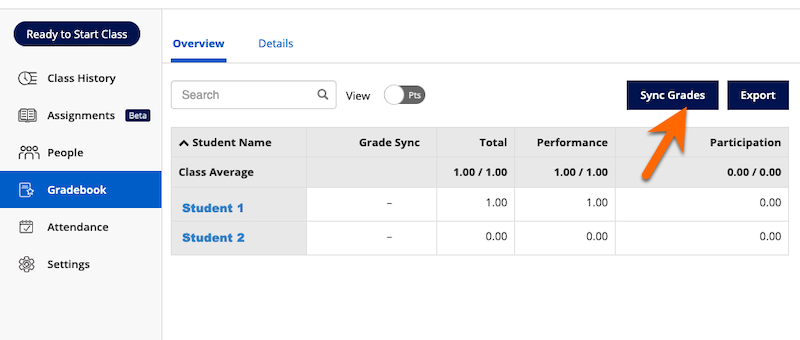
Navigate to the Gradebook section of your iClicker course and click the Sync Grades button to initiate the grade sync.
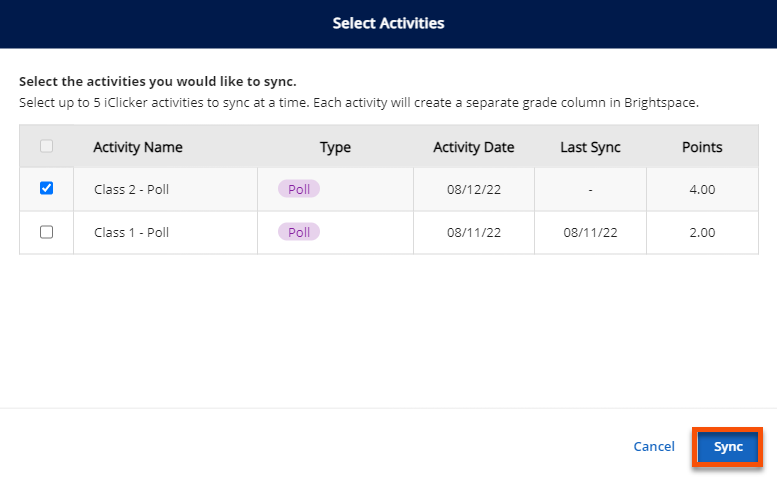
Select which activities you want to sync to your Brightspace gradebook, then click the Sync button.
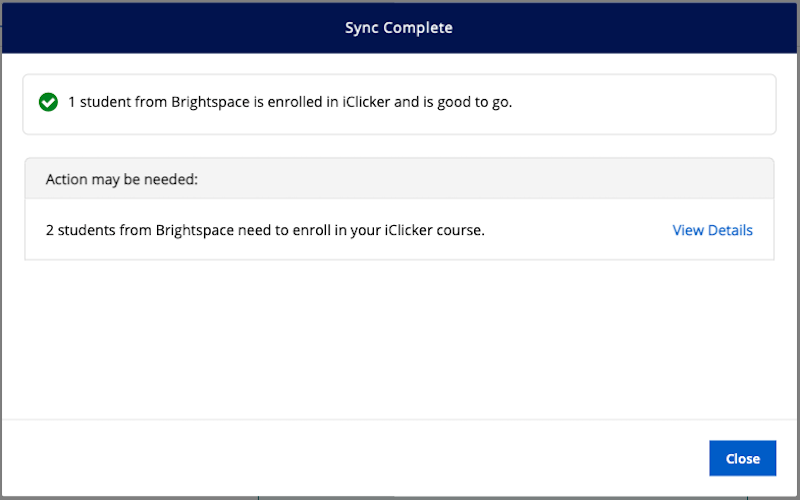
When complete, a summary of the sync request is shown with the number of students successfully synced and any error details if an issue was encountered.
Note: Changes to previously-synced scores that you make in Brightspace will be overwritten the next time iClicker Cloud is synced. We recommend making score changes directly in iClicker Cloud, then sync to Brightspace to ensure that the two gradebooks are consistent with each other.
Ready your Presentation
The iClicker Cloud system integrates with your powerpoint presentations. Have your presentations prepared and ready to be presented to your students.
Signing In and Starting a Class
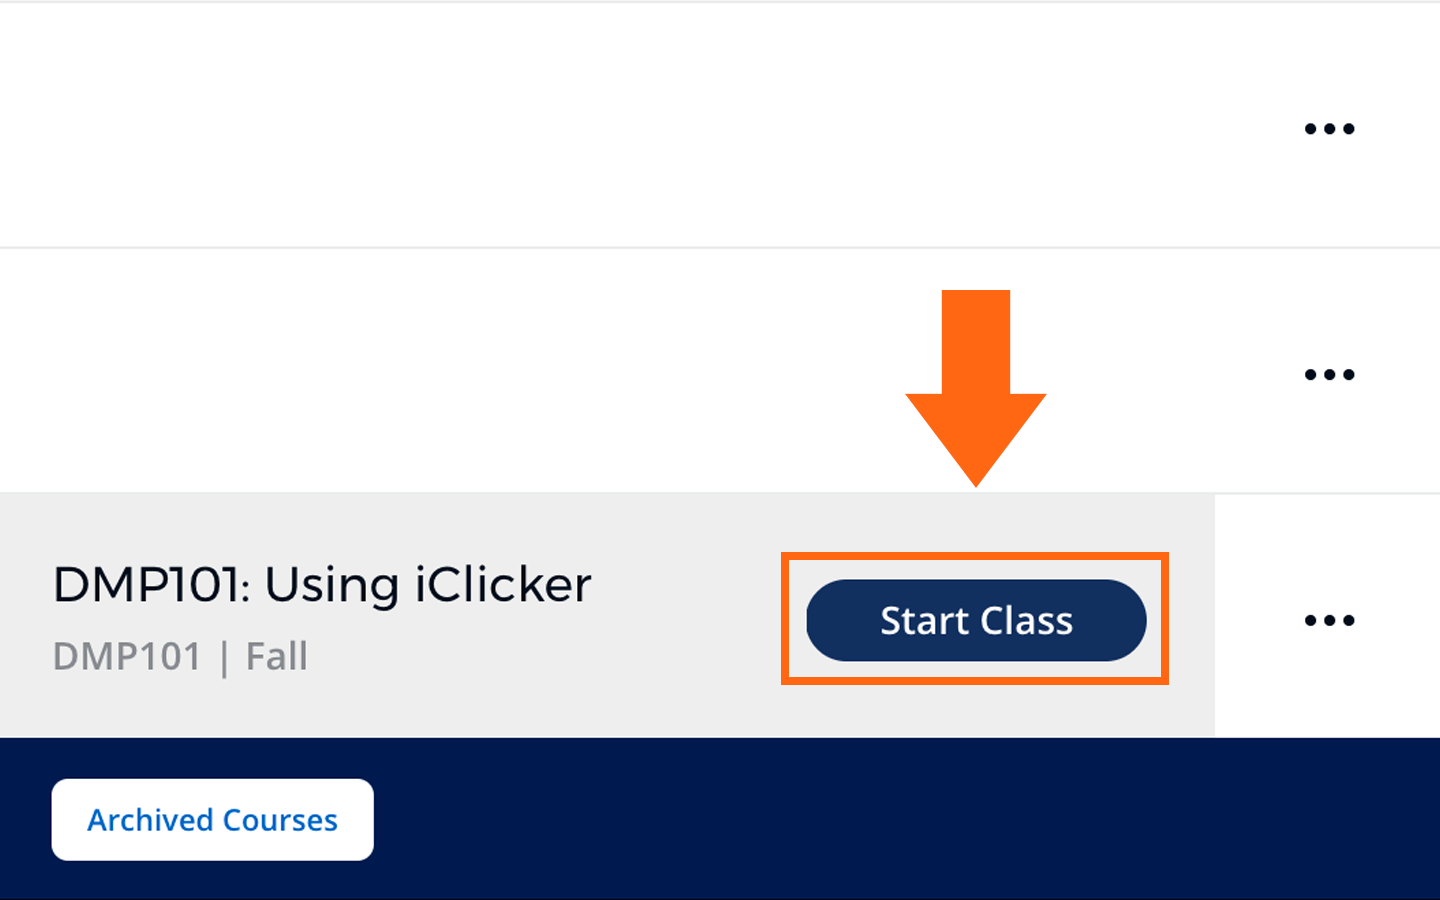
- Open the iClicker Cloud application that you have previously downloaded on your device.
- Sign in to your iClicker Cloud account.
- Select the course that you would like to start a session with and click 'Start Class.'
You will notice that the iClicker Cloud application will launch the iClicker navigational polling bar on your screen.
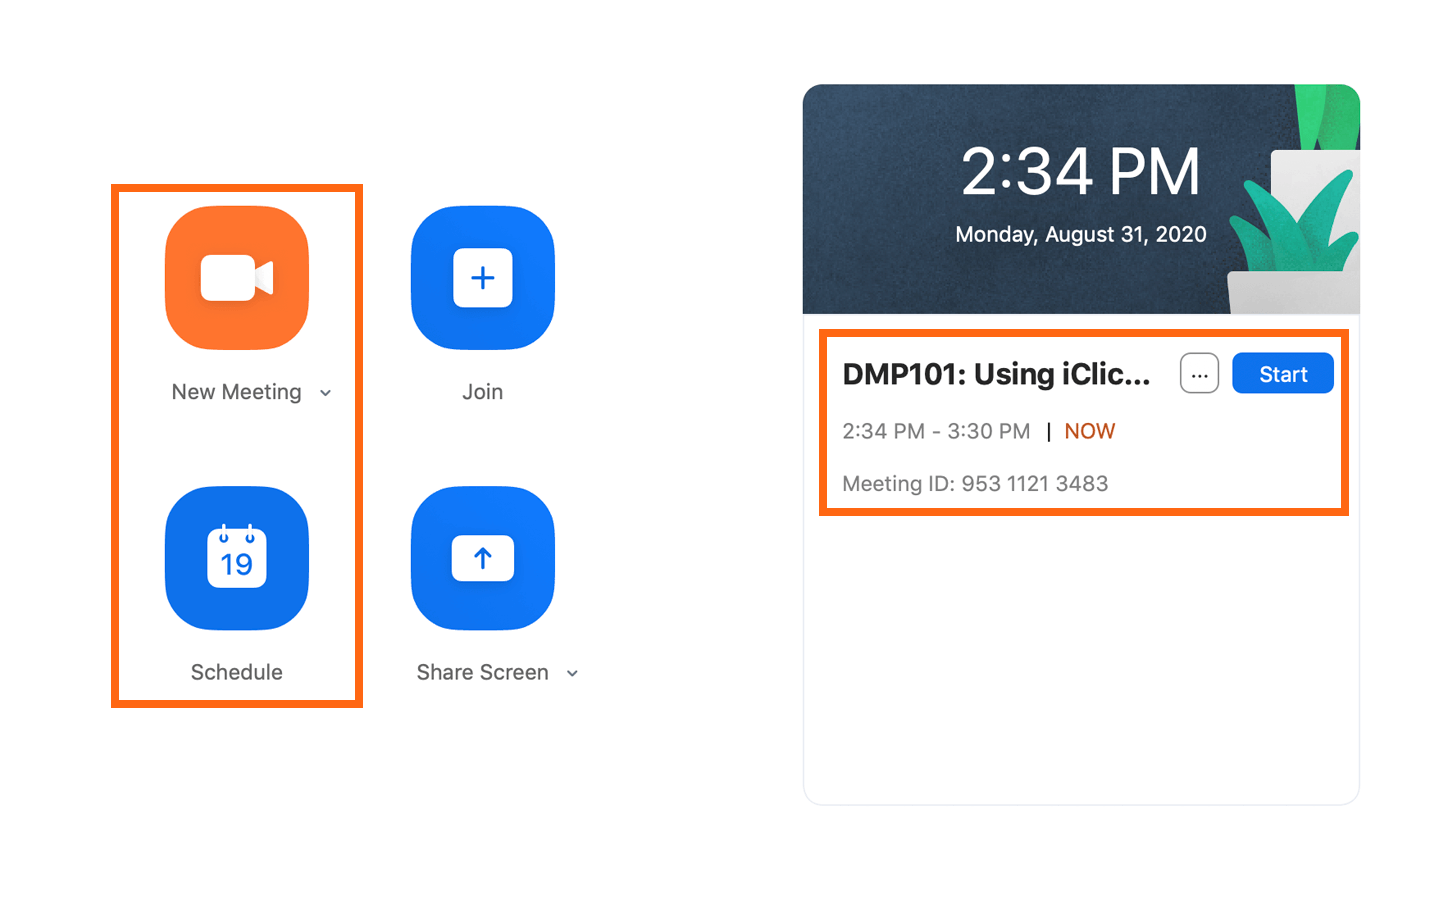
Launch Zoom
Once your iClicker Cloud software has been set up, launch the Zoom application located on your desktop.
From here, you can access a scheduled meeting that you have created for your class or create a new meeting.
Share your Screen
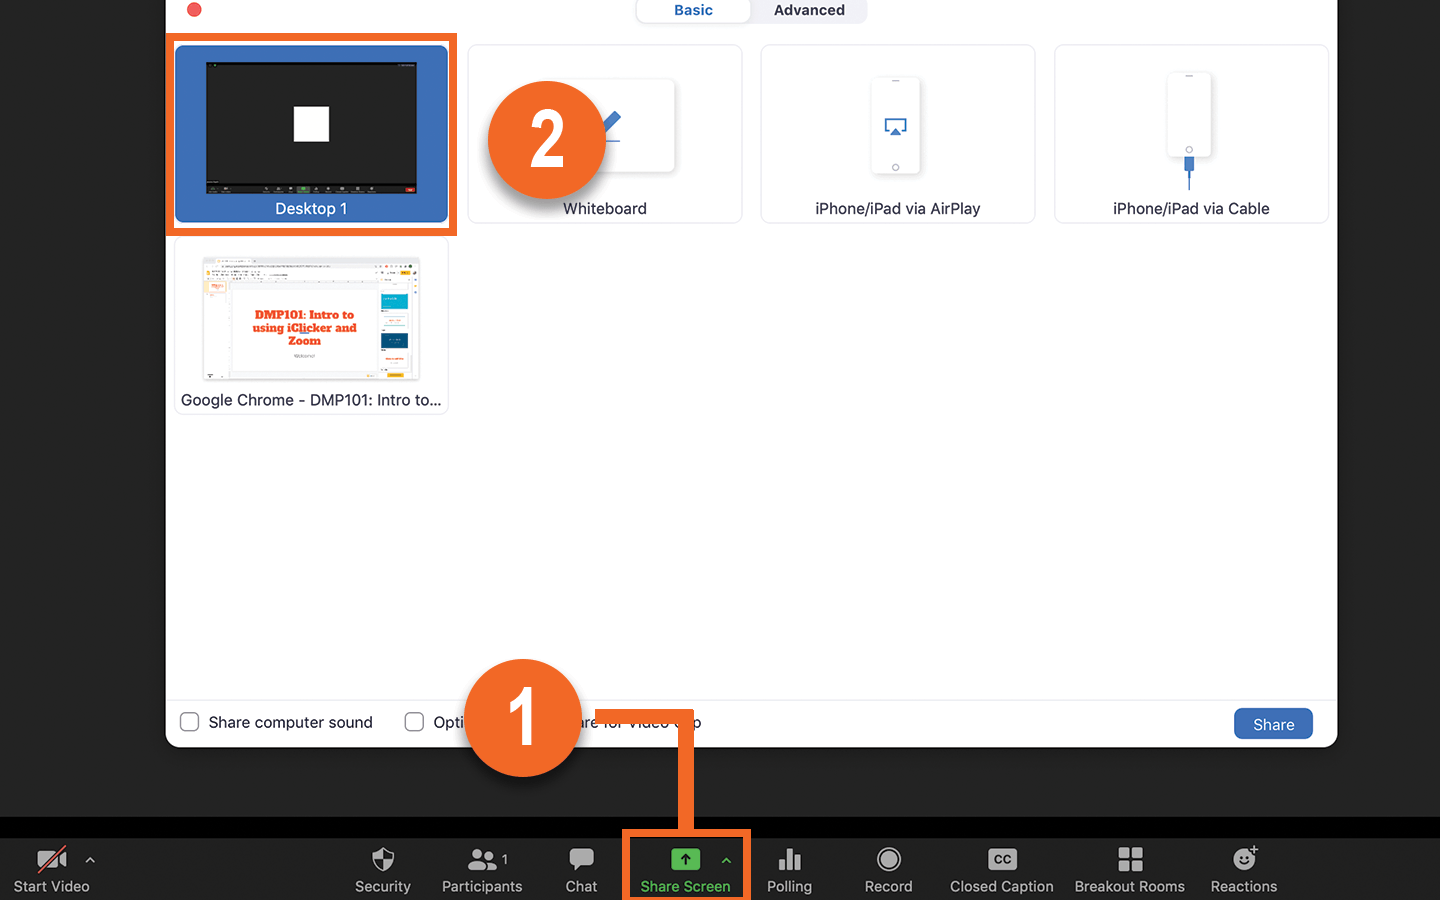
- When you are ready to present your powerpoint presentation, click 'Share Screen' located on the bottom bar of the Zoom application.
- Select the option that says 'Desktop 1,' this will allow students to see all windows on your device including Zoom, Powerpoint and the iClicker Cloud software.
Important: Please close any private or confidential windows you have open on your device.
Presenting your Powerpoint Presentation
After sharing your screen, present your powerpoint. Note: this will enter you into fullscreen mode.
Zoom has a built in navigational bar as iClicker does, and so you are still able to control your Zoom meeting using this bar.
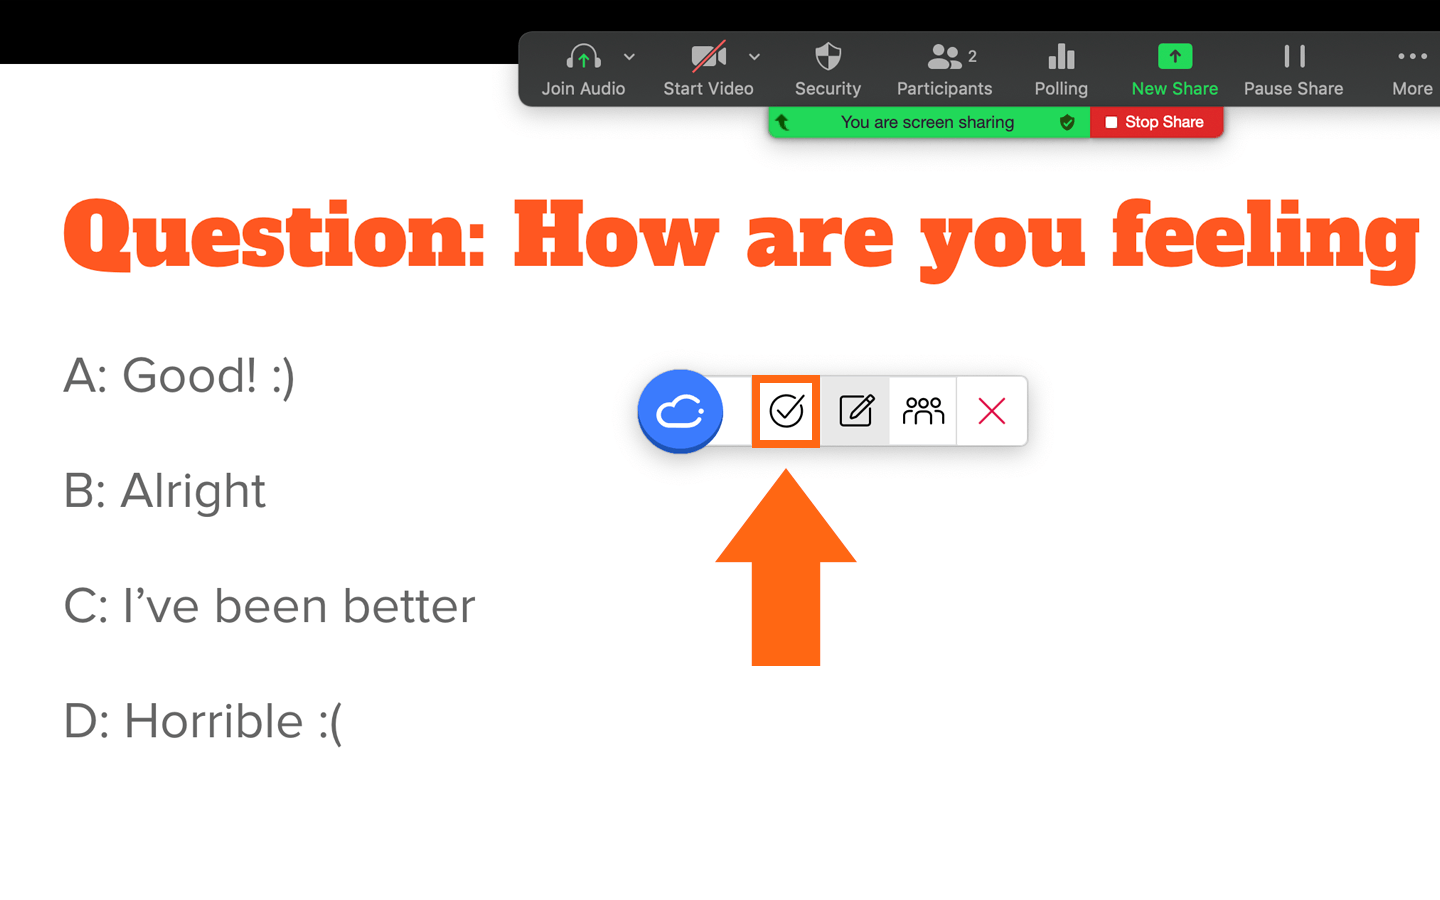
Using the iClicker Polling Tool
Once your presentation requires the iClicker polling system, click the circle with the checkmark icon in order to begin a polling session.
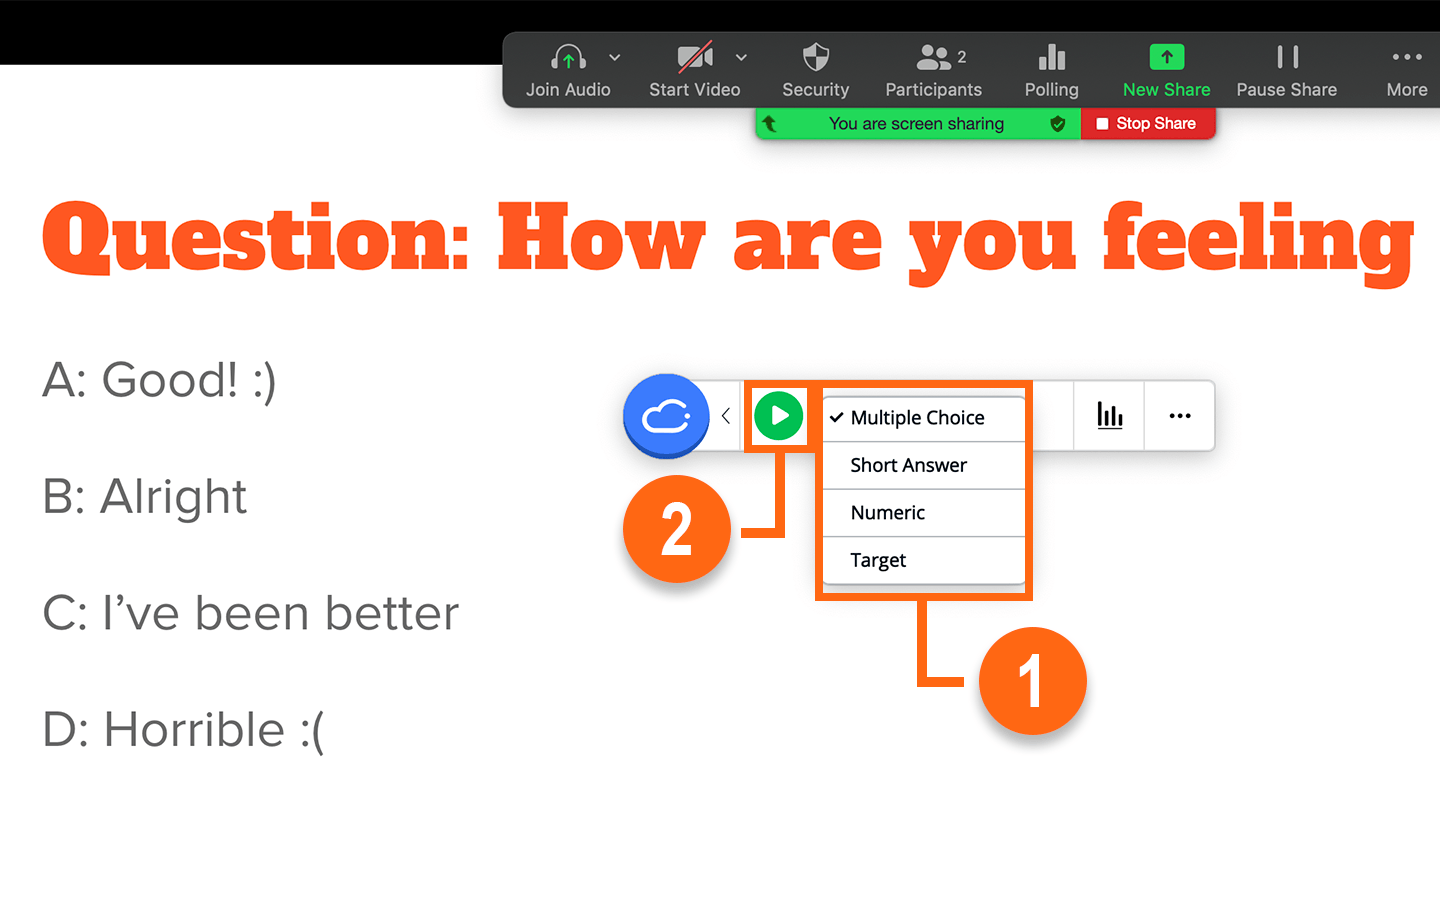
Selecting a Polling Type and Starting the Poll
- Select a polling type from the drop down menu.
- Once you are ready, click the play button located to the left of the drop down menu.
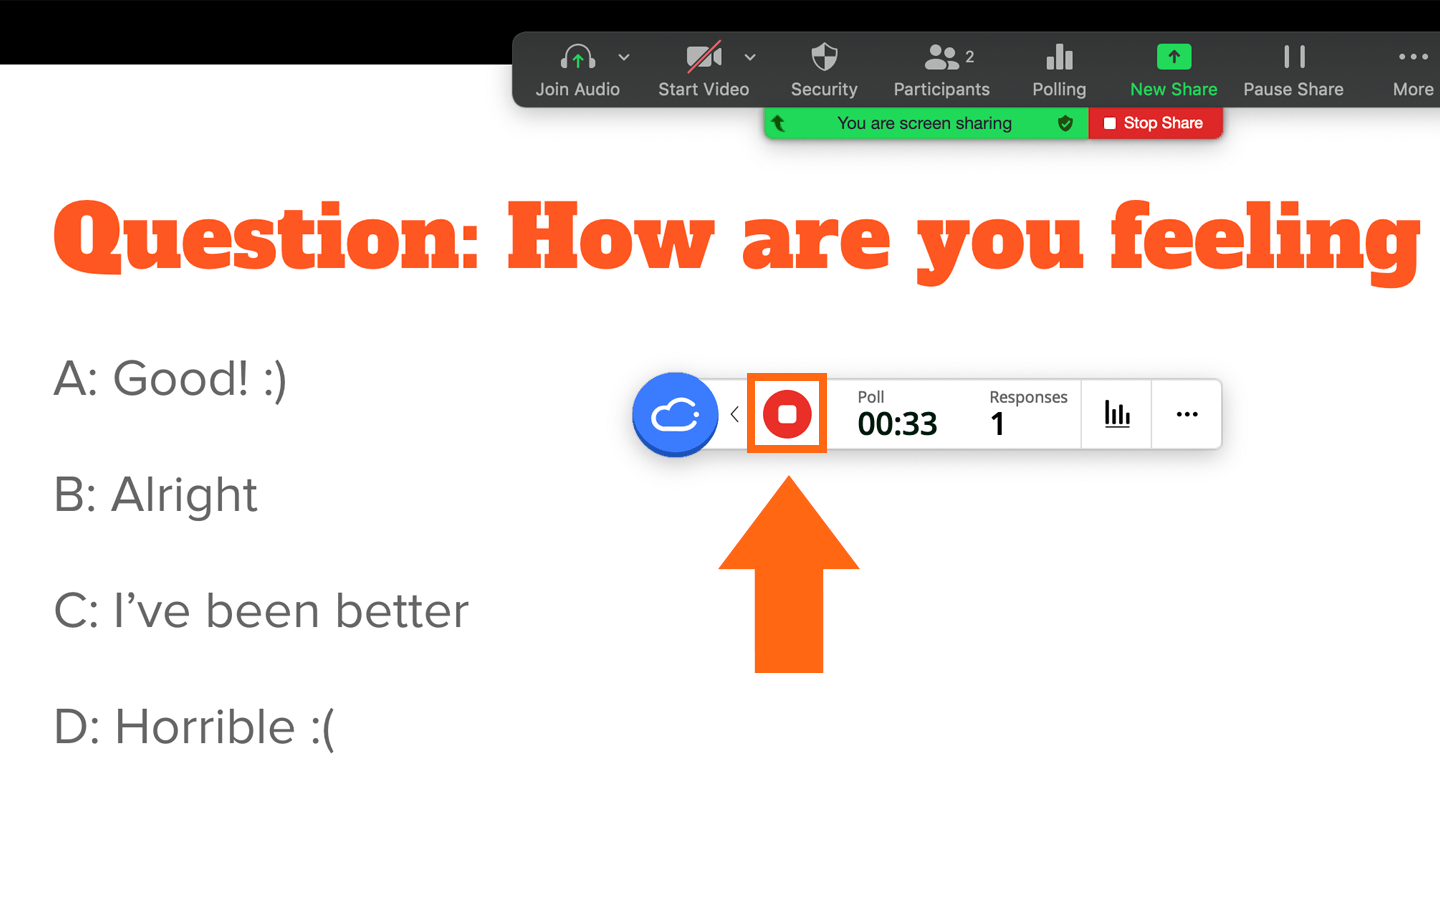
Ending a Poll
Give your students time to answer the questions. Once you are ready to end the poll, click the stop button located on the iClicker navigational polling bar.
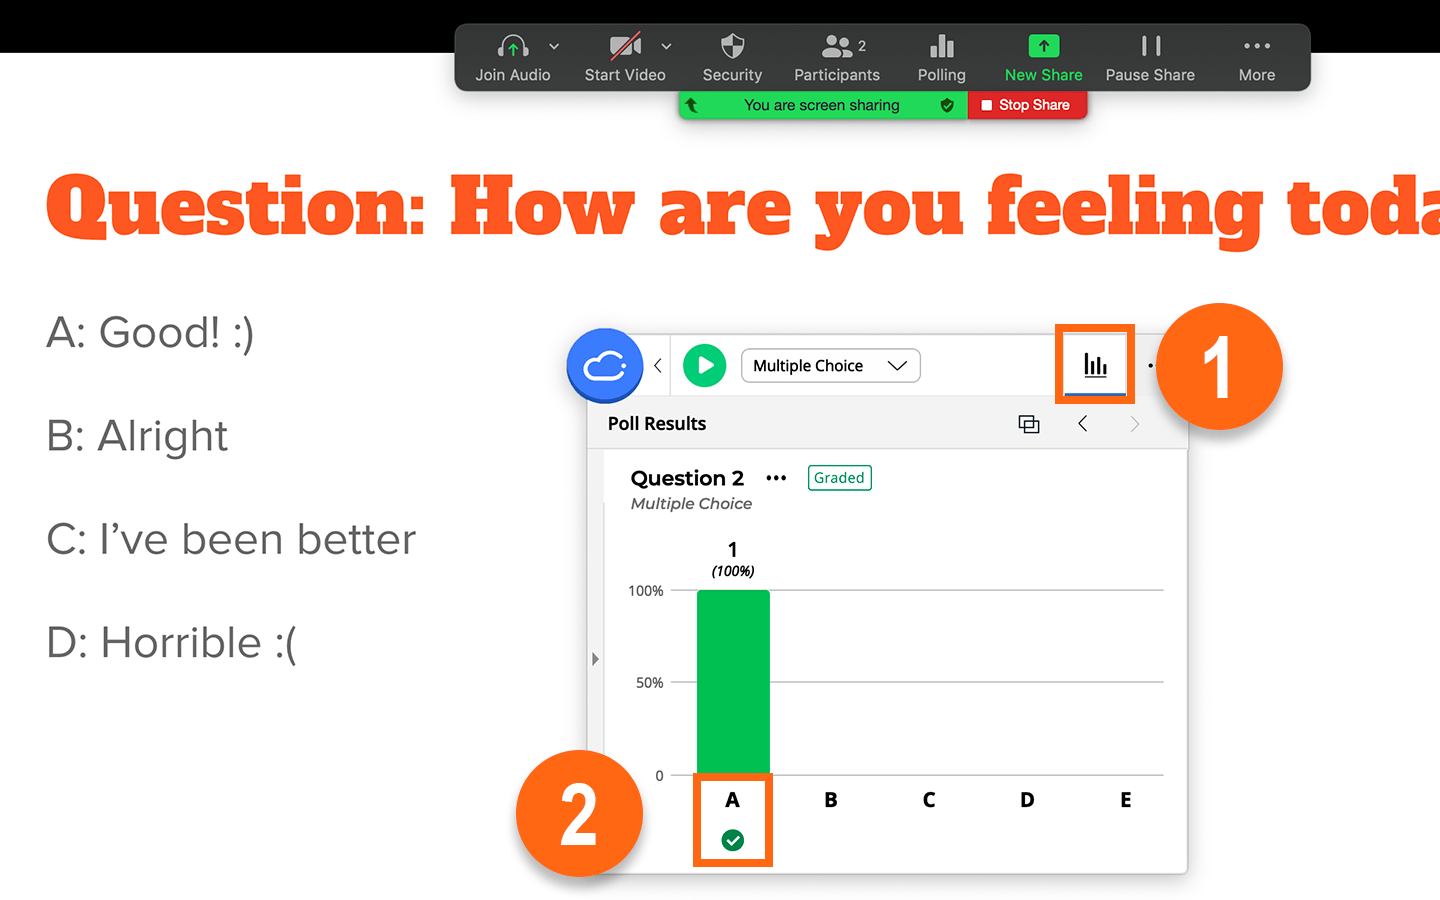
Viewing Results, Sharing Results & Grading
- You have the ability to view and share the results of the poll. Click the graph icon located on the iClicker navigational polling bar to do so.
- The polling tool by default has no grade or mark component active. This allows you to poll your class' opinions without them worrying about having a correct answer. However, in a situation where you would like to appoint marks to questions, select the answer that is correct by click on the letter that corresponds to the correct answer. In this example, 'A' is correct and so you will click 'A' to designate it as correct.
Note: You are not obligated in any capacity to select the correct answer during the lecture. If you would like to perform this action after the lecture, you can access this function by clicking 'Class History' in your iClicker Cloud (external link, opens in new window) account.
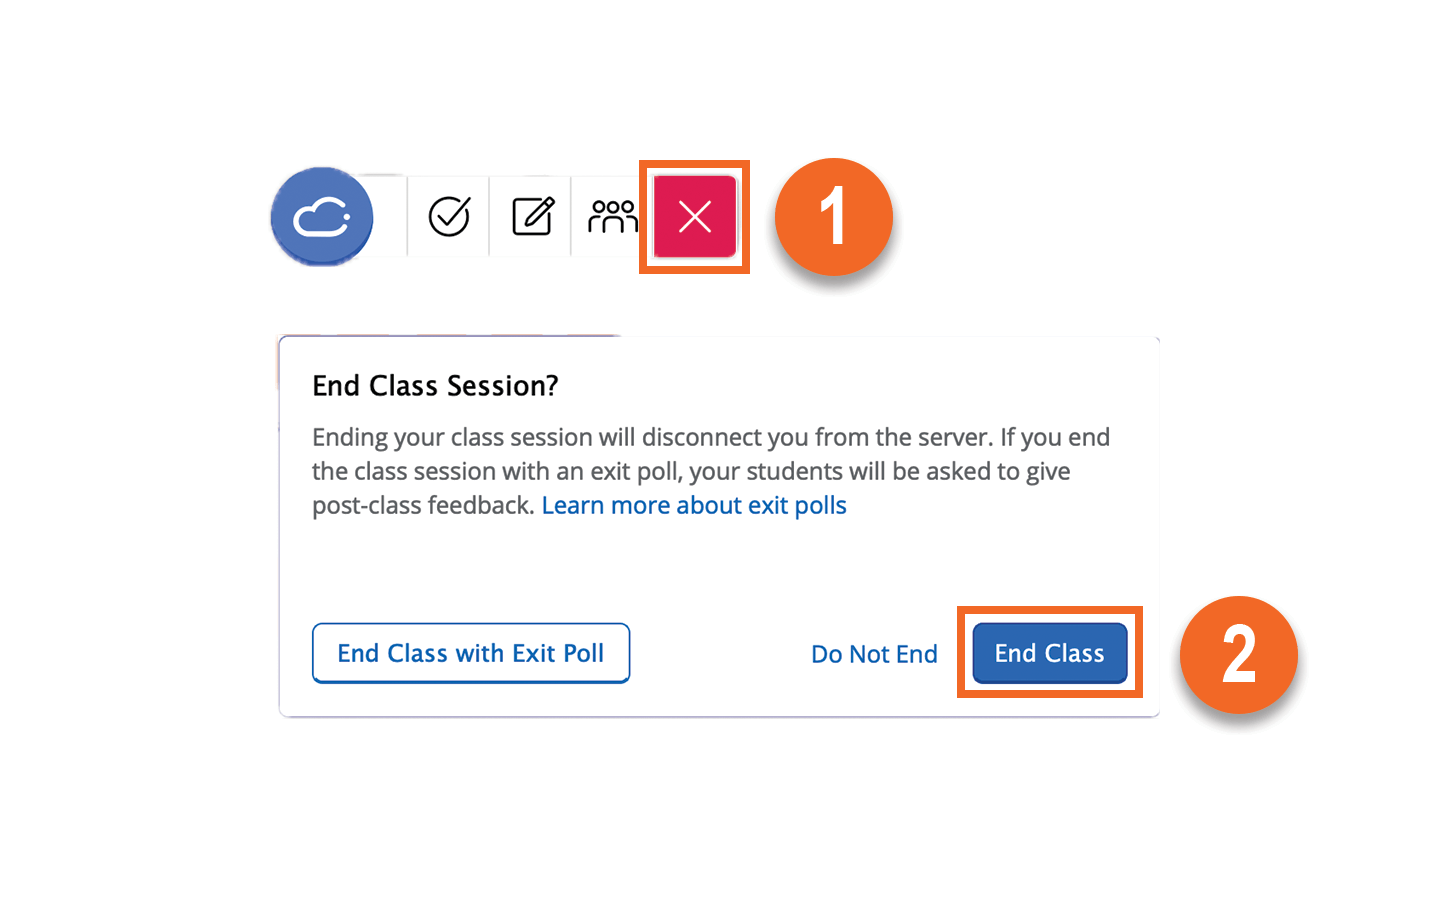
Ending your Presentation and Class
When you are ready to end your presentation:
- Click on the X icon located on the iClicker navigational polling bar.
- A pop-up will display, click 'End Class.'
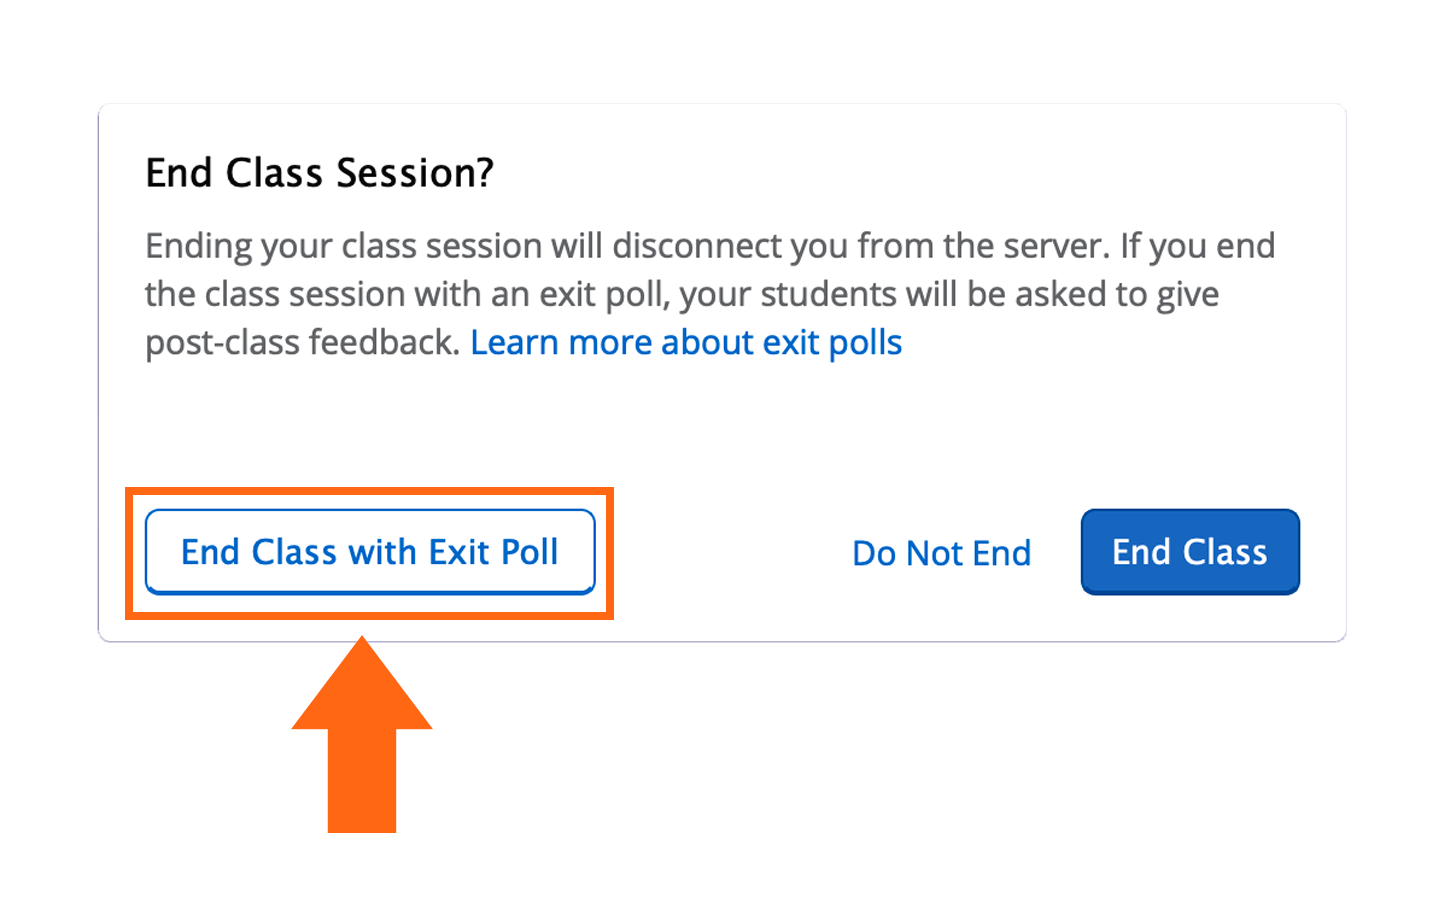
iClicker Exit Polls
You will notice that when you click on the X icon, a pop-up will appear asking you if you would like to conduct an Exit Poll. This allows you to poll your students in the same fashion as previously and allows you to gain insight on how they felt about the lecture.
To do this, click 'End Class with Exit Poll.'
However, if you would like to end your class without an Exit Poll, click 'End Class' located on the right hand side of the window.
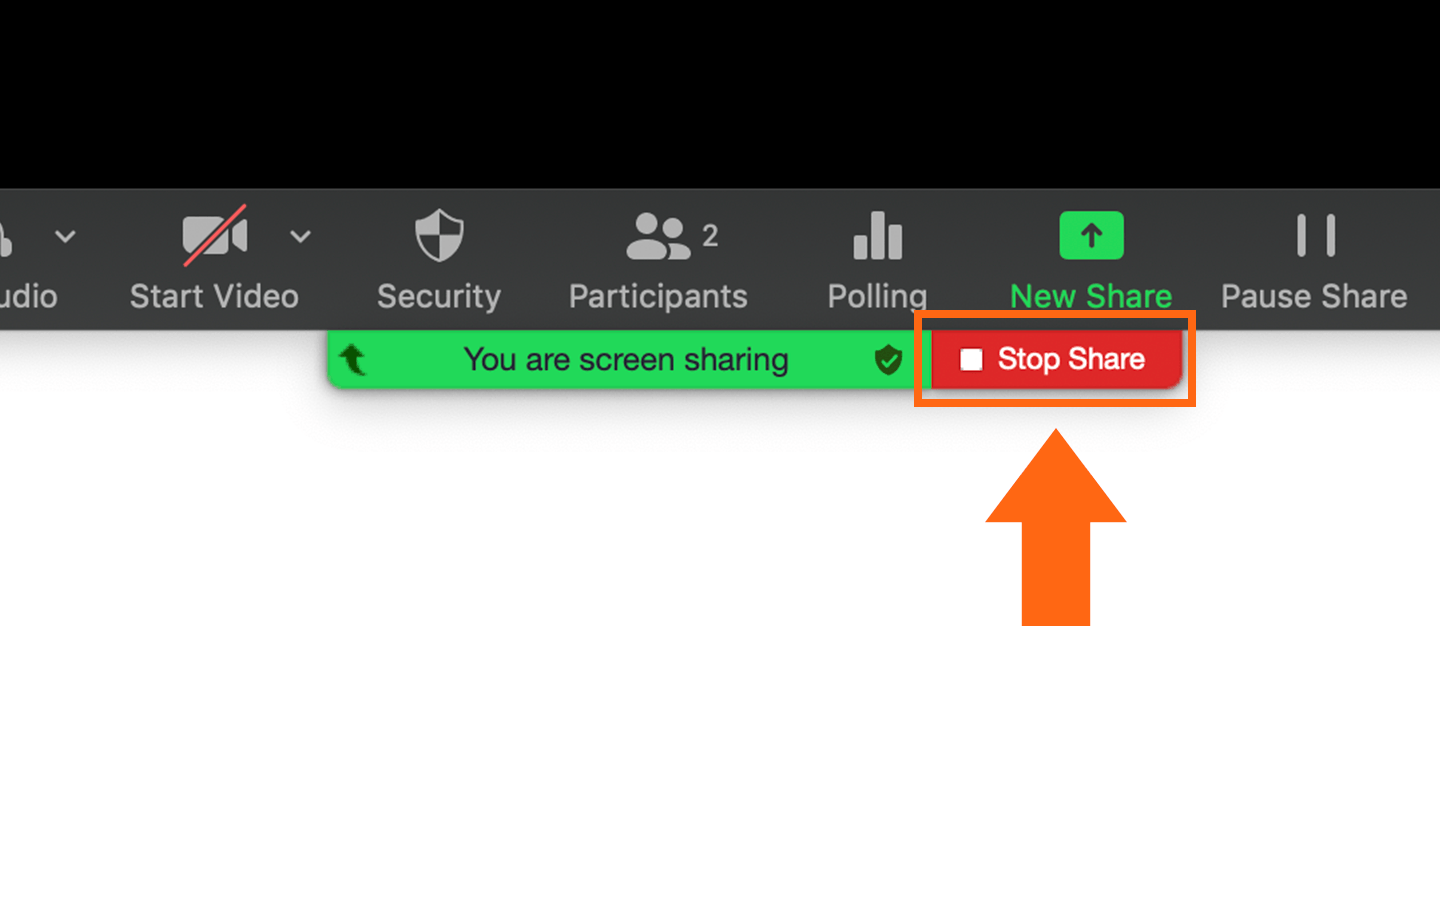
Stop Sharing your Screen
Once your iClicker session has ended, you may stop sharing your screen on Zoom. To do this, click on the 'Stop Share' button located on the Zoom navigational bar.