Awards
What is the awards tool?
The Awards tool allows Instructors to issue badges or certificates to their students, in order to provide evidence of achievement or enhance course engagement.
These awards can be given ad-hoc (manually), or automatically, using Release Conditions that issue awards based on course-related merit (completion of a task, grade achievement, etc.).
On this page:
Awards can be found in the top navigation, under Assessment. If it isn't there, review how to enable course tools.
Point your students to our student guide to how to receive and share an award in Brightspace.
- Badges are small images attached to details and criteria about the achievement. These often include 'evidence' that supports the achievement (i.e. achieved 90% or higher when tested).
- Certificates include all of the same details as badges, but also include a downloadable PDF file that can contain the recipient's name, achievement date, etc. We recommend using these for awards that are provided for certifications.
- Instructors & TAs can create and manage the awards for a course. This allows them to create new awards (badges & certificates), modify awards and delete them.
- Instructors, TAs and Graders may issue and revoke awards to individuals in a course. This allows them to award individual students, and also revoke the award if required. As Graders are not permitted to create or modify awards, they are not able to set up Release Conditions for the automatic issuance of awards.
Note: Awards are tied to the person that initially created them. Unfortunately, this means that only that person can modify the award afterward, regardless of the ownership of the course shell itself.
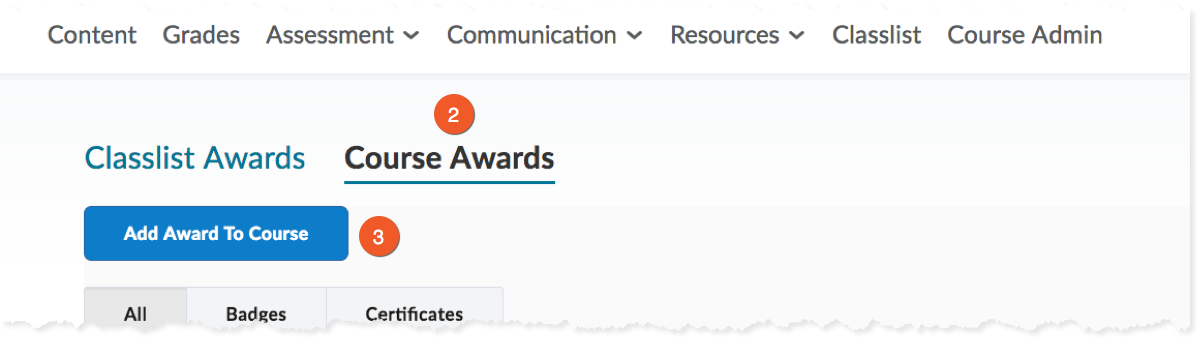
1. Go to the Awards tool in your course shell (see above).
2. Click the Course Awards link at the top of the tool. This is where you create new awards, or edit ones you have already created.
3. Click the Add Award to Course button.

4. Create a new award:
If none of the existing awards suits your course needs, click the Create Award button at the top of the tool.
If you already have an award that you would like to re-use, you can select it instead and skip the remaining steps.
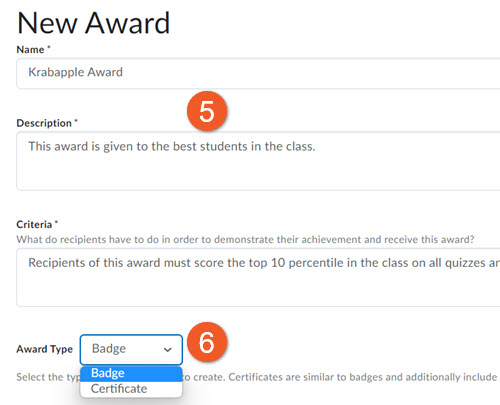
5. Give the new award a Name, Description, and Criteria. Make sure:
- The Name is short, and meaningful. Please DO NOT use the university name in your award name, as this award is not something that is officially granted to students via the university.
- The Description should adequately describe the award.
- The Criteria should specify what a student must do to achieve a particular award. If the student shares their award outside of the university, the viewer will see this explanation.
6. Select an Award Type - choose whether this award will be a badge or certificate.
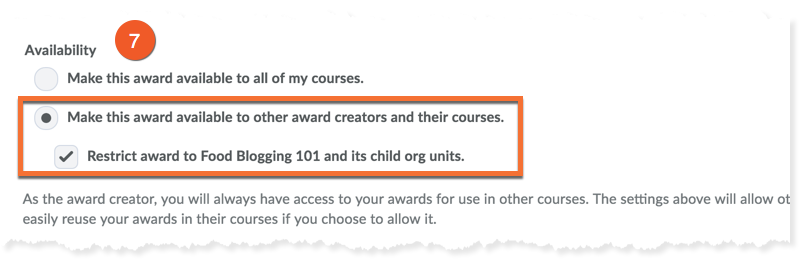
7. Availability:
Please note that each award is tied to the person who initially created the award.
Recommended Settings:
- select "Make this award available to other award creators and their courses"
- also check "Restrict award to course name."
At this time, we ask that you not share your awards with other courses. It may get unruly if everyone shares their awards.
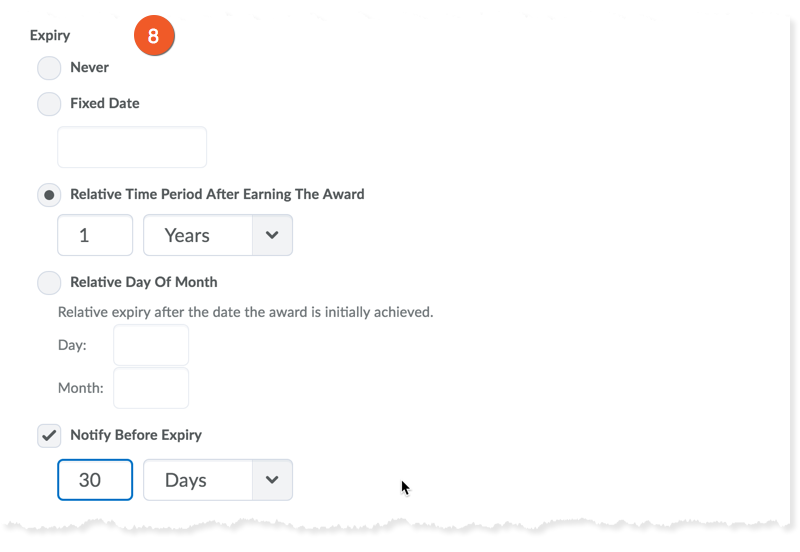
8. Expiry Date
Choose whether your awards expire.
You can choose for all awards issued with this badge/certificate to expire on a specific date ('Fixed Date'), after a certain number of days ('Relative Date'), or on a specific day of the month following the issue of the award ('Relative day of the month').
You can also choose whether the students receive a notice when their award is about to expire.
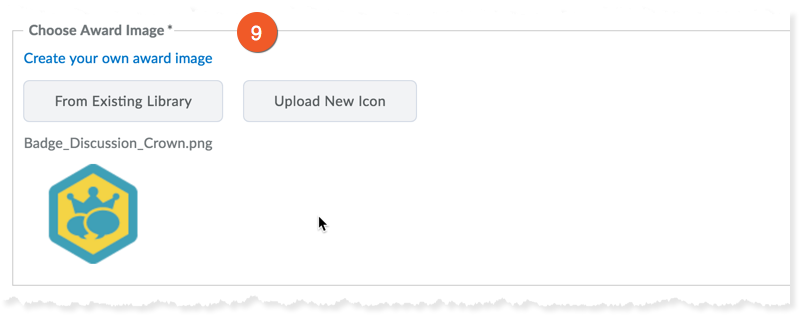
9. Award Image
Choose the icon associated with your award. There are three options to choose from:
- Choose an image from the existing award library in D2L.
- Upload a new image that you have stored on your computer.
- Click "Create your own award image" to be brought to a website that helps you to create a new image.
In each case, follow the on-screen instructions to complete the selection.
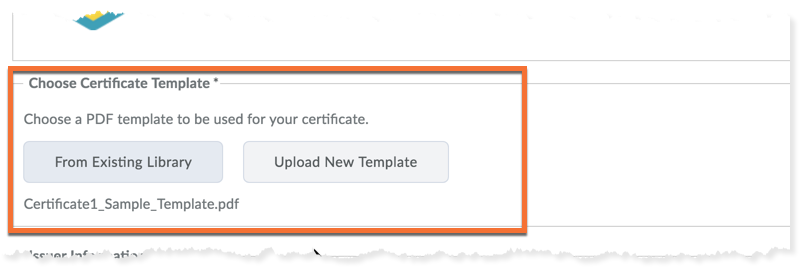
Certificate Template (optional)
If you chose to create a certificate award (as opposed to a badge), you will need to upload a PDF certificate template.
This template needs to be created specially to work with the awards tool, as it dynamically writes the name of the student, the date the award was achieved, etc.
Select to either add a template 'From Existing Library' or 'Upload New Template'. Follow the on-screen instructions from there.
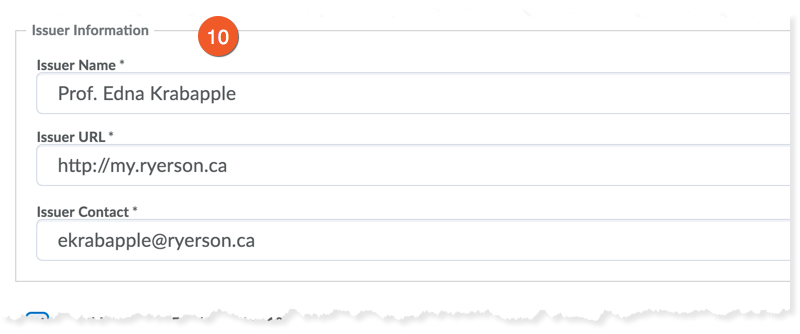
10. Issuer Information
This should represent the people or organization that is issuing the award, with their contact information. If you aren't sure what to enter here, you may want to include your (Instructor) information.
Please do not enter Toronto Metropolitan University as the issuer, as these awards are not official credentials issued by the university.
Final Steps
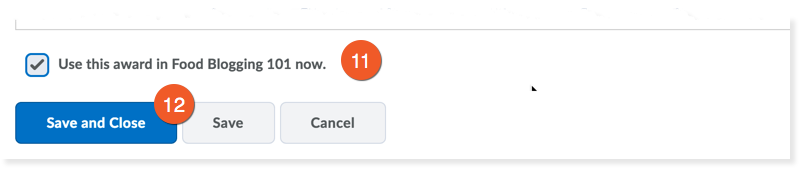
11. Ensure the box is checked to "Use this award in…" your course.
12. Click Save to complete the process.
You should now see the award listed in your course, and can proceed to the instructions for Issuing Awards.
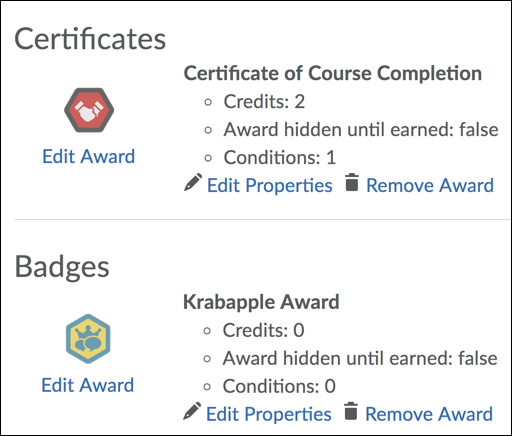
This section contains the descriptive information for the award, such as the award title, type, image and expiry.

- Start by going into the Awards tool in your course.

2. Click the link to enter the Course Awards page, where you can see a list of awards already created for this course. We will be adding a Release Condition to an existing award.
3. Locate the award you want to modify, and click its Edit Award link. (Note: If you have already issued this award to students, you will receive a notification pop-up that warns you that any changes will propagate to all instances of the award - including to those who have already earned the award).

4. Here, you can modify the name, description, expiry, award image and/or certificate file as well as Issuer information. Please note that you will not be able to switch the type of the award (badge or certificate) after it has been created.

5. Click Save to complete the changes.
Here's your award!
Now that you've created an award in your D2L Brightspace shell, you need to figure out how to issue the award to your students.
There are two main ways to issue awards to students:
- Ad-hoc (by manually assigning awards to students as needed)
- Automatically, based on course-related achievements (assigning Release Conditions).
The following instructions assume that you have already made your course shell 'Active', have enabled the Awards tool and have created an award in your course.
Note: you will not be able to issue awards if your course shell is Inactive.
Use this to issue awards to students individually, on an ad-hoc basis.

- Start by going into the Awards tool in your course.
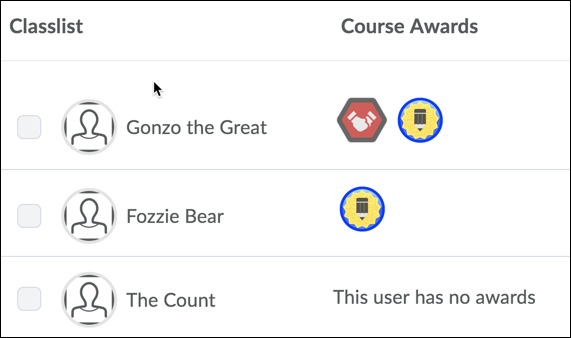
- Make sure you are in the Classlist Awards page, and can see a list of the students in your class.
- Use the checkboxes to the left of each student name to select which students will receive this award. Note that all selected students will receive the same award. If they each require different awards, you will need to issue them one at a time.
- Scroll to the top of the page, and click the Issue button.

- Select an Award by clicking the dropdown menu and choosing the appropriate award to issue the selected students.
- Award Criteria - Enter the reason for the award.
- Click the Issue button to complete the process. When you return to the Classlist Awards page, you will see the new awards issued to the students.
You may have some awards that are based on activities in the course that can be tracked. For example, you may issue an award to a student who has achieved over 80% on a project, or has accessed all of the content for the course, etc. These kinds of trackable milestones can be set up to issue awards using a feature in D2L Brightspace called Release Conditions.

- Start by going into the Awards tool in your course.
- Click the link to enter the Course Awards page, where you can see a list of awards already created for this course. We will be adding a Release Condition to an existing award.
- Locate the award you want to modify, and click its Edit Properties link.

4. To add a Release Condition to this award, click the Create button. These Release Conditions are similar to the ones used to release content, quizzes, discussions, and other things in D2L.

5. Select the Condition Type. These include 'Visited Content Topic', 'Completed Quiz Attempt', 'Score on a Quiz' and 'Grade value on a grade item'.
6. The Condition Details will vary depending on the Condition Type you selected. For example, if the award is issued based on a 'Grade value on a grade item', the Condition Detail would include selecting the grade item that the condition is based on (like Midterm Exam) and the grade achieved (like >= 60%).
7. Click the Create button to add the Release Condition criteria.

8. Click the Save button for the award in order to complete the creation of the Release Condition.