View and grade quiz attempts
Manual vs. automatic grading
With D2L, it is possible to set up quizzes that grade automatically, but there are cases when you may need to manually grade a student's quiz attempt.
Some of the reasons include:
- the inclusion of a question that cannot be automatically graded (such as essay-style questions)
- the instructor prefers to manually check each quiz to confirm the grade and manually publish the results
- the instructor needs to re-grade a question that had an error in the question text or settings
Start by creating a quiz!
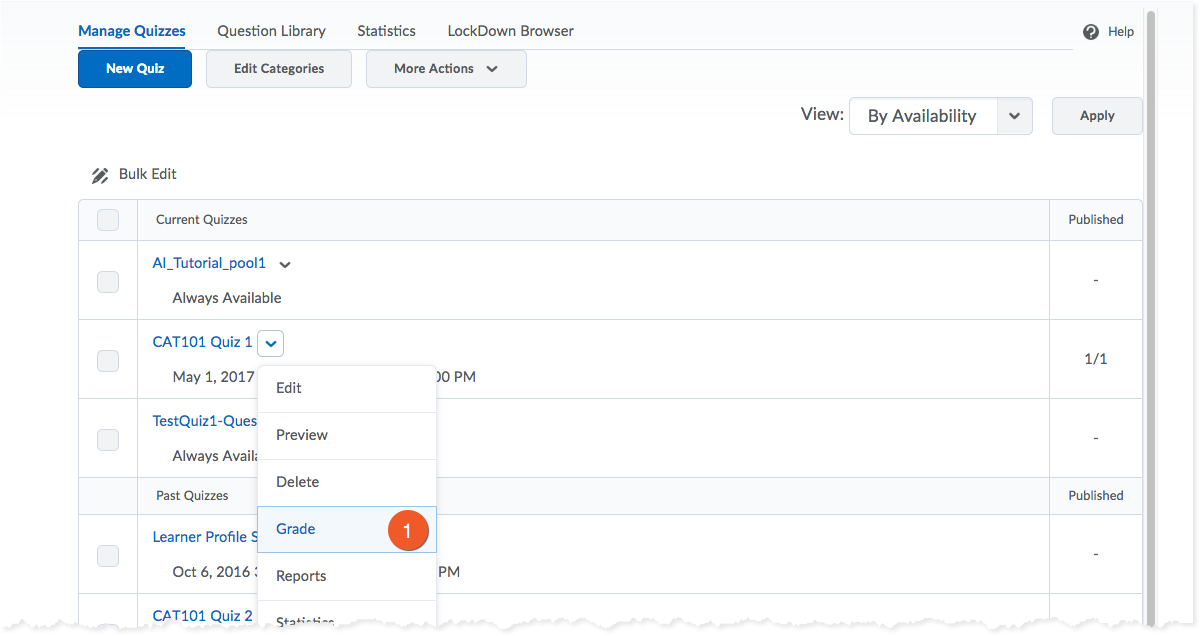
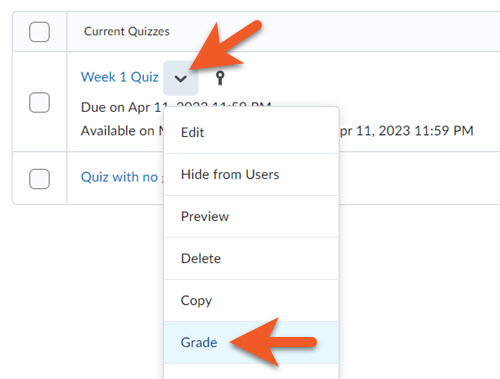
1. Click Grade from the context menu of the quiz you want to grade.
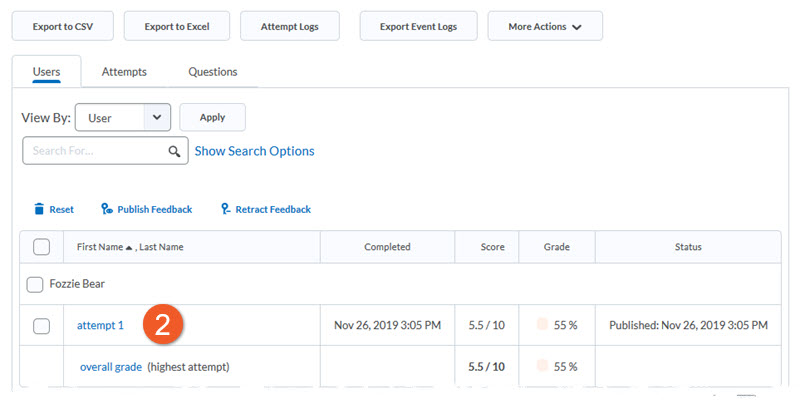
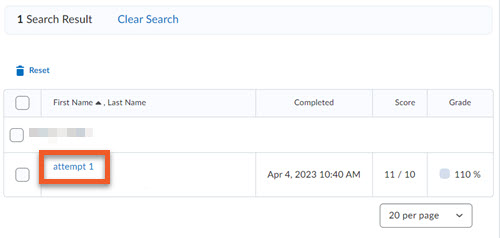
2. In either the Users or the Attempts tab, click on the quiz attempt you want to grade.
The evaluation screen will load in full-screen mode (without the D2L navigation), to give you more space to see the student's quiz attempt.
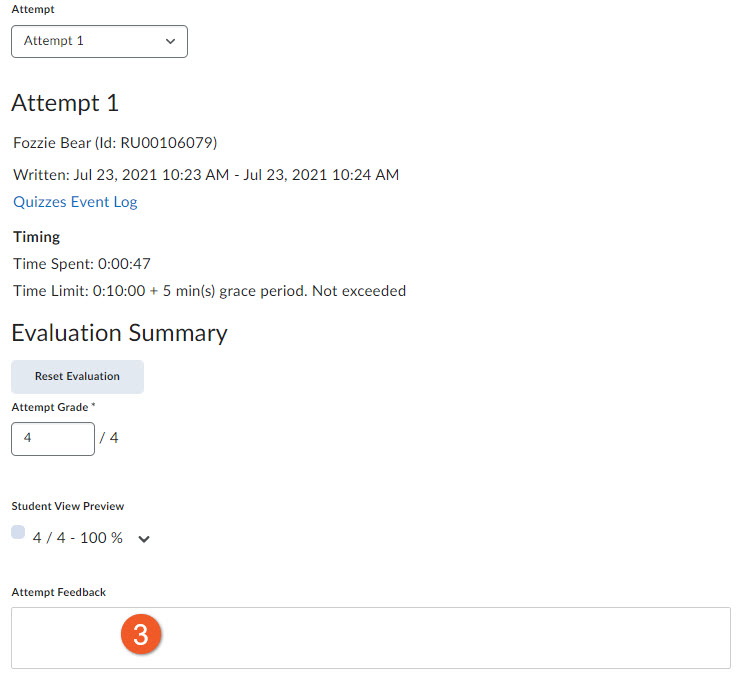
3. If you wish to provide written feedback to your student for this quiz, you can type any comments into the Attempt Feedback field.
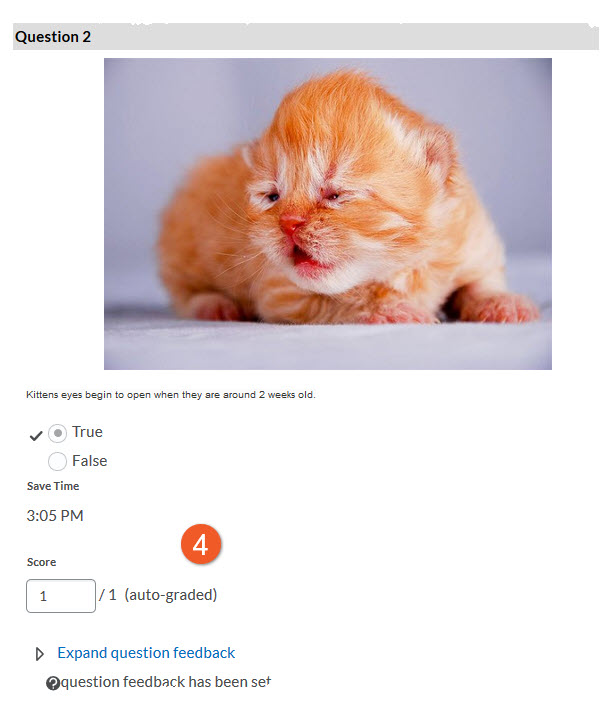
4. Some questions, like True/False or Multiple Choice, will be auto-scored based on the values assigned to the answers when creating the quiz. If necessary, you can manually override the scores.
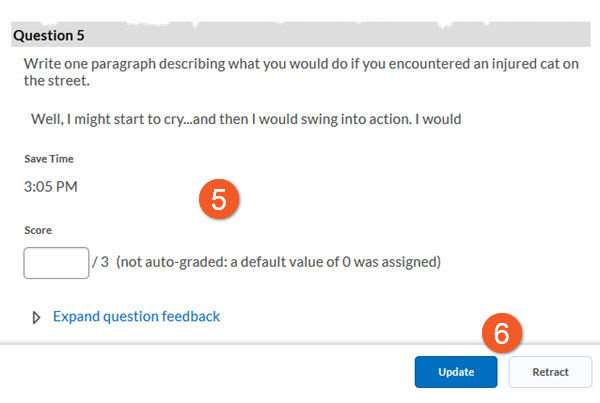
5. Other questions, like Written Response, are not auto-scored and need manual score input. Review the student's response, and then enter the score into the Score field for that question.
6. If the quiz has questions that have been auto-graded, and published, and you have then manually graded any questions or added feedback, click on Update to publish updated information, or Retract to unpublish any previous results.
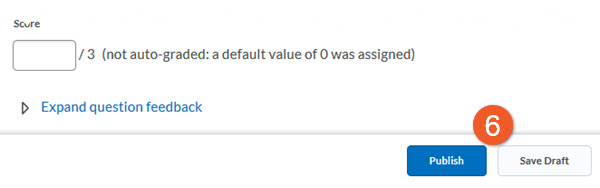
If the quiz has not been auto-graded or published previously, you can click on Save Draft to save any grading/feedback you have completed, or Publish to push any grades and feedback to the gradebook.
1. Click Grade from the context menu of the quiz you want to grade.
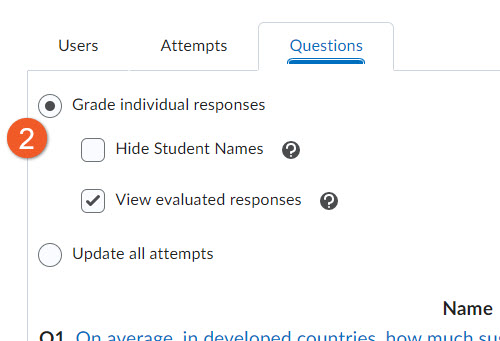
2. In the Questions tab, select the appropriate marking option:
Grade Individual Responses enables you to grade a quiz one question at a time. This means you can grade and leave feedback for all responses to each question before moving onto the next question. There are two additional options available in this view:
- Hide Student Names: Student information does not appear alongside responses and responses display in a shuffled order. This aids in preventing unintentional bias during marking.
- View Evaluated Responses Previously-graded responses appear as part of the response queue.
Update All Attempts allows you to leave identical feedback for all responses to a selected question and assign all users the same grade for the question. For example, if your question contained an error, you could send a correction comment to all respondents and give everyone who attempted the question full marks.
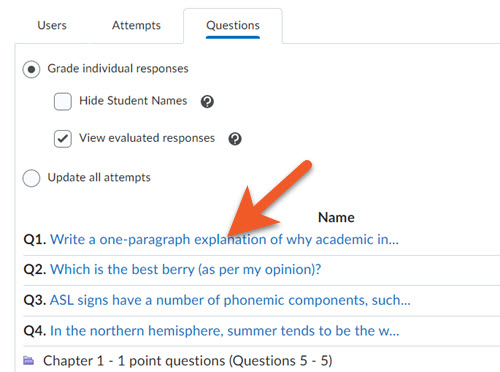
Click on the blue question text, to grade the student attempts for that question.
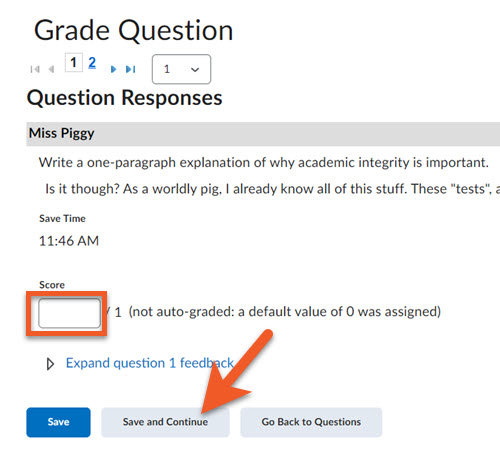
Review the student’s answer to the question.
If needed, enter or adjust the score, then click on Save and Continue to see the next student’s answer.
When you are on the last student, you will only see Save or Go Back to Questions buttons. Click on Save to update the score for that student.
You will return to the list of questions.
Why would I view a quiz attempt in progress?
This is often a tool we use when troubleshooting issues that come up during or after the quiz.
- The student may contact you describing problems during the exam.
- The student's quiz attempt may not appear in the list of completed quiz attempts.
These steps will allow you to find an attempt that was started but not completed - if one exists.
You may then choose to submit the student's attempt on their behalf so that it may be graded.
Why would a student's quiz attempt still be 'in progress' after the quiz is over?
If it was an asynchronous quiz, it's possible the quiz attempt was completed, but not fully submitted.
Occasionally, a student may experience a problem if they:
- Neglect to submit their quiz once they've finished answering questions (or neglect to complete all of the steps to submit - it's several clicks).
- Accidentally exit a quiz or close their browser.
- Experience a browser or computer crash.
NOTE: If you create a synchronous quiz or select the “Automatically submit the quiz attempt” timing option when you set up your quiz, the problem of unsubmitted quizzes can be avoided, as all attempts are auto-submitted at the end of the time limit.
To locate a quiz attempt in-progress:
1. After clicking the arrow icon next to the quiz in the list, click Grade.
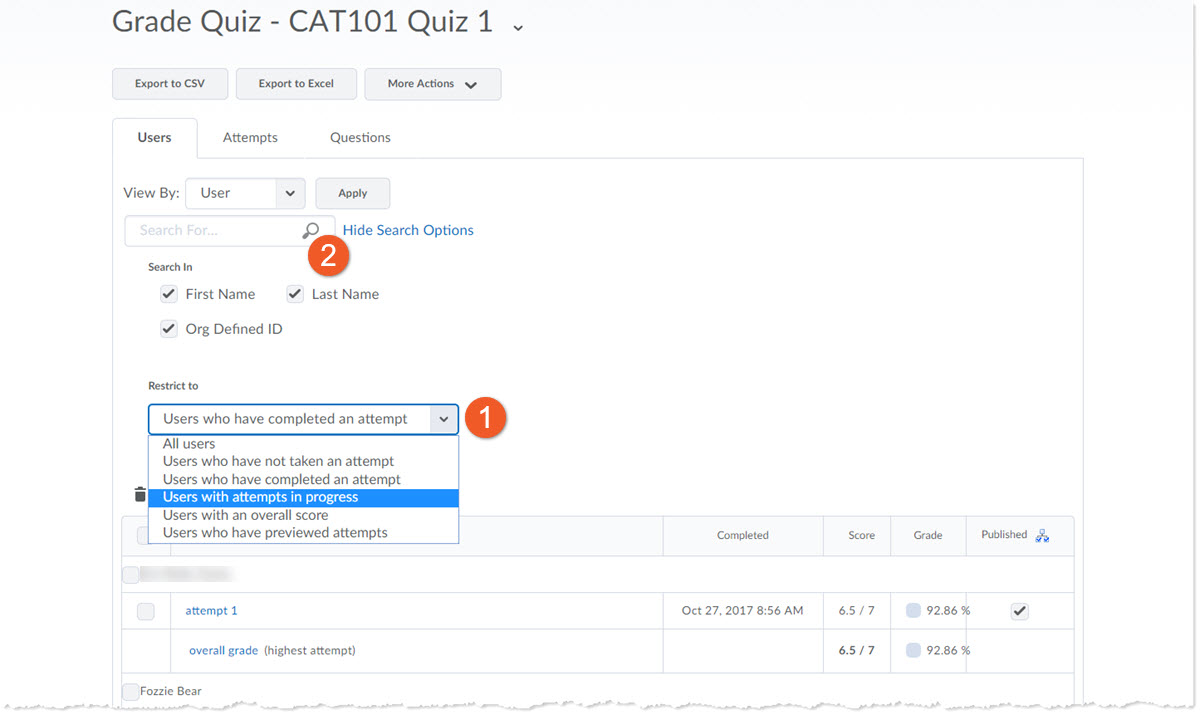
2. You need to filter the quiz attempts to see the users who have started, but not submitted their quiz. Under "Restrict to", choose Users with attempts in progress.
If you don’t see all of the filter options, click on Show Search Options to reveal.
Click on the magnifying glass to update your view.
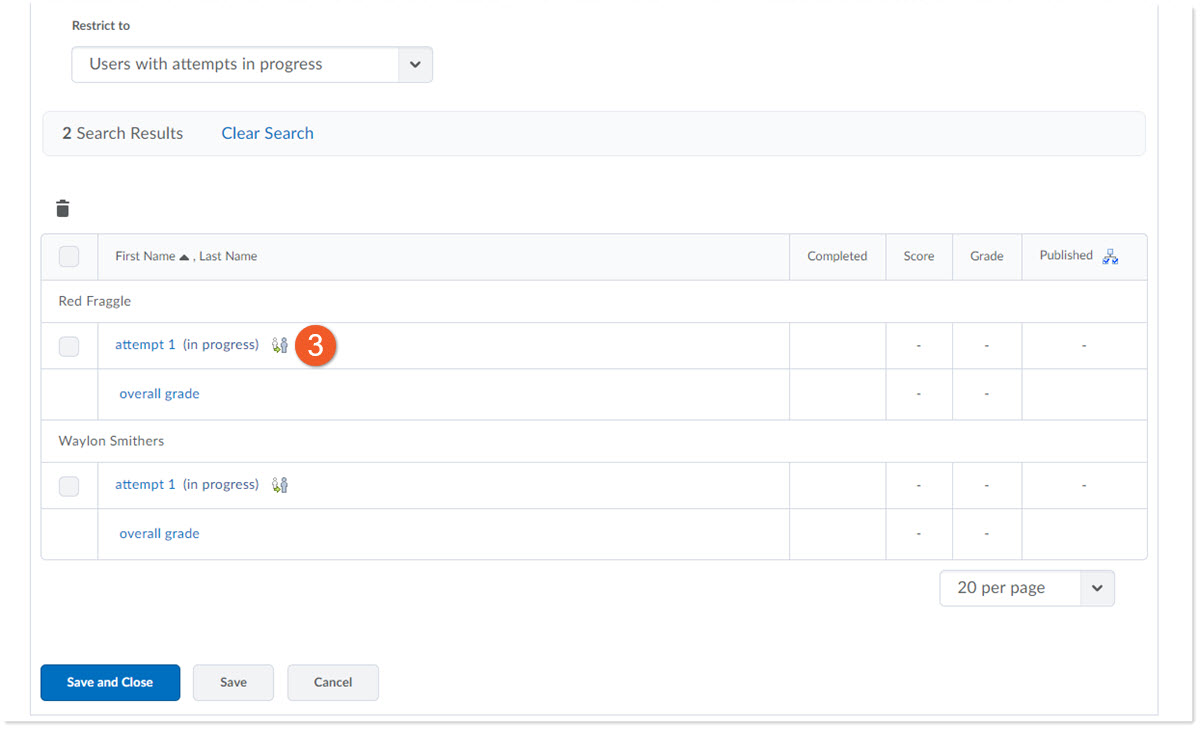
3. If there are any, you will now see a list of quiz attempts that were not submitted.
It is not possible for you to grade (or autograde) a quiz attempt that has not been submitted, so you will need to enter the quiz attempt on the student's behalf, and submit it.
Please note that if the student did not save their answers while completing the quiz, those answers will not be saved in the attempt.
Click on the icon to the right of the quiz attempt, to Enter Quiz as User, and in the pop-up window, confirm that this is what you wish to do. The quiz-in-progress will load in full-screen mode, without the D2L navigation.
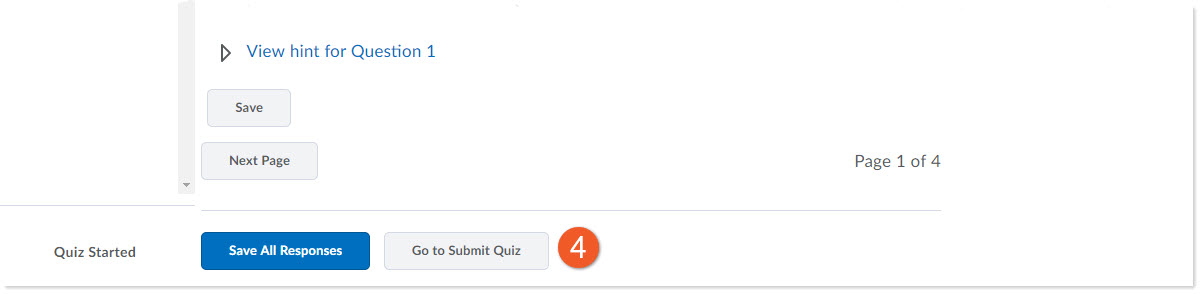
4. You can now see the first screen of the student's quiz attempt. You can page through to see the student's answers, if you wish.
To submit the quiz attempt, so that it can be graded, scroll to the bottom of the page, and click on Submit Quiz.
5. Click on Submit Quiz again.
You are now back on the main Grade Quiz page, but you need to change the Restrict to filter, back to All users, then click on the magnifying glass in the search box, to refresh the list of students and their attempts.
Once you have done this for all unsubmitted quiz attempts, if your quiz is autograded, those attempts will be graded. If you need to manually grade the quiz, see the instructions above these, if needed.
These settings should be applied before the students begin the quiz.
The settings to push the quiz grade into the gradebook can be found in the "Evaluation & Feedback" panel of the quiz editor.
NOTE: If your quiz contains any Written Response questions, instructor intervention is required before the quiz is fully graded. We also recommend at least reviewing student responses for Short Answer or Fill in the Blanks questions, as there may be some false negatives.
Before you begin
Make sure you have created the grade item (column) for the quiz in the gradebook.
We recommend hiding the grade item from the students, until you are ready to release the grades to all of the students.
Return to the quiz editor to associate the grade item to the quiz and enable the settings that will push the grade from the quiz to the grade item once it has been graded.
Associate the quiz with a grade item
Once you’ve made sure that you have created a grade item for the quiz, you need to go to Assessment > Quizzes, to edit the quiz and connect the grade item and quiz to each other.
You can learn more about how to do this on the Create Online Quizzes page, in the “If you already have a grade item in the gradebook for this quiz (recommended)” section.
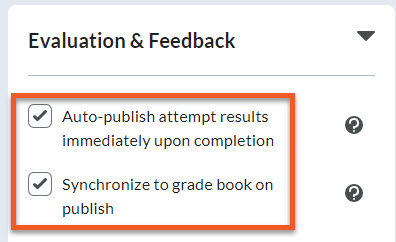
Click on the Evaluation & Feedback panel to find the settings to control auto-grading of questions, and synchronization with the gradebook.
Ensure that auto-graded question types are graded
Select Auto-publish attempt results immediately upon completion. We recommend enabling this setting regardless of whether all questions will be auto-graded by D2L, only some will be auto-graded, or all will be manually graded by you. This ensures that any questions that can be auto-graded will be, and the grade-in-progress will be synchronized with the gradebook (which is why we recommend hiding the grade item until all questions have been graded).
Ensure that grades are synchronized with the gradebook
Select Synchronize to grade book on publish. This setting ensures that the gradebook is kept updated anytime grades are updated and published, regardless of whether D2L is auto-grading questions, you’re manually grading questions, or you need to regrade any answers.
NOTE: If you do not select both of these checkboxes, it is easy to overlook inconsistencies between the grade in the quiz and the grade in the gradebook.

Remember to save your changes!
When you are done making changes, make sure to click on Save and Close, to save your quiz and return to the Manage Quizzes page.
My students have already taken the quiz - how do I get the grades to appear in the gradebook?
If the quiz grades weren't set up to automatically push to the gradebook, and now you need to publish existing grades, here’s how to fix that!
First, know that this is easy to fix. If your students wrote the quiz in D2L Brightspace, any marks for questions that have already been graded are in the quizzes tool.
Follow the steps in the section immediately above this one, called “Push the quiz grades to the gradebook automatically upon completion”, to:
- Create a grade item
- Associate the grade item and quiz with each other
- Ensure that the auto-grade/auto-publish settings are turned on, so that any subsequent updates to quiz marks will be published right away.
Manually publish grades from the quiz to the gradebook
On the Manage Quizzes page, click on the context menu for the quiz and select Grade.
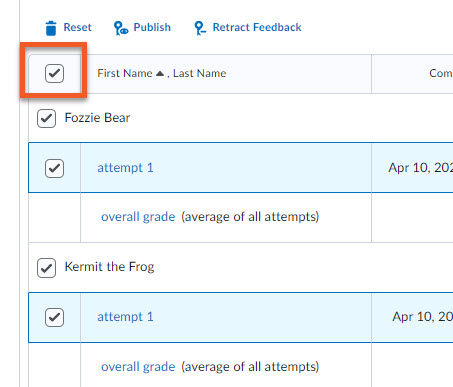
First, scroll to the bottom of the page, and change the # per page, to ensure you are viewing all students on one page. If you have a large class, you may need to repeat the next few steps for each page of students.
Select the checkbox in front of each of the quiz attempts that you wish to publish.
Or, if you want to publish ALL attempts, select the checkbox in the upper left header row of the list of students/attempts.
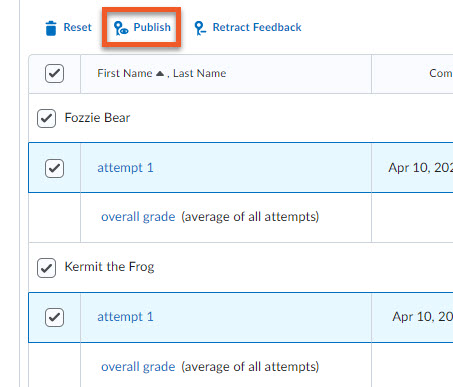
Above the list of students/attempts, click on Publish.
In the confirmation popup window that appears, click on Yes.
If you have a large class/selection, it may take a few moments to process. You will notice the list of students/attempts reload.
Go to Grades > Manage Grades, and review a few students’ grades, to confirm they have been updated.
Occasionally, this doesn’t work on the first attempt. If this is the case, review your settings, and try publishing again, then check the gradebook again.
When you’re ready, unhide the grade item, so that all students can see their grade.
If you don’t plan to reuse quiz questions in the future, and all of your students have completed a quiz, you can allow students to view their attempts and see how they did on each question.
Ideally, you would set this up before students write their quiz. These settings are found in the Evaluation & Feedback panel.
What students see upon submitting their quiz
For typical quizzes/tests/exams, our recommendation is that upon submission of their quiz attempt, students DO NOT see their grade, and do not see any questions/answers.
This ensures both that you have time to review the results before students see their grades, and that students are slightly less able to share information about the quiz (based on their known grade) while other students are still writing the quiz.
For step-by-step instructions to change these settings, visit the Create Online Quizzes page, and review the “Control what students see after the quiz is complete” section.
If you have already created and published your quiz results, adjusting the default view does not work retroactively. Please see the option below.
What students see later, after you’ve finished grading the quiz
If you do not plan to reuse quiz questions in the future, and are fine with students reviewing the questions and their responses, you can set up custom quiz results displays (previously known as “submission views”), which can show questions, incorrect or correct answers, scores for each question, and other details.
For step-by-step instructions, visit the Create Online Quizzes page, and review the “Control what students see after the quiz is complete” section.
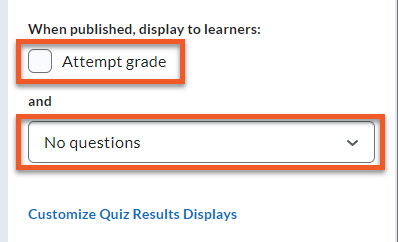
If you do not want students to see anything upon quiz submission
For typical quizzes/tests/exams, our recommendation is that upon submission of their quiz attempt, students DO NOT see their grade, and do not see any questions/answers.
To do this, in the Evaluation & Feedback panel, make sure that Attempt grade is NOT selected, and the dropdown below that is set to No questions.
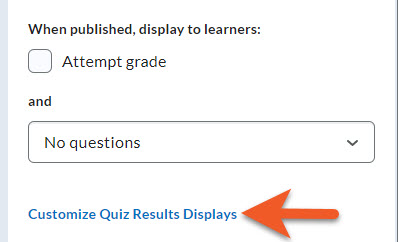
If you do not want students to view any details of their quiz attempt at a later date
After everyone has completed the quiz, and grades have been released to students, if you want to make sure students cannot view their quiz attempt, quiz questions, etc, simply make sure that your quiz does not have any additional “Quiz Results Displays” set up.
Edit the quiz, click on the Evaluation & Feedback panel to expand it, then click on “Customize Quiz Results Displays”.
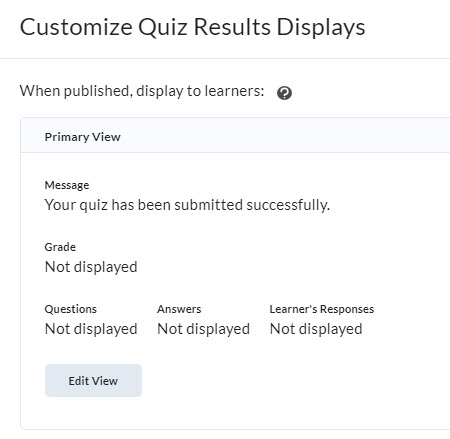
If you only see a “Primary View”, which does not display the grade, questions, answers or learner’s responses, your students will not be able to view any details.
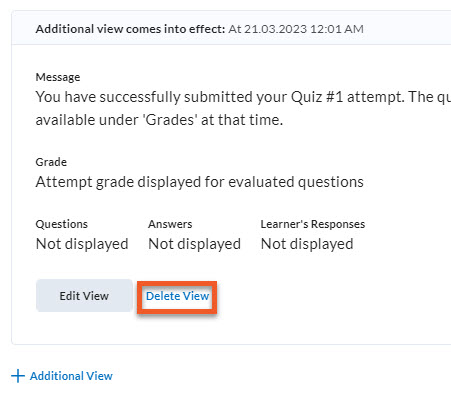
If you see any additional views, click on Delete View to remove each of those views.
Troubleshoot issues with quiz attempts
Are you looking for a student's attempt and don't see it in the list of submitted attempts - even when the student assures you it's been completed?
It's possible the quiz attempt was completed, but not fully submitted.
Occasionally, a student may experience a problem if they:
- Don't fully submit their quiz once they've finished answering questions.
- Accidentally exit a quiz or close their browser.
- Experience a browser or computer crash.
If the student is unable to enter the quiz again to submit the attempt themselves, you can find it and may choose to submit it on their behalf in order to complete the grading.
See the section on viewing and submitting a "quiz attempt in progress" above for instructions!
If you don’t find the quiz attempt there, consider viewing the attempt logs for the quiz.
It’s also possible that the student made an error, attempting another quiz in this or another course shell.
NOTE: If you create a quiz with a start/end window that covers the duration of the time limit, and auto-submission, this can help you avoid most incidents of “lost” quiz attempts.
Why delete a student's quiz attempt?
This is an option if there was a technical issue and the student isn't able to get back into their quiz in order to complete it.
However, it may be better practice to use Special Access to give additional attempts to specific users instead. Retention policy may require that we keep all quiz attempts.
To delete a quiz attempt:
1. From the Quizzes tool, click the context menu next to the name of the quiz in question and select Grade.
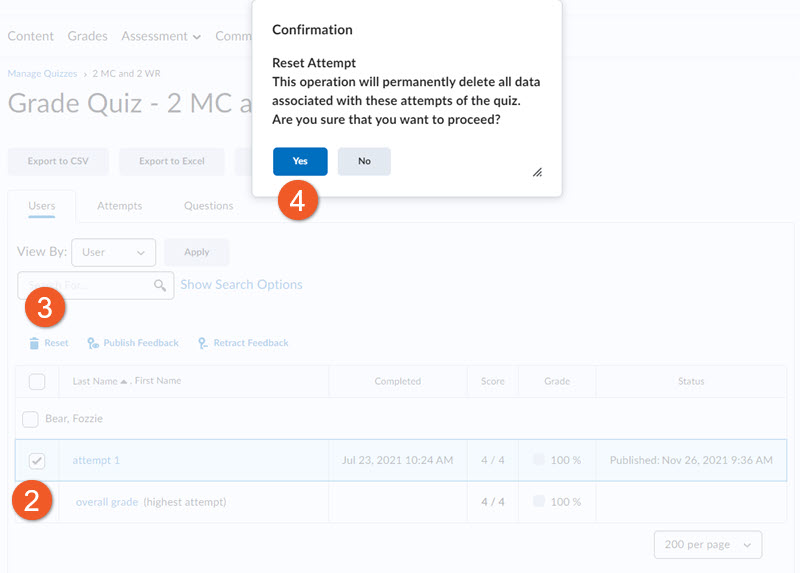
2. Under either the Users or Attempts tab, click the check box next to the attempt(s) you wish to delete.
3. Click the trash can icon/Reset.
4. Click Yes to delete the attempt(s).
Why would you restore a deleted quiz attempt?
If you've accidentally deleted a student's quiz attempt, and now realize that you wish to restore it, whether to use that attempt for the student's grade, investigate possible misconduct, or other reasons, you can now restore the attempt.
Access the Quiz Attempt logs:
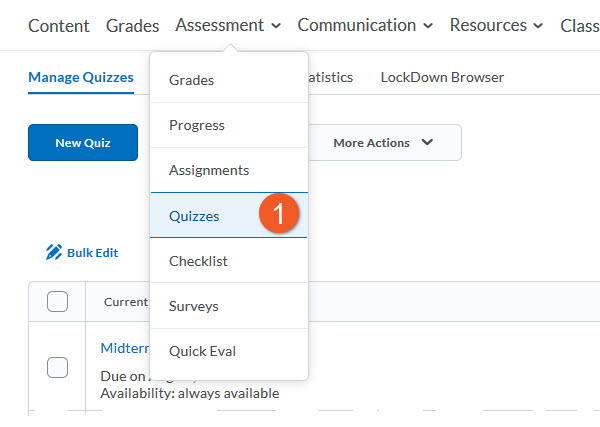
1. Go to Assessment > Quizzes.
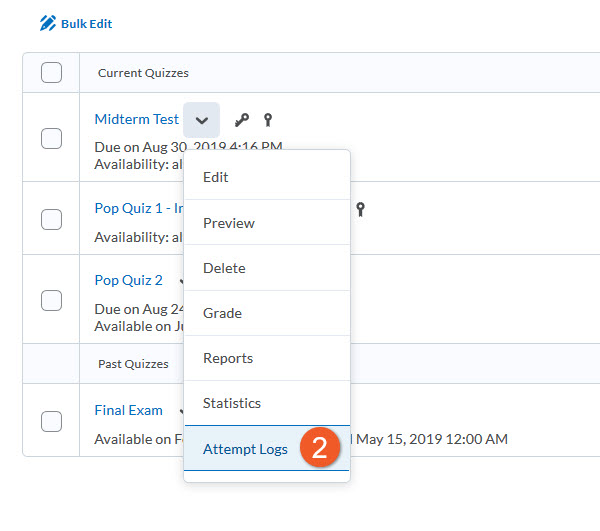
2. Click on the contextual menu to the right of the quiz in question, and select Attempt Logs.
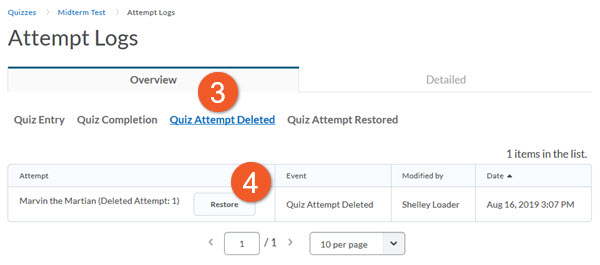
3. To see only attempts that are available to be restored, click on just Quiz Attempt Deleted, so that other filtering options are grey. You will notice that the list of events in the table below now only show deleted attempts.
4. Click on the Restore button to the right of the student's quiz attempt you wish to restore.
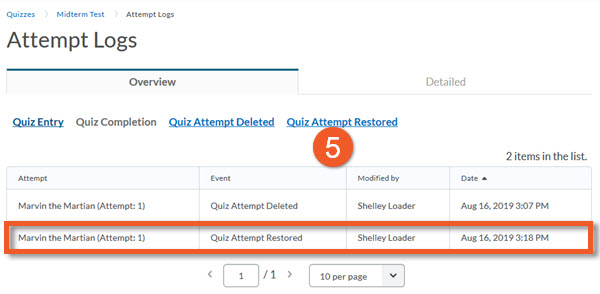
5. Now click on the Quiz Attempt Restored filter located above the table, to include restored attempts in the view. You can now see both the previous attempt deletion and the attempt restored listed.
You can now go to Grade Quiz to see the student's attempt, manually grade any questions, publish the grade to the gradebook, etc.
NOTE: If the student currently has an additional attempt in progress, you will not see a Restore button for any previously deleted attempts. Once the student has submitted their current attempt (or you have submitted on their behalf), you will be able to see and restore any previous attempts, if necessary.
All student activity in quizzes is logged, and the Quiz Attempt Logs make it possible for you to see this information, so that you can troubleshoot the situation and make an informed decision about how to proceed.
- You might notice you don't see a score for a student's quiz, and you're not sure why.
- A student might approach you because they insist they wrote the quiz, but they can't see their attempt or grade.
The Quiz Attempt Logs may provide you with the details you're looking for, such as:
- The quiz entry time
- The quiz completion time
How to proceed after viewing the logs
Once you've viewed the logs and determined what happened, here are your options:
- Submit the quiz on behalf of the student, as is, grading only what they completed. (See section near the top of this page.)
- Add the student to special access for the quiz, and give them more time or an additional attempt at the quiz.
- Delete a quiz attempt, so that the student can start the quiz again. (See section slightly above this section.)
- Restore a quiz attempt, if you have accidentally deleted it. (See section right above this section.)
- If there are concerns about conduct, you could also collect and use this information to consult with your department or the Academic Integrity office for advice about how to proceed.
Access the Quiz Attempt logs:
1. Go to Assessment > Quizzes.
2. Click on the contextual menu to the right of the quiz in question, and select Attempt Logs.
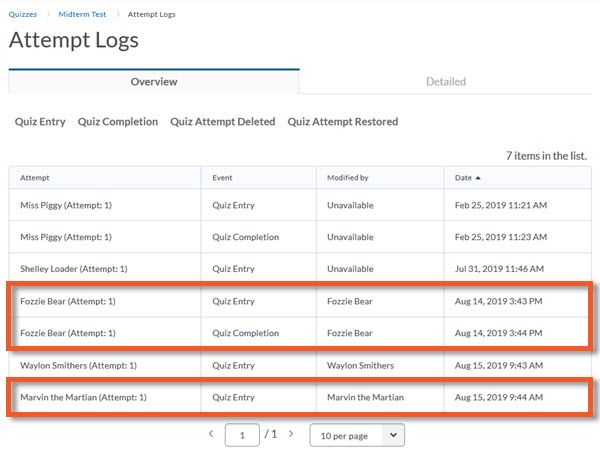
By default, you see the Overview, which lists, by date/time, all quiz entries, completions, deletions and restored quiz attempts.
Each student who successfully completed the quiz should have one "Quiz Entry" row, and one "Quiz Completion" row.
If you only see a Quiz Entry row, the student has not successfully submitted their quiz. They may still be writing the quiz, they may have accidentally left the quiz without submitting, or they may have had a technical problem, such as a browser or computer crash.
If the student tries to re-enter the quiz within the allotted time, they should be able to continue.
If the student cannot re-enter the quiz, you can use the information in these logs to inform your decison about how to proceed.
Filter by event type
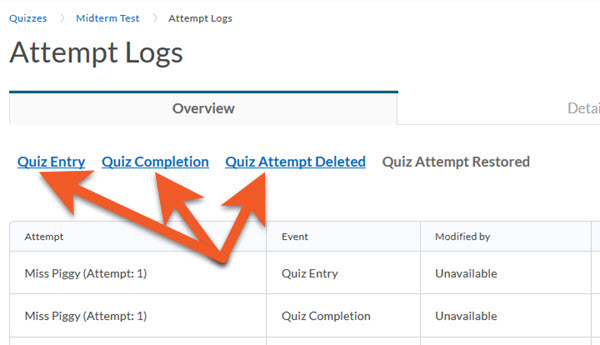
If you have a lot of students, even the Overview tab can contain a lot of information, which can make it difficult to spot what you're looking for.
You can filter to view only particular types of events by clicking on those event types at the top of the page. If an event type is highlighted in blue, it is displayed in the table below.
To exclude an event type, click on it again. It will turn grey and those events will not appear in the table below.
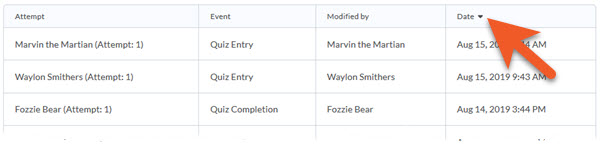
Sort by date
By default, events are listed from oldest to newest.
If you wish to see the most recent events first, click on the small arrow beside the Date header in the table.
Click on the arrow again, to revert the date order back to oldest to newest.
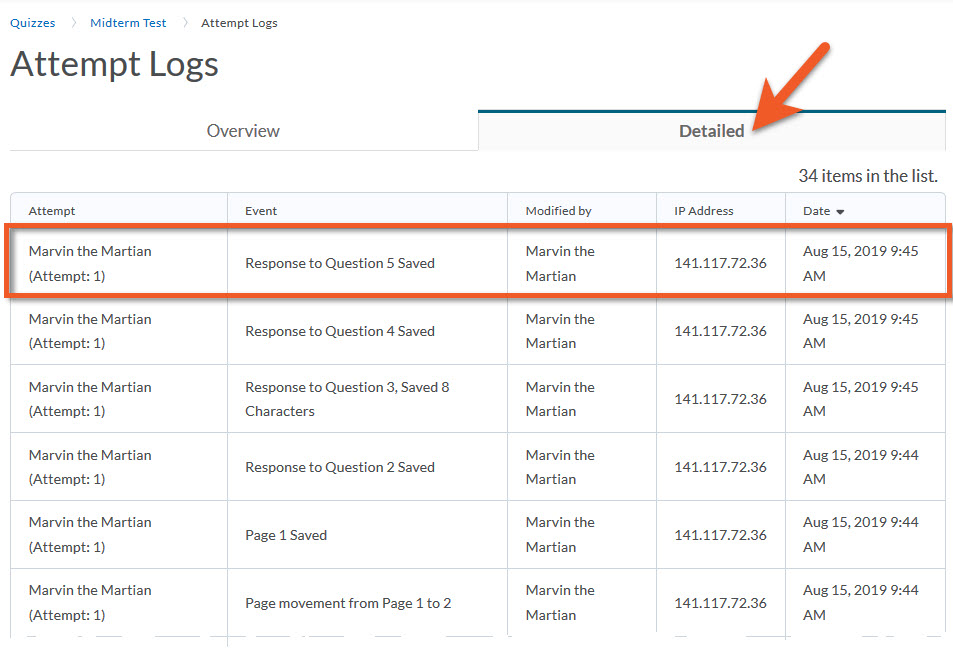
More details
If you need to see more detail than just if a student started and/or finished the quiz, click on the Detailed tab.
You can see when each question was answered, when the student moved from one page to the next, etc.
In the example screenshot, you can see that Marvin the Martian answered question 5, and the date/time that he did so, but there are no entries for him after that, which indicates that he didn't do anything else, such as submit his quiz. In this instance, this might lead you to a decision to use special access to allow Marvin back into the quiz to continue with the rest of the quiz, or you might decide to submit the quiz, as is, on his behalf.
Have you ever had a student urgently contact you mid-quiz to say that something happened that prevented them from completing the exam?
There are a couple of "Special Access" strategies that can help here.
Instructions for setting up "Special Access" can be found on the Create a Quiz tutorial page!
"Help! I clicked Submit by mistake and I wasn't done the exam!"
This happens quite often, as the quiz "Submit" button appears at the bottom of every page of the quiz. Since the student has submitted this attempt, you may choose to give them a second attempt using Special Access.
- Check "Override attempts allowed"
- Indicate how many attempts the student is permitted - if they have already completed 1 attempt, you will need to specify 2 or more.
"Help! I lost access to the quiz and can't get back in!"
This can happen if the student loses their internet connection, or their browser crashes, and - although they have time left in their time limit - it is past the availability end time.
You may choose to give them a later availability end time so that they can continue their current attempt.
- Check "End Date" in the availability section.
- Specify the new End Date and time for this student.
- Most of the time, you will leave the timing as-is if you don't want to give the student more time to complete the quiz. The clock is still ticking from the time they first started the quiz. However, if there are extremely extenuating circumstances, you may wish to add time to the enforced time limit.
NOTE: If you create a quiz with a start/end window that covers the duration of the time limit, this can ensure that students can re-enter anytime during the duration of the quiz, which can reduce the frequency that this problem occurs.
Try the quiz by completing a "preview" quiz attempt
In Quizzes, select Preview from the context menu of the quiz you wish to attempt.
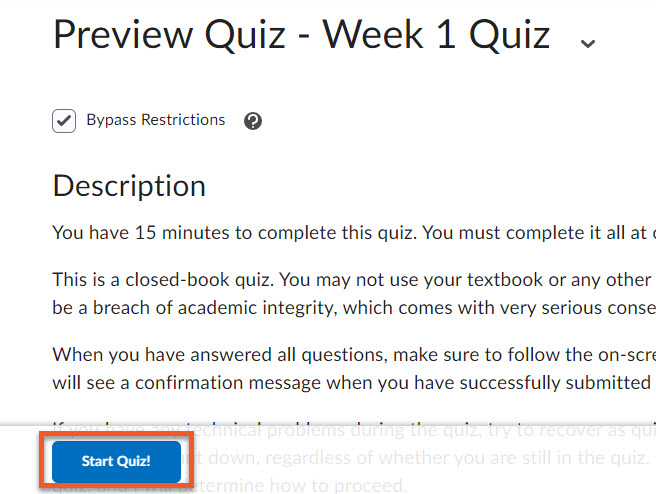
Click Start Quiz!
The quiz will open. If the quiz has a time limit, the countdown timer will begin counting down.
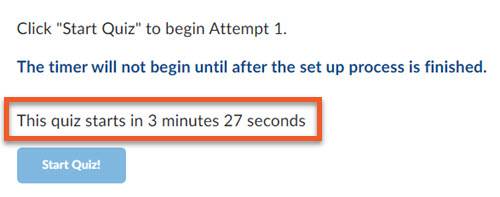
NOTE: If you have created a synchronous quiz (all students must start and end at the same time), please note that on this page, near the “Start Quiz” button, students will see a countdown timer, starting 5 minutes before the beginning of the quiz. When the countdown reaches the start time, students will be able to click on the Start Quiz button.
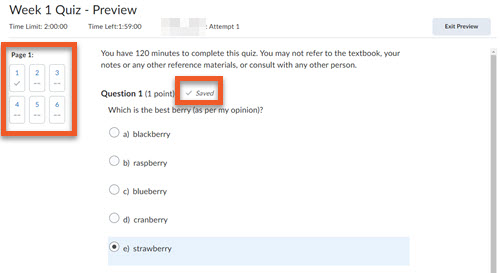
Complete the quiz questions, and notice that quiz responses are saved within about 10-15 seconds, or when you click outside of a text input field. You can see that a response has been saved by looking for the checkmark icon in the left navigation.
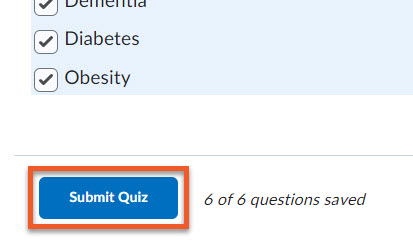
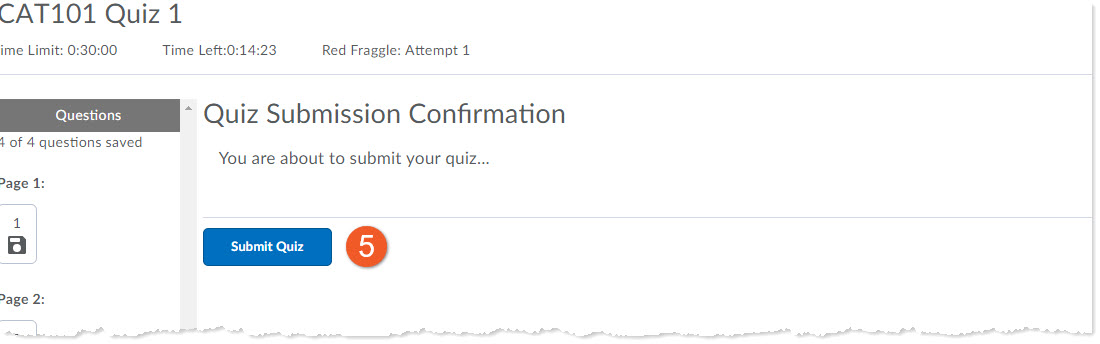
When done, click Submit Quiz.
You may also see a warning popup box. Click it to continue.
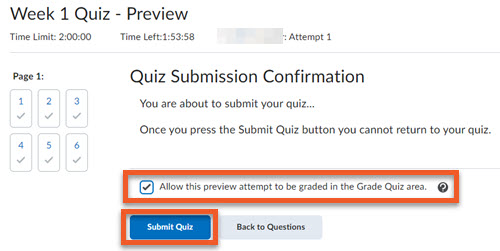
On the Quiz Submission Confirmation page, be sure to click the checkbox to "Allow this preview attempt to be graded in the Grade Quiz area".
Click Submit Quiz.
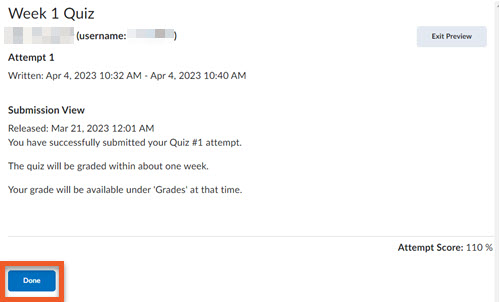
On the confirmation page, you should see a message that your quiz has been submitted successfully. Depending on how you have set up the default view for this quiz, you might also see the questions, your answers, your score, or the grading status. Please note that this page may look somewhat different for your real students.
Scroll to the bottom of the page and click Done.
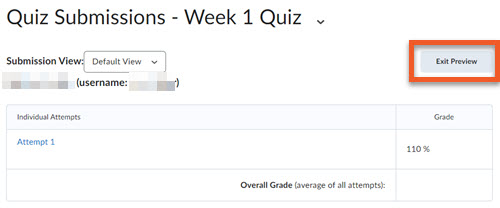
You can click on Exit Preview to return to your list of quizzes.
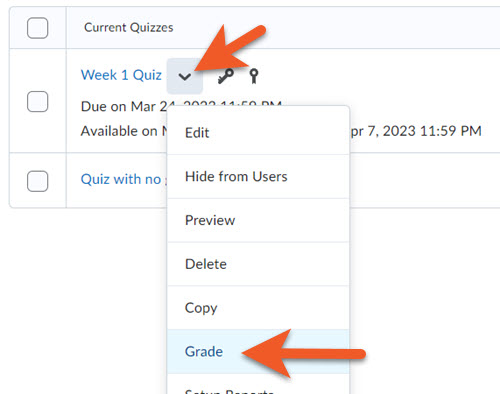
In Quizzes, click Grade from the context menu of the quiz you attempted.
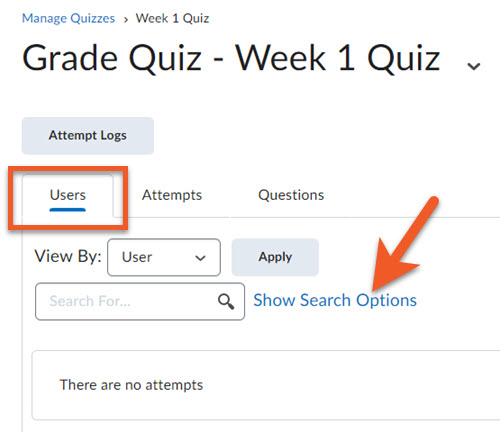
Make sure you are on the Users tab.
If you do not see all of the filters, click on Show Search Options to reveal them.

Find the Restrict to dropdown, and change it to "Users who have previewed attempts".
Click the magnifying glass icon in the "Search For" field to complete the search.
You should see your name listed below, with your attempts listed. Click on an attempt to review the answers. From there, you can grade your attempt. See Grading Quizzes for more information.