Use the D2L ePortfolio
Overview
The ePortfolio is a tool that allows you to collect samples of your work ("artifacts"), write about experiences you have ("reflections") and then choose whether to share them with others (like Instructors, or even potential employers).
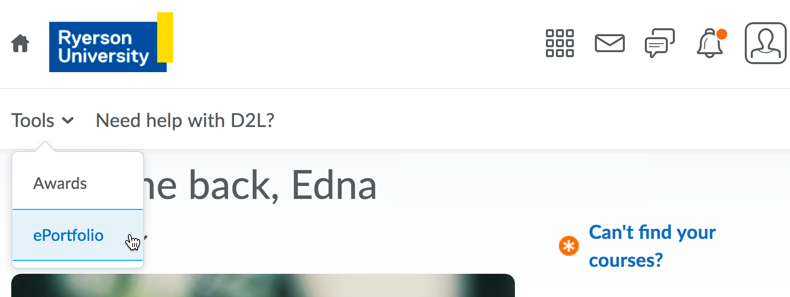
Users can always access their ePortfolio from the D2L Homepage, by going to the Tools menu and clicking 'ePortfolio'.
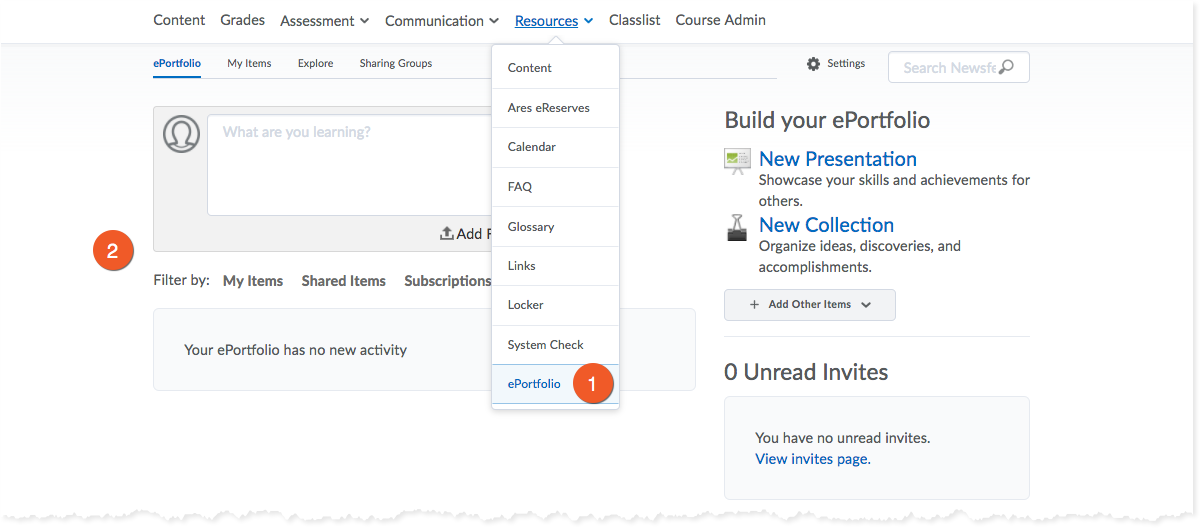
If a course has the ePortfolio tool enabled, you should be able to find it in the course menu, under Resources > ePortfolio.
![]()
Instructors: If you do not see ePortfolio in the course menu, please review our tutorial to learn how to Enable course tools.
![]()
The things you add to your ePortfolio are only visible to you - unless you choose to share them with others. Please see the section on sharing your ePortfolio content for the different ways to share your ePortfolio content.
ePortfolio & Your Private Information
It is important to be selective about the information you share in your ePortfolio. While it may be necessary to include your name and maybe even contact information (if you are sharing with a potential employer), it is not advisable to include very confidential information, such as medical information or financial details. You are responsible for the information that you include in this tool.
If you are asked to use ePortfolio as a part of a course assignment, and are not comfortable doing so for privacy reasons, please discuss alternatives with your Instructor.
Collect Content
There are a few different types of content that you can create/collect in your ePortfolio:
- Artifacts (files & links)
- Reflections (written entries, relating to your experiences and interests)
- Collections (a group of artifacts and reflections)
- Presentations (a website grouping of artifacts and reflections - great for a CV)
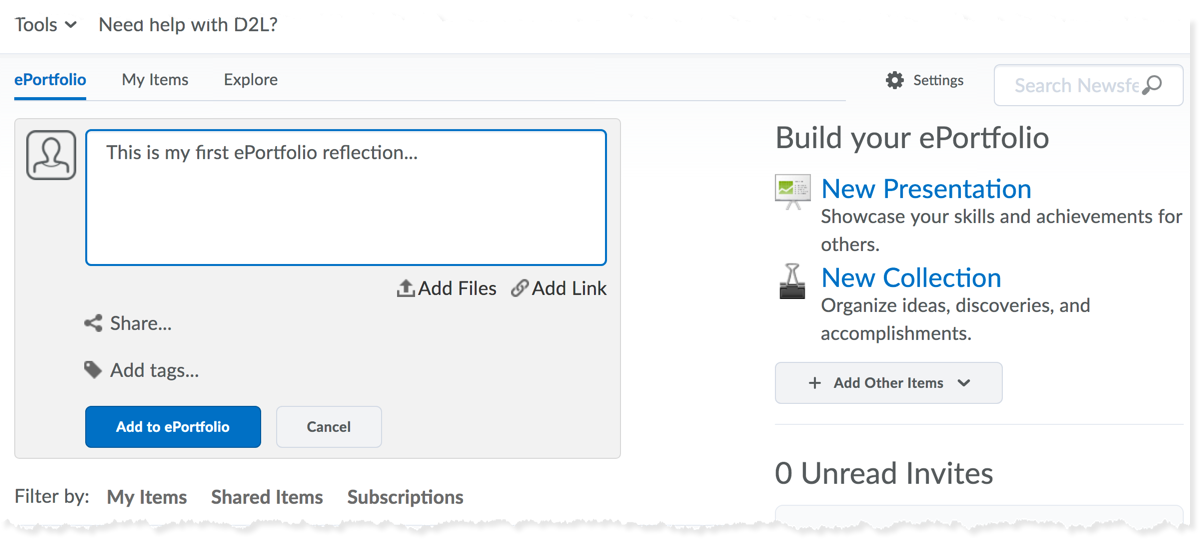
- Go into the ePortfolio tool. From the Course Menu bar, click Resources > ePortfolio.
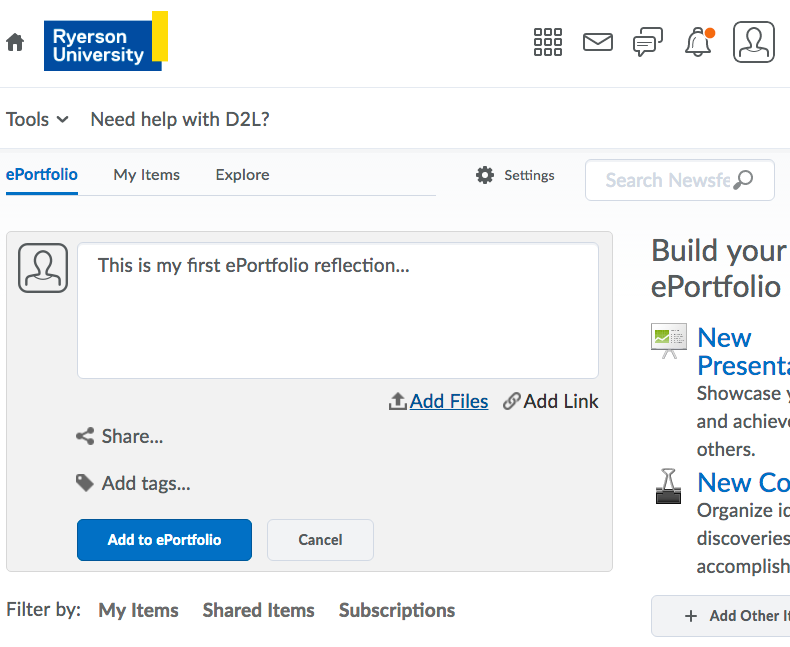
- In your main ePortfolio Dashboard, you will see a textbox, followed by options for sharing and tagging.
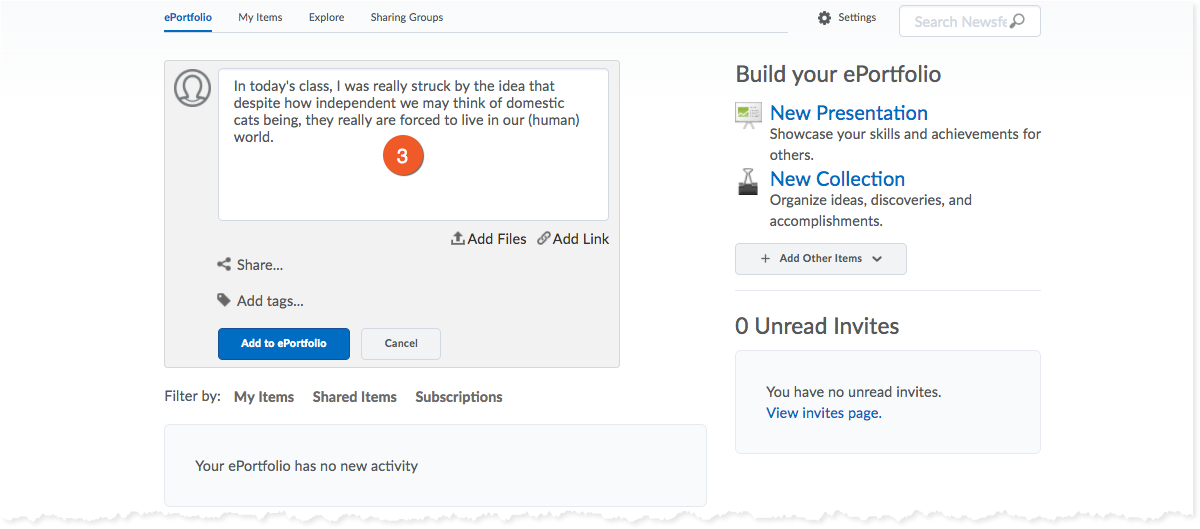
3. To create a "reflection":
In the main textbox: enter some text, to reflect on something you have been doing, thinking or learning.
Click Add to ePortfolio to complete the process.
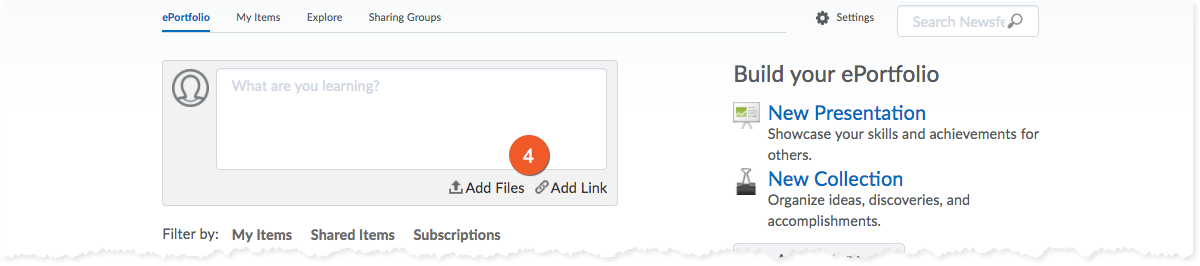
Most 'artifacts' will be files of your own work that you upload to your ePortfolio.
To create an "artifact" by uploading a file:
Click the Add Files link. Proceed to upload a file from your computer.
Click Add to ePortfolio to complete the process.
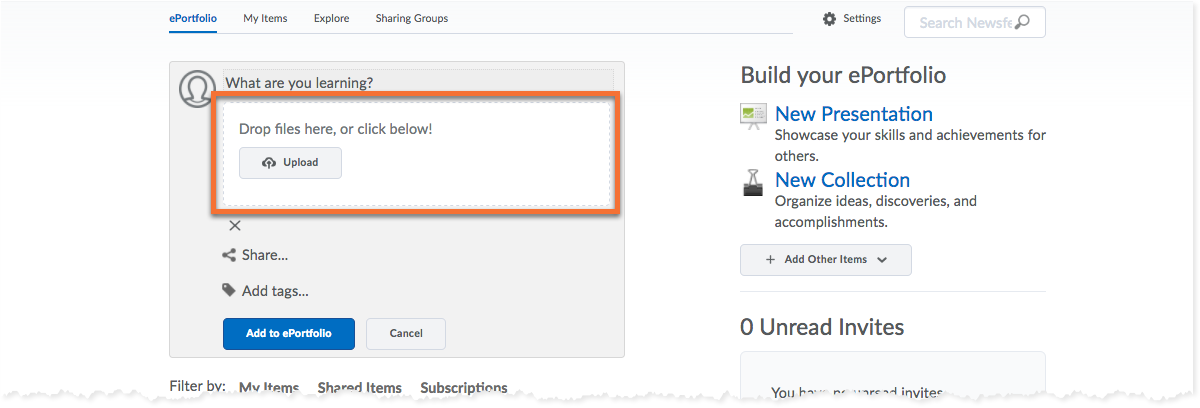
![]() IMPORTANT: At this time, we do not recommend entering text into the text box AND adding a file/link at the same time. This will create both an artifact and a reflection, not one combo item.
IMPORTANT: At this time, we do not recommend entering text into the text box AND adding a file/link at the same time. This will create both an artifact and a reflection, not one combo item.![]()
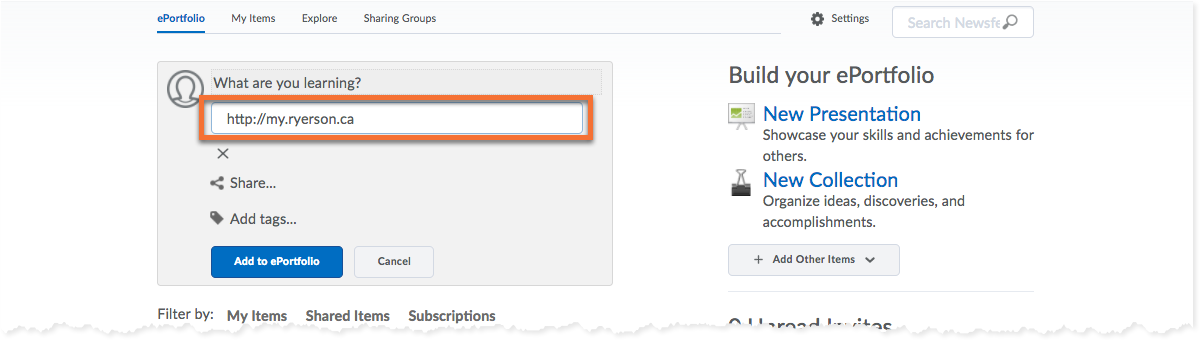
While most 'artifacts' are files that you upload, you may want to collect links to useful sites - especially ones that you have contributed to!
To create an "artifact" by adding a link:
Click the Add Link link. Proceed to enter a URL for a website.
Click Add to ePortfolio to complete the process.
![]() IMPORTANT: At this time, we do not recommend entering text into the text box AND adding a file/link at the same time. This will create both an artifact and a reflection, not one combo item.
IMPORTANT: At this time, we do not recommend entering text into the text box AND adding a file/link at the same time. This will create both an artifact and a reflection, not one combo item.![]()
Sharing is optional - you don't need to share anything right away, and can choose to share your items later.
There are two main ways to share:
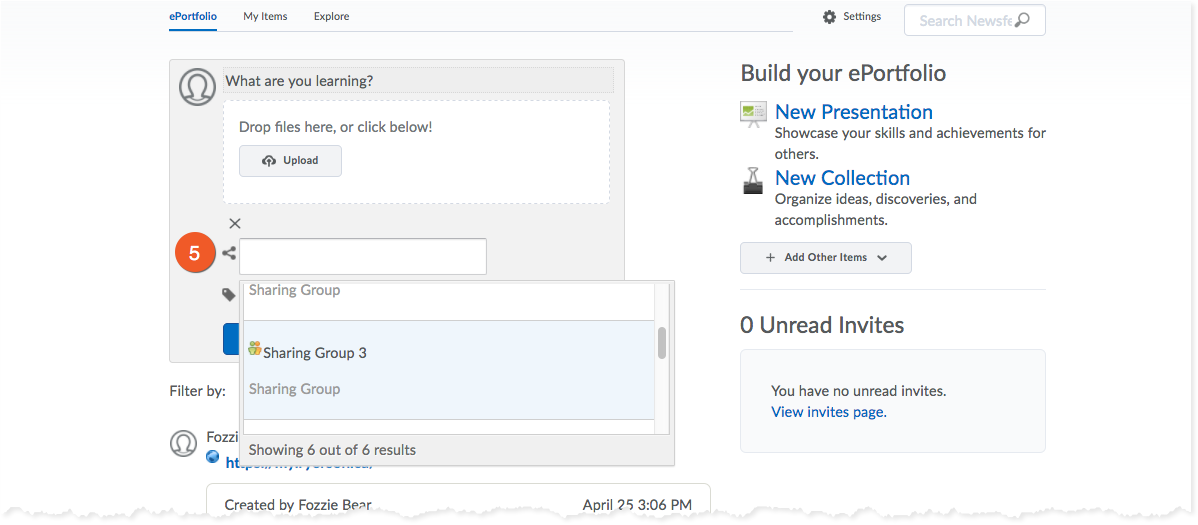
- Share with course Instructors and TAs by sharing your items with a Sharing Group.
- Share 'Presentation' items with individuals, or people outside of the university by using one of the external sharing options.
For more information on sharing, please see the section specifically on Sharing, in this documentation.
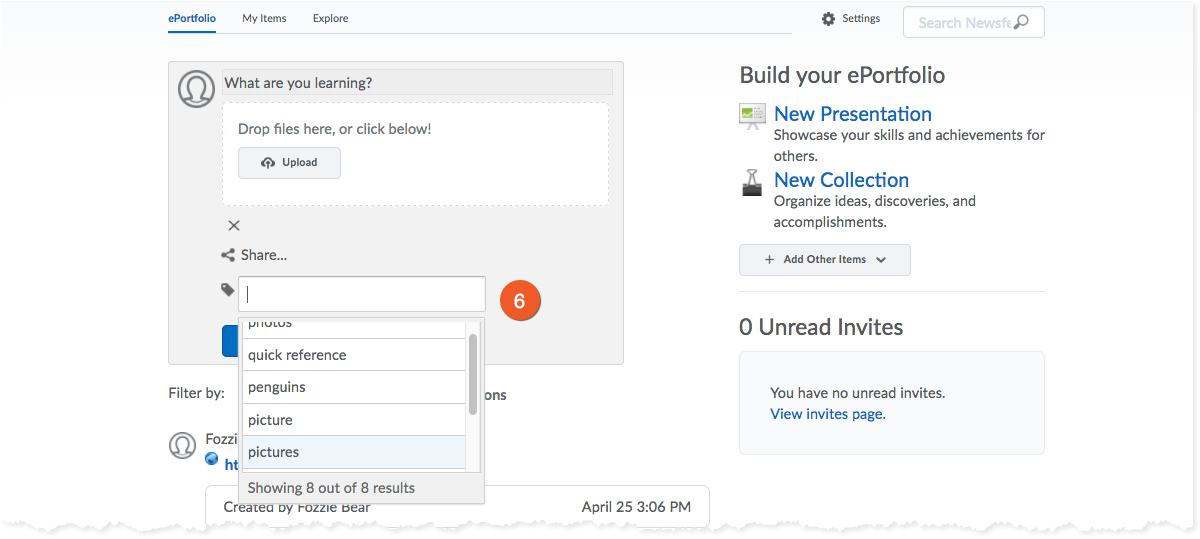
Tags can be useful for thematically grouping your ePortfolio items, and can be used to pull items into your Collections.
Public tags appear when you first click into the Tag field. Only course Instructors may create public tags, but you can apply them to your items as needed.
Click Add to ePortfolio to complete the process.
At any time, you may choose to remove content from your ePortfolio. Keep in mind that this will delete it from your view, as well as from those you have shared with.
How to delete ePortfolio items:
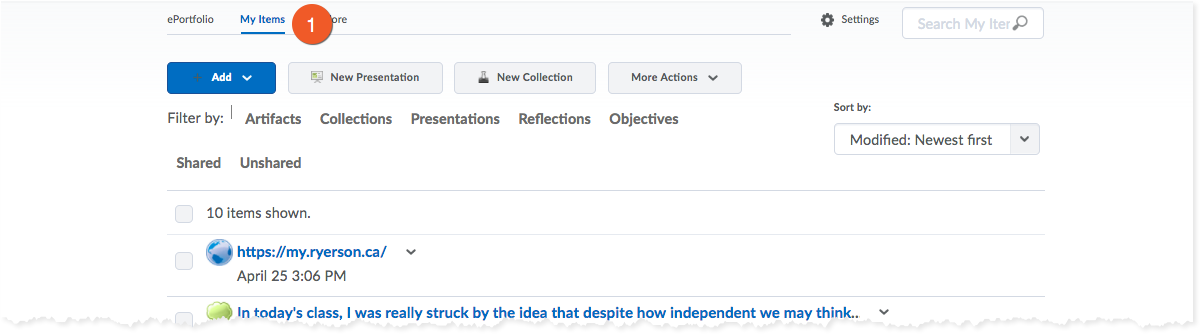
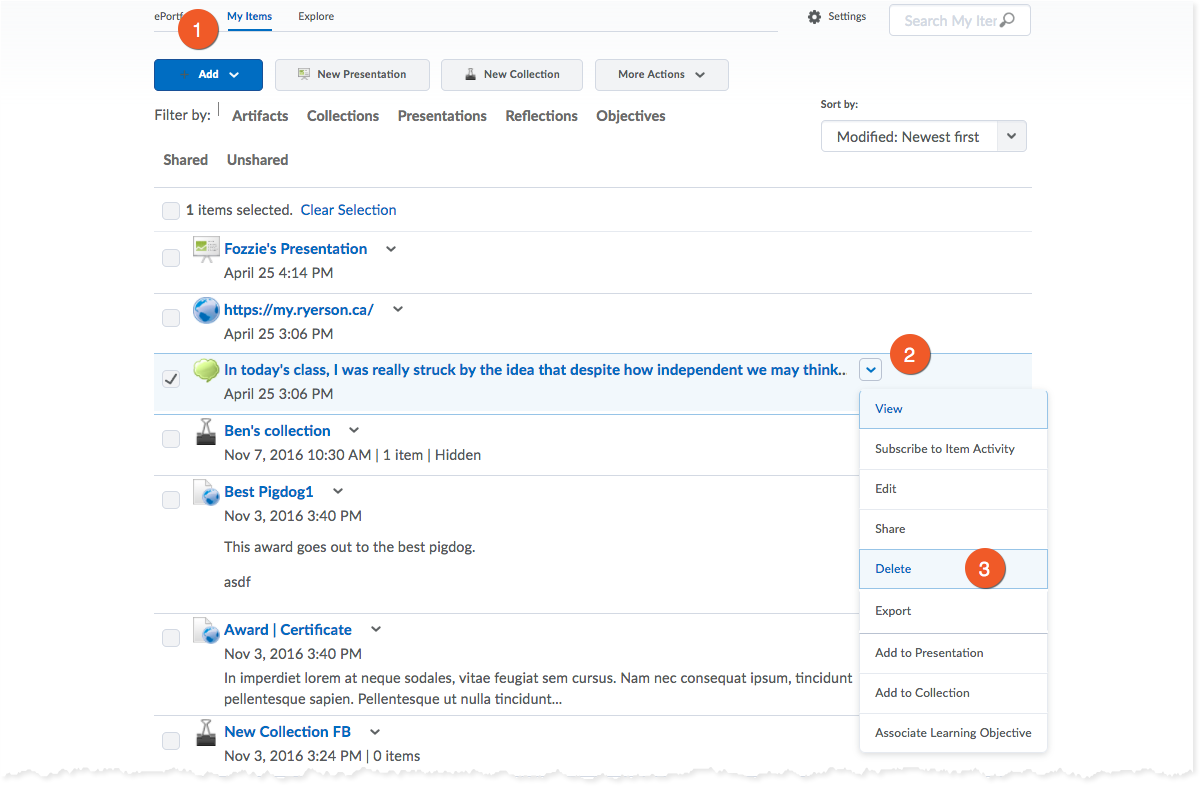
1. In your ePortfolio, go to "My Items". Locate the item you wish to remove from your ePortfolio.
2. Click the triangle icon to the right of the name of the item.
3. Select "Delete" from the dropdown menu.
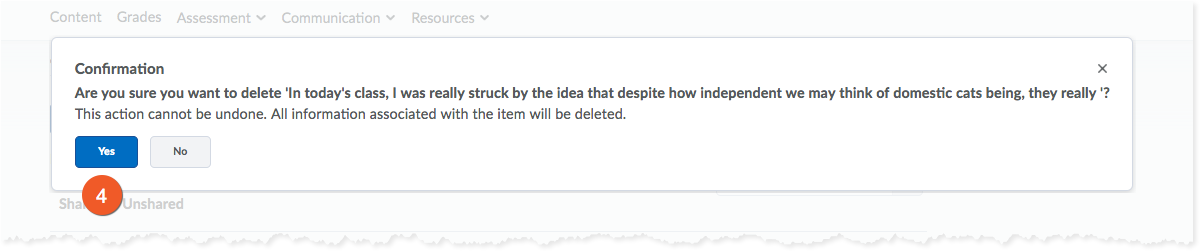
4. Click "OK" to confirm that you want to delete the item. This will permanentlyremove the item from your ePortfolio, and D2L.
Collections & presentations
Once you have collected some artifacts and reflections, you may decide to group them together (for your own viewing, or for further sharing).
The ePortfolio has two tools for this: Collections and Presentations.
Presentations are mini-websites to group and contextualize your ePortfolio items. You can create information pages, link to your artifacts and reflections and choose from a few select design options.
Collections are just a grouping (like a folder) in which you save certain ePortfolio items. There is no real context for these collections, as you can't add an interface to guide the person with whom you share the collection.
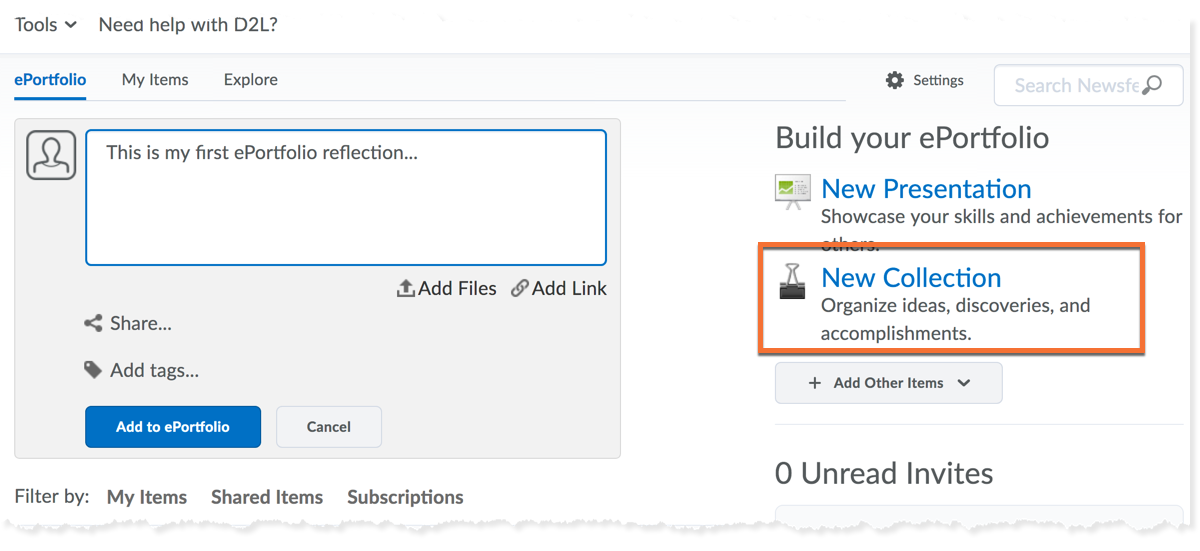
From your ePortfolio dashboard, click the 'New Collection' link on the right-hand side.
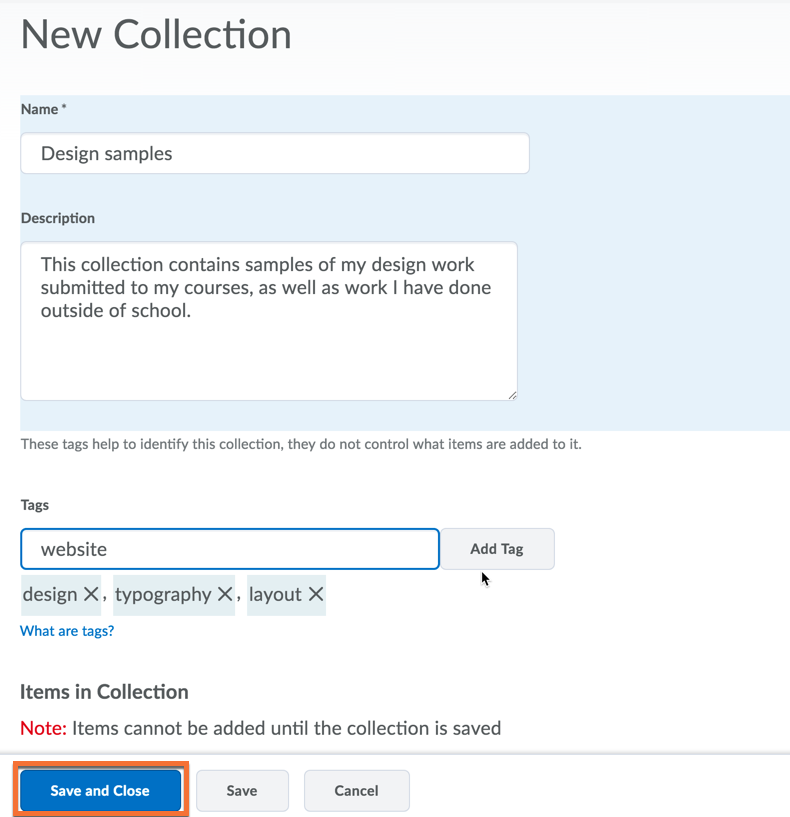
Give your new collection a clear and concise name, and add a description. These will help you to remember the purpose of your collection in the future.
Tags: These can be useful if you want to see a sub-set of items you've saved. Type the word into the field and click the 'Add Tag' button.
*Don't forget to click the 'Save and Close' button!

From your ePortfolio dashboard, click the 'New Presentation' link on the right-hand side.
Follow the on-screen instructions to create pages. Your presentation will act as a mini-website, so think about how you want visitors to navigate your content.
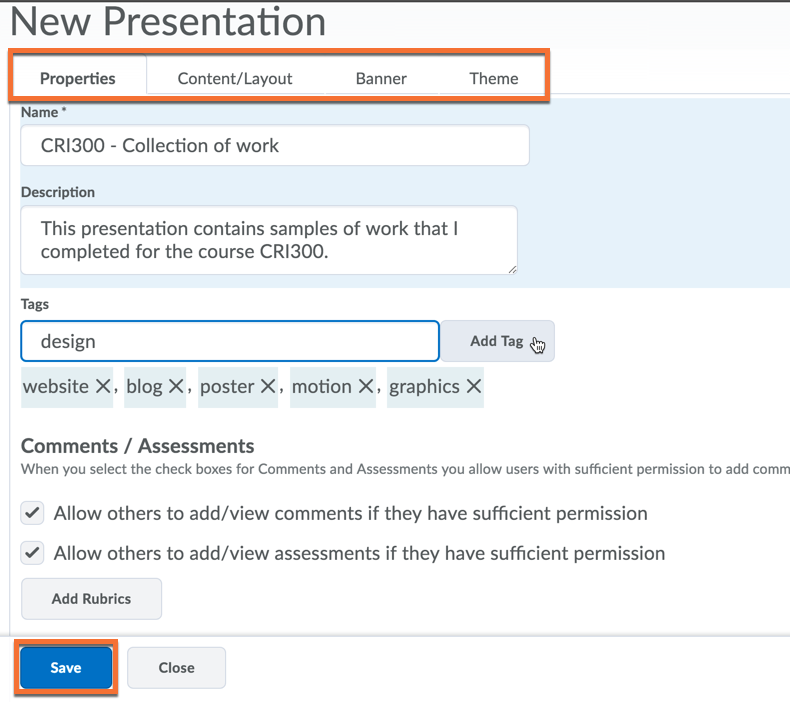
Be sure to review the options in all of the tabs: Properties, Content/Layout, Banner, Theme.
Give your new presentation a clear and concise name, and add a description. These will help you to remember the purpose of your collection in the future.
Tags: These can be useful if you want to see a sub-set of items you've saved. Type the word into the field and click the 'Add Tag' button.
Comments/Assessments: Allow others to comment and add assessments to your presentation.
*Don't forget to click the 'Save' button!
1. In your ePortfolio, go to "My Items". Locate the item you wish to add to a presentation or collection.
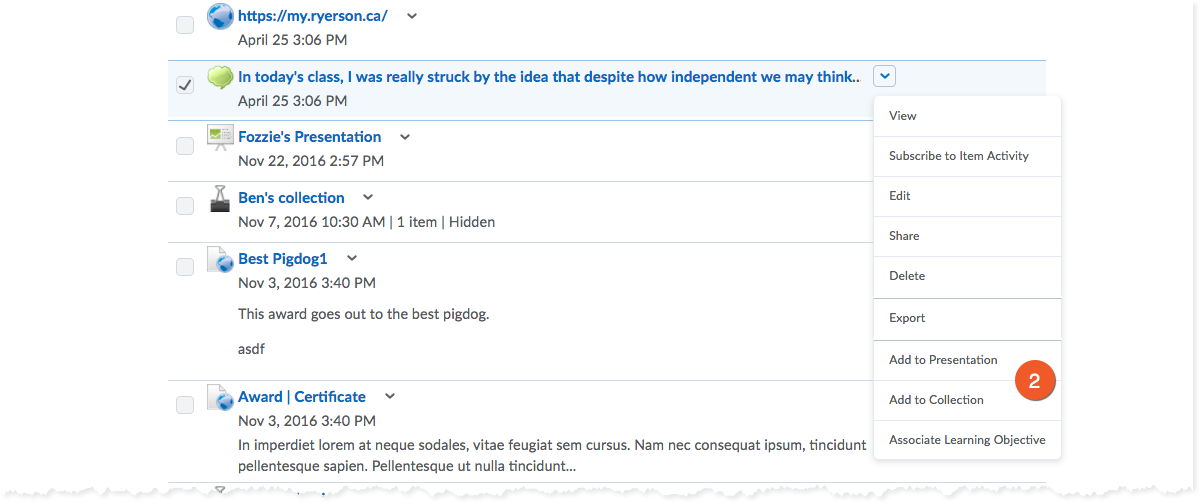
2. Click the triangle icon to the right of the name of the item
- Click "Add to Presentation" to add the item to an existing presentation.
- Click "Add to Collection" to add the item to an existing collection.
3. Follow the on-screen instructions, as required.
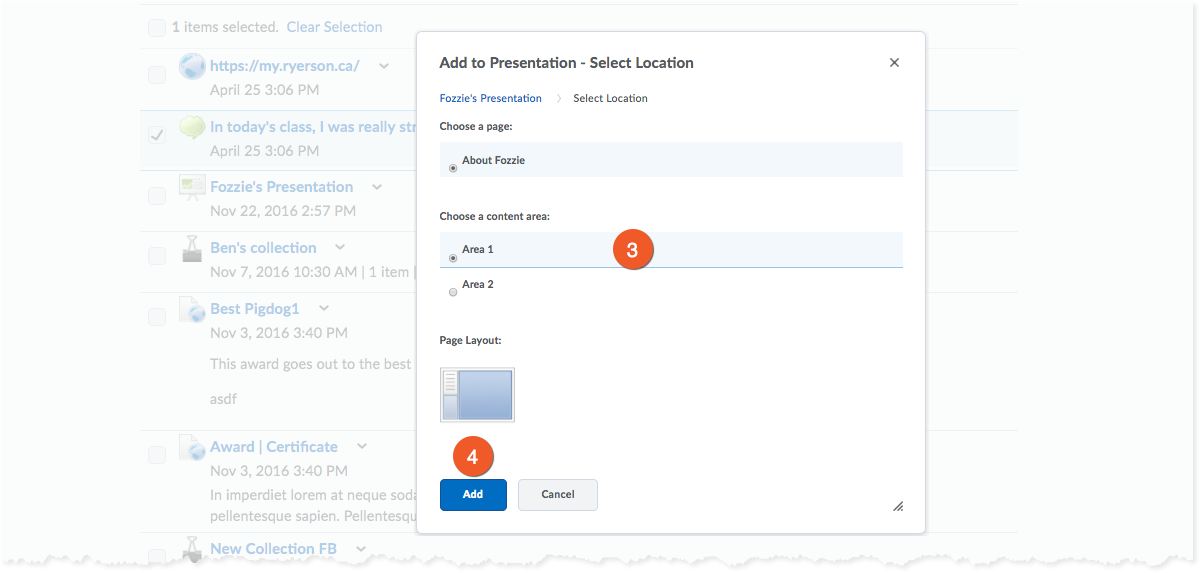
4. Click the "Add" button to save your changes.
Share content
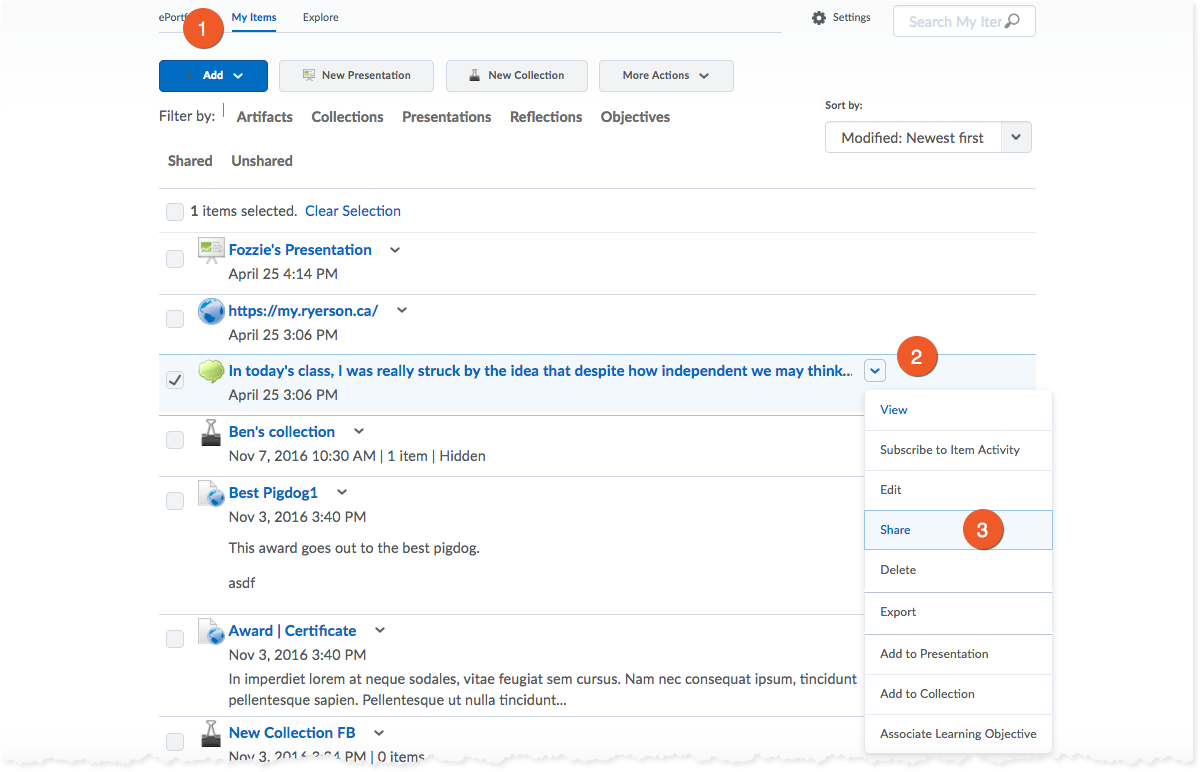
1. Start by going to the "My Items" section of your ePortfolio.
2. Locate the item you want to share and click the arrow icon to the right of the name of the item.
Tip: You can use the "Filter by:" links at the top to show specific types of content (i.e. only your Presentations).
3. Select "Share" from the dropdown menu. You will be brought to the Share setting popup.
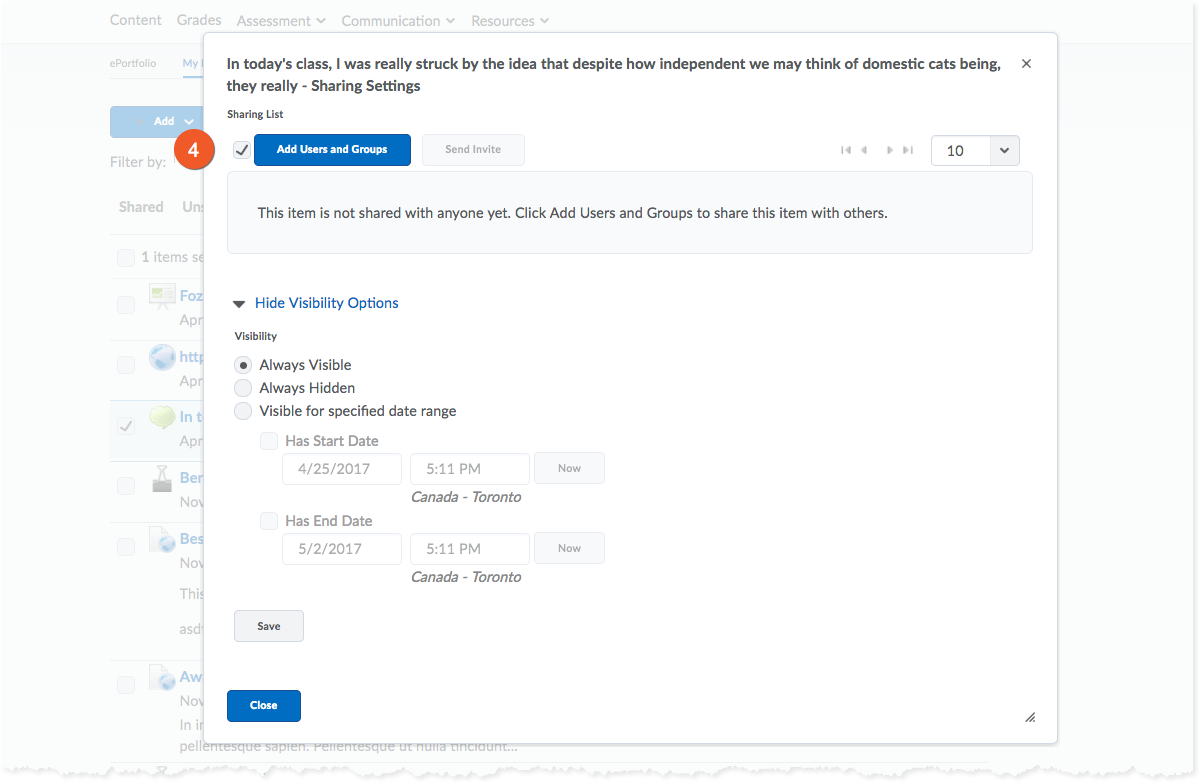
4. Click "Add Users and Groups". There are two options for sharing.
Sharing groups are normally set up to allow students to share their work with their course instructors. Only an Instructor of a D2L shell can create a sharing group.
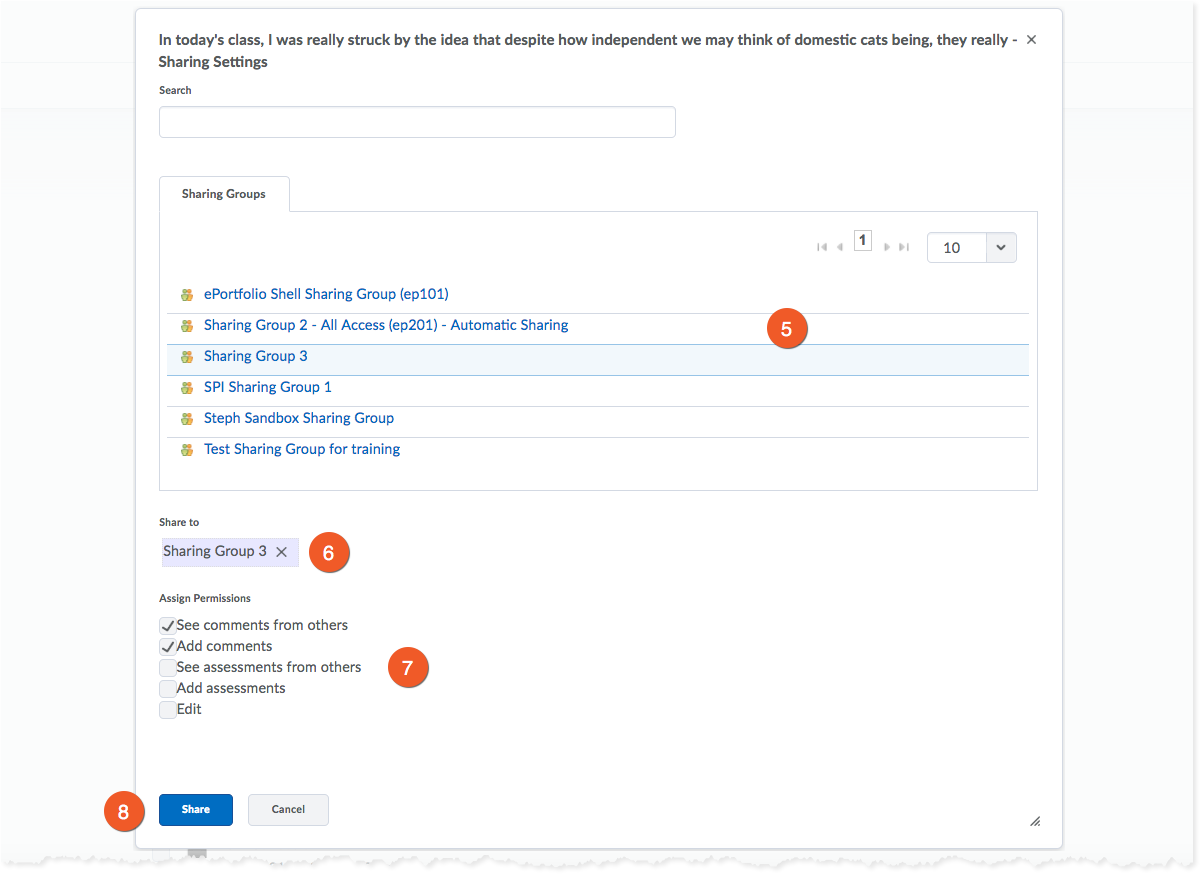
To share with a pre-set Sharing Group:
5. You will see a list of the Sharing Groups you are a member of. Select the one you wish to share with.
6. Cancel Sharing - If you change your mind about sharing with the sharing group, click the red 'X' icon to the right of their name.
7. Assign Permissions - select which permissions this group will have, when they access your content. We do not advise allowing Edit access on your content.
8. Click the Share button, at the bottom of the screen.
You will be brought back to the main sharing screen, and will see the selected Sharing Group listed. If you ever need to stop sharing the item with this group, simply click the red 'X' icon to the right of their sharing privilege.
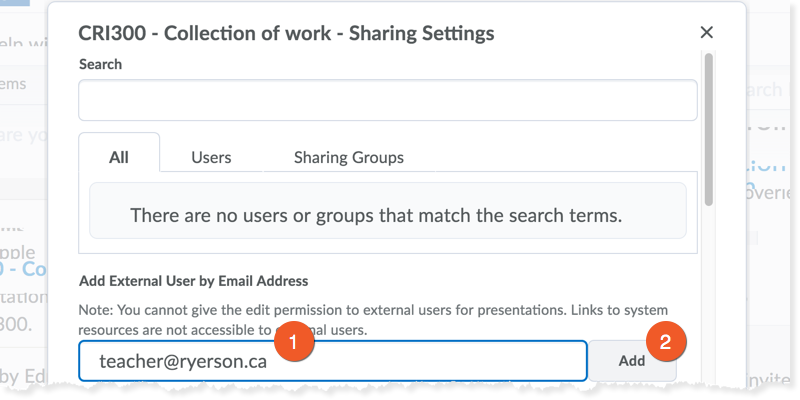
You can share your ePortfolio presentations with individuals - even those outside of the university - by adding their email address.
This option is only available for sharing ePortfolio Presentations.
To share with an individual:
1. Enter their email address into "Add External User by Email Address"
2. Click Add, and scroll down to review some additional options.
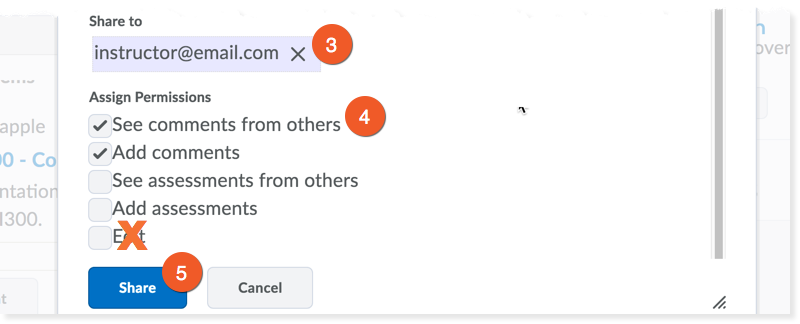
3. Cancel Sharing - If you change your mind about sharing with any of the users selected in the above steps, click the red 'X' icon to the right of their name.
4. Assign Permissions - select which permissions this group will have, when they access your content. We do not advise allowing Edit access on your content.
5. Click 'Share'. Users will be sent an email invitation to view your presentation. People who don't have a Toronto Metropolitan University D2L account will be prompted to create a username and password that they will use to access your presentation on D2L.
You will be brought back to the main sharing screen, and will see the selected Sharing Group listed. If you ever need to stop sharing the item with this group, simply click the red 'X' icon to the right of their sharing privilege.
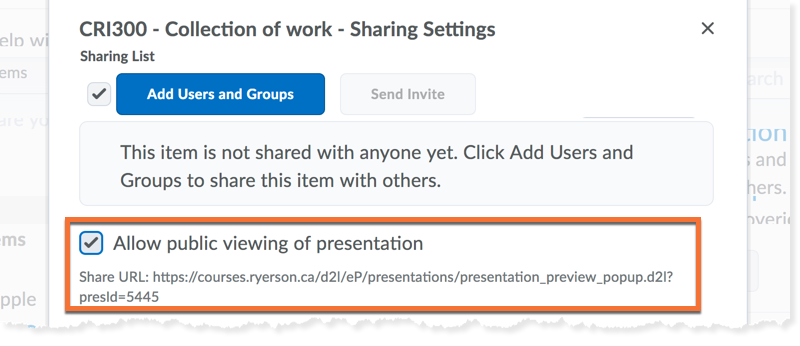
There may be some situations where you want to share your ePortfolio, but are not comfortable asking the person to take the time to create a user account.
In these cases, you can create a public URL.
This option is only available for sharing ePortfolio Presentations.
![]()
CAUTION Please only use this option when absolutely necessary.
This option is less secure than the other sharing options, since visitors do not need to login.
![]()
To create a public URL for your presentation:
Check the box to "Allow public viewing of presentation"
Don't forget to copy the share URL before you leave the Share window.
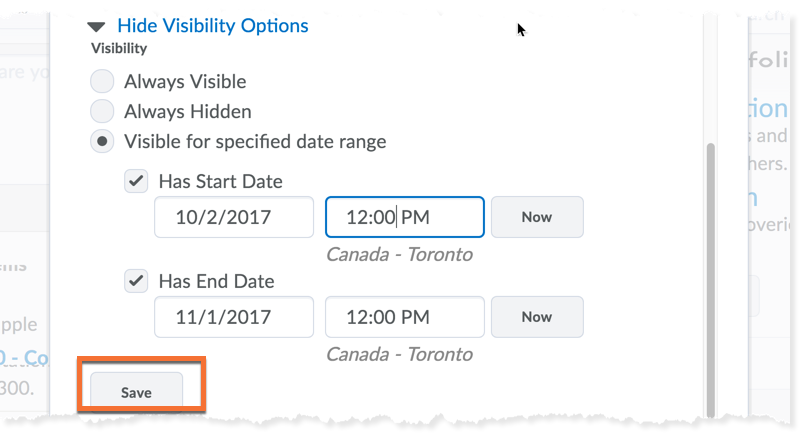
Visibility Options are used to determine when/if the people in the sharing list can see the item you have shared with them.
You can set the visibility of your item to:
- always visible (default)
- always hidden
- set start &/ end dates to control the visibility of your item
Click Save to apply your changes.
![]()
IMPORTANT: if you have set a public URL for a presentation, the visibility settings WILL NOT apply to those using the public URL. The public URL cannot be set to be hidden.
![]()