Google Meet Guide
.png)

To access Meet through your desktop or laptop computer you will need one of four modern web browsers (Chrome (external link, opens in new window) , Firefox (external link, opens in new window) , Edge (external link, opens in new window) , and Safari (external link, opens in new window) ). The first time you start Meet on a device or browser, you will be asked to allow Meet to access your camera and microphone. For more information on computer requirements, visit the Meet help page (external link) .
You can access Meet through your Android (external link) and iOS (external link) devices. You can move from web and mobile access while in a meeting. You can manage your mic and video settings within the app.

A streamlined interface has all the important features at your fingertips. The meeting details to join are on the left of the user interface and to share your screen (external link) , there is a Present Screen button on the right of the user interface. In addition to the video and audio capabilities, there is a chat feature (opens in new window) . This can be used for participants that are in the meeting that do not have video or voice enabled.
Starting and joining a meeting all happens in your web browser or on your Android or Apple mobile devices. (external link) Meeting join instructions are sent out using email or chat outside of the Meet app. If you are on the go, you can switch between devices during the meeting. In addition, meeting details now include a dial in feature that can be utilized using a phone.
The dial in feature has a US number with a PIN for meeting participants. Dial out features are available only to Canadian and US numbers. The phone number used is based the creator’s country settings location in their account.
Only fulltime faculty and staff will have access to create video conference meetings with Canadian phone numbers.
Dial in guests have a 3 hour limit, they will be dropped from the video conference but can still re-enter the video conference after being dropped.
Meetings in Meet can accommodate up 500 participants (dial in and out participants are counted towards this limit). Participants can be internal or external to TMU. External participants need to be approved before entering a meeting. Only the host and co-host can approve an external participant.
Both video and audio streams are encrypted, to learn more about how Meet encrypts your information, please visit the Google Meet help page (external link) .

For instructions on how to join a video conference on Meet, please see the Google Meet help page:
You can start or create a new Google Meet video meeting in a number of Google Workspace apps. Instructions on how to start a video meeting in each of the apps are listed in the tabs below.
Schedule a video conference in Google Calendar
- Go to Google Calendar (external link) and create an event.
- On the Guests tab, click Add guests and enter the email addresses.
- Click Add conferencing blue button and video conferencing information will be added to the Calendar invitation.
- Click Save.
- Click Send to send the invites.
Guests receive an email with the event information and a link to the video meeting. Guests can forward the meeting link to other people. If someone tries to join who was not invited to the Calendar event, a meeting participant from your organization must accept their request.
If you need a quick answer from a team member, you can start an instant meeting in a web browser. If someone sends you a meeting link URL, simply click the link to join the call.
Note: You can send the meeting link to people outside of your organization, but someone from within your organization needs to give them access to the video meeting.
- In a web browser, enter https://meet.google.com (external link, opens in new window) .
- Click New meeting or enter a code or nickname of the meeting
- After clicking New meeting, you will have choice to create a meeting for later, start an instant meeting, or schedule in Google Calendar.
- To add someone to a meeting, choose an option:
- Click Copy joining info
and paste the meeting details into an email or another app.
- Click Add people and choose an option:
- Under the Invite section, select a name or enter an email address and click Send invite.
- Under the Call section, enter a phone number and press Call
.
- Click Copy joining info
Important: To start a video meeting from Gmail, you must be on unified Gmail (external link, opens in new window) .
- Open Gmail (external link) .
- On left side menu, select Meet and click New meeting.
- To send the meeting invite via link or email, click Send invite.
- To copy the meeting invite details, click Copy meeting invite.
- To send an email invite, click Share via email.
- When you’re ready to join the meeting, click Join now.
- Before you join your first meeting, make sure to allow permissions for your Microphone and Camera. Once you grant permission:
- To turn your microphone on or off, click Microphone
.
- To turn your camera on or off, click Camera
.
- To turn your microphone on or off, click Microphone
- To join the call, click Join now.
- To end the call, click Leave call
.
1. Open a chat message in Google Chat.
2. In the reply area, click Add video meeting
Send
Join video meeting
Join now.
Meeting organizers can now add co-hosts in Google Meet video meetings. While in a Google Meet video meeting, at the bottom right, click Host control , a side panel with host management options will appear. Co-hosts will be able to lock chat and presenting, end meeting for all and mute everyone, toggle quick access and setup and start polling, breakout rooms and Q&A. Attendance reports, poll answers, Q&A summary and recording emails will still only be sent to the meeting organizer and host.
For more information on setting up a co-hosts in a Google Meet, please see this Google Meet support article. (external link)
Meeting codes from Meet can be shared by email, chat or Calendar event. External users can use the meeting codes to to join a video conference without signing into a TMU Google account. External guests must be given access to enter a video conference, the meeting creator is the only user that will be able to accept or reject the request. Dial-in guests (external link) will have a PIN that they must enter before entering the video conference. For instructions on inviting people to a video meeting, please see the Google Meet help page. (external link)
The meeting code can also be used for multiple events. To schedule Calendar events with the same meeting code, you can create the Calendar event and edit the invite and paste in the meeting code you will be using. Please see instructions below:
- In Google Calendar, open an event that has a conference call in the edit mode.
- Click View Details.
- Click Edit
.
- Paste or type an existing Google Meet URL and click Done.
- Click Save.
Note: You can only paste a Meet link from another calendar event.
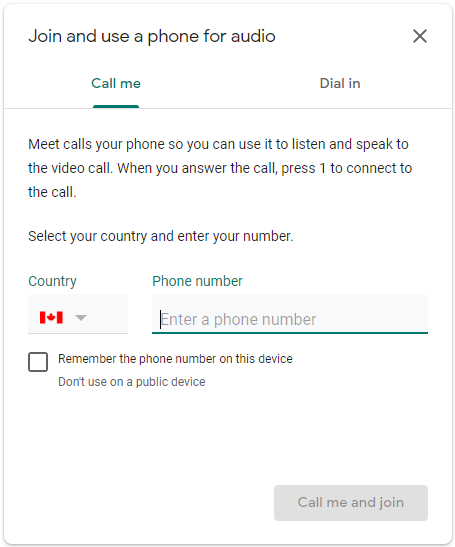
Google Meet has features to dial in or dial out to use your phone's audio to join and participate in the meeting. Dialing in to the meeting provides you with a phone number and a PIN to enter. Full-time employees will be able to set up Canadian dial in numbers for their meetings. Dial out allows you to enter your phone number and have Google Meet call your phone to join the meeting.
Phone numbers provided are not toll free, we recommend if you do not see a local dial in number to only use the dial out feature if you need to join a video conference in Meet using your phone for audio.
Have Meet call your phone
- If you are in the meeting, click More (three dots menu) and select "Use a phone for audio".
- From meet.google.com, select the meeting and click "Join and use a phone for audio".
We recommend using the Call Me option to avoid long distance charges.
For more information on using a phone for audio in a video meeting, please see the Google Meet Help page. (external link, opens in new window)
Multi task with Picture-in-Picture mode:
When you do not have multiple monitors or large desktop real estate, multitasking during Google Meet may be difficult. Google Meet offers Picture-in-Picture mode to easily follow the presentation and active speakers while you multitask.
1. Click Menu button and select Open picture-in-picture.
2. To close, hover your cursor over picture-in-picture and select Back to the tab or go to Google Meet tab and click on Bring the call back here button.
More information can be found at Google Meet support (external link, opens in new window) page.
Push to talk while muted:
While in the Google Meet video conferencing, and in muted state, you can push and hold the spacebar on your keyboard to speak. You will be unmuted while you are holding the spacebar and when you release the spacebar you will be back to muted state.
More information on push to talk can be found at Google Meet support (external link, opens in new window) page.
- Open a Google Meet video conference.
- Click More (three dot menu) and choose "Manage recording".
- You will have an option to record the captions and start a transcription.
- Wait for the recording the start. A red "Recording" icon will appear in the top left of the tab and a sound will play when the recording starts.
- Click More (three dot menu) and choose "Stop recording" when you are done recording.
-If you forget to stop the recording, the recording will end when everyone leaves the meeting.
Considerations with Recording your Google Meet video conference:
- Recordings will include any active speaker in the meeting and anything that is presented. Other windows or notifications are not included in the recording.
- Anyone in the video meeting with a TMU Google account can start and end the recording.
- Pinning a participant will not affect who is shown in the recording.
- Captions will be made available a couple of hours after video recording is made available and to view the captions, closed caption (cc) option needs to be turned on.
- Chat log is captured in the video recording. It is saved as a separate .txt file that can be found in the Meet Recordings folder in Google Drive.
- The recording will take a few minutes to process so that it can be viewed in Google Drive. An email will be sent to the organizer once the video is done processing.
- All Google Meet video recordings will be saved to the organizer's Google Drive under a folder called "Meet Recordings".
- Meetings that were created in Google Calendar and the recording took place at the time of the meeting, will link to the video recorded once the meeting is complete. The organizer of the meeting will be the owner of the video recording, everyone else in the meeting will have "View only" access.
For more information on recording a video meeting, please see the Google Meet Help page. (external link, opens in new window)
1. Open a Google Meet video conference.
2. Click Activities button at bottom right and select Transcripts.
3. Click on Start transcription button.
4. When completed, click Stop transcription button.
Considerations with transcribing your Google Meet video conference:
- Transcription will be saved as a Google Doc on meeting creator's Google Drive under Meet Recordings folder.
- Transcription will only be available in English, despite Closed Caption allows translation to 4 other languages.
- This is not a live transcription and what you see on Closed Caption may be different on transcription.
- It can take a few minutes after the transcription has been stopped before transcript is made available and the creator will be notified once the transcript is available via email.
For more information on Google Meet transcription, please refer to Google Meet support page (external link, opens in new window) .
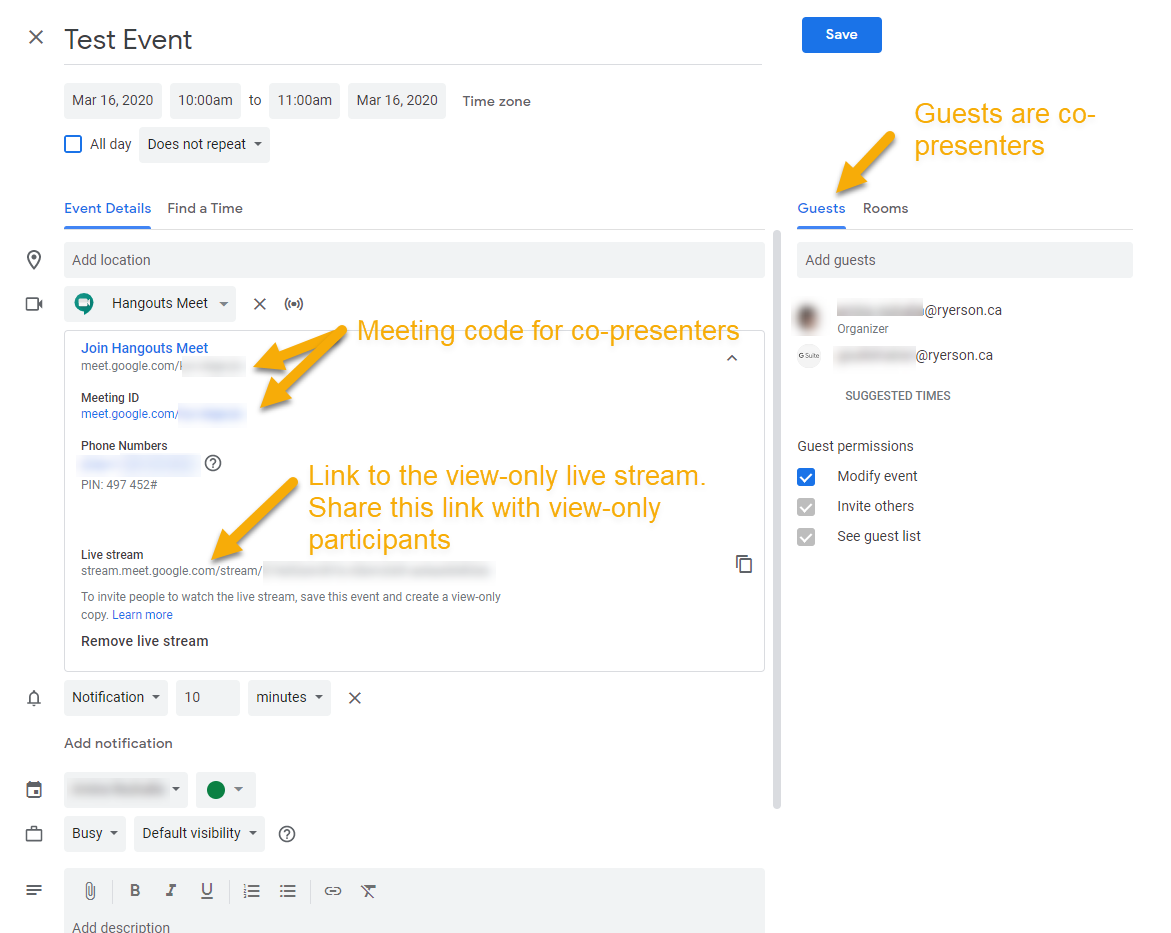
Faculty and staff can enable live streaming on their video conference meetings in Google Calendar and invite their view-only participants.
Live streaming through Hangouts Meet allows you to add up to 100,000 view-only people to your video conference. Only people with TMU accounts will be able to view the live stream.
Creating a live stream event
- Open Google Calendar.
- Create an event and add your event details.
- Add conferencing to the event by clicking Add conferencing>Hangouts Meet.
- Click on the down arrow and click on "Add live Stream"
- Click Save.
Create a view-only event to share with participants
- Open Google Calendar and click the live stream event you created.
- Click the More menu (three dots) and then click "Create view-only event".
- Add view-only participants in the Guest section. Add other event details as needed.
- Click Save.

Considerations when live streaming using Google Meet
- Only faculty and staff can create a live stream event.
- Only TMU Google accounts can view a live stream event.
- Live stream events are not automatically recorded. The organizer of the event or co-presenter in the Google Meet video conference will need to start the recording.
- There is no registration process to view the live stream event.
- There is no chat features in a live stream event.
For more help on live streaming a video meeting, please see the Google Meet Help page. (external link, opens in new window)
Notes for Organizers
- When using Meet, participants can turn off their camera to show their profile photo instead. This can improve video meeting quality if internet speed is slow. If audio quality is poor, use a phone for audio (external link) instead.
- Consider using Google Slides in combination with Meet if you need to hold a Q&A, see instructions on how to make interactive lectures. (opens in new window)
- Google Meet automatically changes the layout in a video meeting to display the most active content and participants. To ensure you appear on the main screen, during a video conference in Meet, in the lower-right corner of the Meet screen, click More
Change layout. Click a participant's image or your image to pin them/you to the screen.
Layout options for video meetings
- Auto—Allows Meet to choose the layout for you. By default you will see 9 tiles on your screen.
- Tiled—Shows up to 49 video feeds in equal size when there is no presentation. If there is a presentation, it fills the window with up to 16 participants on the side.
- Spotlight—The presentation, active speaker, or pinned feed fills the window.
- Sidebar—You see the active speaker or presentation with additional participants on the side.
Use the small tile icon on your video feed in the top right of the Google Meet screen to add your tile to the screen. This will allow you to see your video as one of the tiles in the layout.
Notes for Participants
- Try opening the meeting link early, to adjust your camera and mic settings in the “lobby area” before the meeting. Preview how you look and sound before a video meeting in Google Meet (external link) green room self-check.
- Participants are encouraged to start the meeting with their microphones and cameras off - only when you need to engage, turn your camera and microphone on.
- If you are experiencing network or device issues, you will see a red dot appear on the More options menu. Make sure to follow the automatic suggestions (external link) to fix quality issues with your network or device during a meeting.
- For faculty and staff, you will have access to noise cancelling features in Google Meet. Meet filters out noises that don't sound like voices. Instructions on how to turn it on and off can be found in this Google Meet support article (external link) .
Jamboard is a virtual dry erase board that you can start or open during a Google Meet video call.
- In the video call at the bottom right, click Activities
button and select Whiteboarding.
- To create a new Jamboard, click Start a new whiteboard. To open an existing Jamboard from your drive, shared drives, or computer, click Choose from Drive.
Tip: The Jamboard file will open in a new tab and a link is shared automatically via the in-call chat.
When you start a Jamboard from a Google Meet access permissions are automatically set for all the participants within the Google Meet. The access permissions will vary depending on how the Google Meet video conference was created:
- Participants on the calendar invite and that have a TMU account are automatically given view only access to the Jamboard when it is started.
- Participants not on the calendar invite but have a TMU account are given view only access to the Jamboard if it is started after they joined the video call. You will need to give participants access permissions to the Jamboard if they joined the video call late.
- Participants with a non-TMU account will need to be given access to the Jamboard. Open the Jam file > click Share
type in the email addresses
For help on using the Jamboard, please find the reference guide for Jamboard tools (external link) and how to share a Jamboard instructions (external link) on the Jamboard Help page.
Breakout rooms allow instructors to split students into simultaneous small group discussions. Breakout rooms is a premium feature in Google Meet is only available to fulltime faculty and staff accounts.
When you schedule a Google Meet through Calendar or create a new Google Meet video conference you will be able to create breakout rooms. If you transfer or schedule a meeting on someone else's calendar they will be able to create breakout rooms.
Create breakout rooms
- On your computer, start a video call.
- In the top right, click Activities
Breakout rooms.
- In the Breakout rooms panel, choose the number of breakout rooms. You can create up to 100 breakout rooms in a call.
- Call participants will then be randomly and equally distributed across the rooms.
- To manually move people into different rooms, you can either:
- Enter the participant’s name.
- Click the participant’s name. Hold down the mouse, drag the name, and then drop it into another breakout room.
- To randomly mix up the groups again, click Shuffle
.
- To manually move people into different rooms, you can either:
- In the bottom right, click Create.
Tip: To redo the breakout rooms and put all participants back in the Main room, click Clear .
End breakout rooms
- In the Breakout rooms panel, at the top right, click End breakout rooms
.
- Click End breakout rooms.
Join a breakout room
Your moderator will create breakout rooms and invite you to join one. Your moderator can join each breakout room at any time during the video call.
- On a computer or mobile device, sign in to your Google Account.
- Join a video call from your computer or the Meet mobile app. Tip: If you’re a student, learn the different ways to join a video call. (external link)
- Important: If you dial in to the call from your phone, you won’t be able to join breakout rooms.
- When your moderator invites you to join a breakout room, you’ll see a prompt on your screen. Click Join.
- Tip: If you click “Cancel,” you’ll remain in the Main room. At the top, next to “Invited to Breakout #,’ click Join.
- Once you’re in a breakout room, you can speak to or send chat messages to other participants.
Tip: If your moderator moves you to another breakout room, you’ll see a new prompt on your screen. To switch rooms, click Join.
Return to the main room
During a video call, you can choose to leave a breakout room and return to the video call’s main room.
- On a computer: At the top, click Return to main room.
- On a mobile device: At the top, Tap to return to main room.
When your moderator ends all of the breakout rooms, you’ll see a prompt that you’re returning to the main room. Click Return.
Things to consider when using breakout rooms in Google Meet
- Meeting creators can only create breakout rooms in Google Meet if they access the meeting through a computer.
- There is only one person that is able to create breakout rooms in a meeting. They would be the person that scheduled the meeting, the person that owns the calendar that the meeting is created in or the person that created the Google Meet video conference.
- Breakout rooms cannot be live streamed or recorded.
- Participants in a Google Meet need to be signed into a Google account or dial into a video call to be able to participate in breakout rooms. If they are not signed in or dialed in, their names will appear under "Can't be assigned".
- Meeting creators can join individual breakout rooms, they will not be able to see any chat messages that were exchanged between participants before they join or after they leave the breakout rooms.
- You will not be able to set up the breakout room membership prior to starting the meeting. As an alternative, you can use Zoom to host breakout rooms with custom membership that is set before the meeting is started.
Attendance reports from Google Meet is a premium feature and is available to all fulltime faculty and staff accounts.
Attendance tracking for meetings is turned on by default. After a video call with at least 2 participants, the meeting organizer will receive an email with an attached attendance CSV report with the following info:
- Participant’s name
- If someone calls in from their mobile device, instead of their name, some of their phone number digits will be listed.
- Participant’s email
- Length of time participant was on a call, including timestamps of when they first joined and when they left the call.
- If someone gets ejected from a call, that timestamp will be recorded as the time they left the call.
- If someone joins and leaves the call more than once, multiple timestamps won’t be listed, but their overall call duration will be included.
Q&A in Google Meet allows meeting participants to ask questions during a video conference and to vote on the questions asked. The meeting creator will be able to mark questions as answered or hide questions during the video conference. In addition, the meeting creator will get a detailed report of all the questions from the video conference. Q&A is a premium feature in Google Meet available to all fulltime faculty and staff accounts.
Note: participants will only be able to use the Q&A feature in Google Meet when joining the video conference on a computer.
To turn on Q&A:
- In a meeting, in the top-right corner, click Activities
- Click Questions
Turn on Q&A.
Ask a question
When you ask a question, participants might get a notification in the meeting.
- In a meeting, in the top-right corner, click Activities
- In the lower-right corner, click Ask a question.
- Enter your question
Tip: Participants can answer the question verbally in the meeting or add their reply in the meeting chat.
View and manage questions
The meeting creator can filter questions, mark questions answered, and hide questions. This only applies to the moderator’s view.
- In a meeting, click Activities
- To filter questions, next to "All questions", click Down arrow
and select an option:
- All questions
- Unanswered questions
- Answered questions
- Hidden questions
Tip: Participants can only filter by all questions or questions they asked.
- To upvote a question, on the question, click Upvote
.
- To mark a question answered, on the question, click Answered
.
Tip: Mark a question answered so participants know it was answered. - To hide a question, on the question, click Hide
.
- To sort questions by popularity or chronologically, next to "Popular", click Down arrow
- To delete a question, on the question, click Delete
.
Tip: Moderators can delete anyone’s question. Participants can only delete their own question. The moderator can see all deleted questions and who asked them in the Questions report emailed to them after the meeting.
View a Questions report
After a meeting, the moderator is emailed a Questions report. The report includes any questions asked, hidden, or deleted along with the names of participants.
- Open the email with the Questions report.
- Click the report attachment.
As a meeting participant, you can add questions to a meeting. Anyone in the meeting can see your questions until you delete them. The meeting moderator can hide your questions and see all your deleted questions.
Ask a question
- In a meeting, in the top-right corner, click Activities
- In the lower-right corner, click Ask a question.
- Enter your question
Find, upvote, or delete a question
- In a meeting, in the top-right corner, click Activities
- To sort questions by popularity or chronologically, next to "Popular", click Down arrow
- To view everyone’s questions, click All questions.
- To view only your questions, click My questions.
- To upvote a question, on the question, click Upvote
- To delete a question, on the question, click Delete
Tip: As a participant, you can only delete your own questions. The meeting moderator can see all deleted questions, along with who posted them, in the meeting report.
Polling in Google Meet allows meeting creators to create a poll for participants to vote on. Polling is a premium feature in Google Meet available to all fulltime faculty and staff accounts.
Note: participants will only be able to use the polling feature in Google Meet when joining the video conference on a computer.
Create a poll
- In a meeting, in the top-right corner, click Activities
- Click Start a poll.
- Enter a question and add options for the poll.
- Choose one:
- To post your poll, click Launch.
- To save your poll so you can launch it later, click Save.
Tip: Polls you save remain listed under Polls.
Moderate a poll
- In a meeting, in the top-right corner, click Activities
- (Optional) To let participants see a poll’s results, next to "Show everyone the results", click Switch on
.
- (Optional) To close a poll and not allow responses, click End the poll.
Tip: Participants can still view the poll. - To permanently delete a poll from your list of polls, click Delete
Tip: No one can view deleted polls.
View a poll report
After a meeting, the moderator is emailed a report for any polls conducted in the meeting. The report includes the names and answers of the meeting participants.
- Open the poll report email.
- Click the report attachment.
As a meeting participant, you can submit a response for a poll.
You'll get a notification in the meeting when the moderator starts a poll. Be sure to submit your response before the poll or meeting ends. You can only access the poll in Google Meet if you are on a computer.
In a meeting:
- In the top-right corner, click Activities
- In the poll, select your response
Tip: After you click Vote, you can’t change your response.