How to set up recurring tutorial sessions for TAs/GAs
Many of the tutorial sessions this term will be run remotely by TA/GAs, over Zoom.
There are a few different ways to approach this, and we have outlined two workflows below.
In Option 1, the instructor creates all of the Zoom meetings for the tutorials. This can ensure the instructor maintains ownership of the meetings and recordings, but has a few drawbacks.
In Option 2, the TA/GA creates the Zoom meetings for their own tutorials, but transfers the resulting recordings to the instructor through Google Drive.
Why use this method?
- The instructor can ensure all tutorials have the same settings.
- The recordings of all sessions are saved to the instructor's Zoom account.
- The instructor can re-assign a tutorial to a different TA/GA if needed.
Do not use this method...
- If any of your tutorial sessions happen concurrently. Zoom does not permit a user to host multiple meetings at the same time (external link) , and may close *all* other Zoom meetings created by that host at that time!
- If your TA/GAs need to be able to run polls during the meetings. This can only be done by the person who originally created the meetings.
Considerations
- If you have many tutorial sections, this may be a lot of work for the instructor.
- The TA/GA must enter the room first so that they are given the "host" role.
- Cohosts (the TA/GAs) will not see these meetings listed when they log into Zoom - they will be relying on the link provided by the instructor.
-
Log in at torontomu.zoom.us (external link)
-
Choose “Meetings” from the side navigation on the left, then click the “Schedule a Meeting” button on the right.
-
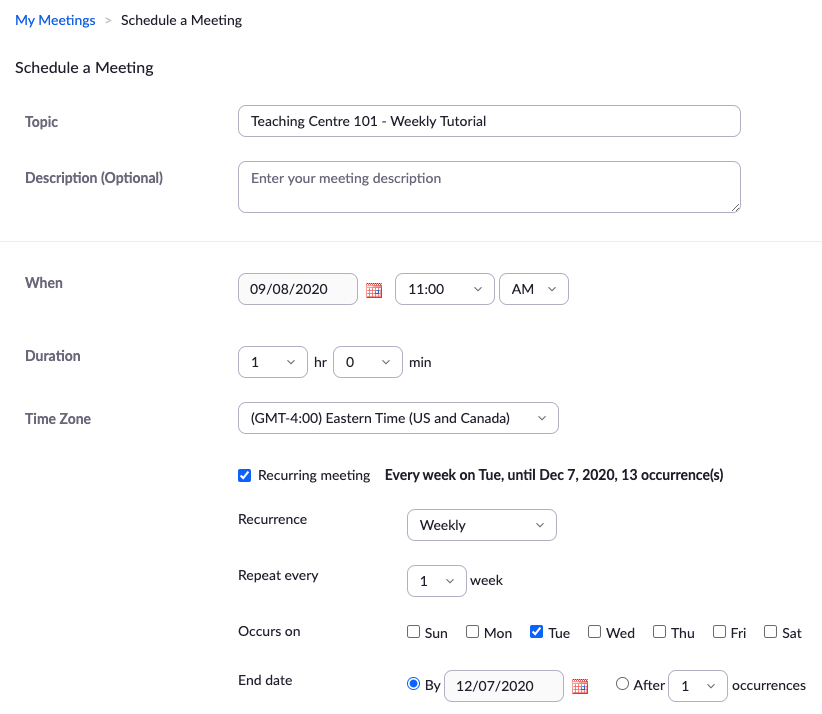
There are many options when scheduling a meeting. Please ensure the following:
- Under topic, make sure to give the session a clear name so you can distinguish between the tutorials easily.
- Enter the date and time of the first meeting and check the box for "Recurring Meeting."
- Select "End Date" and enter the last day of the semester, as shown below.
- Select "End Date" and enter the last day of the semester, as shown below.
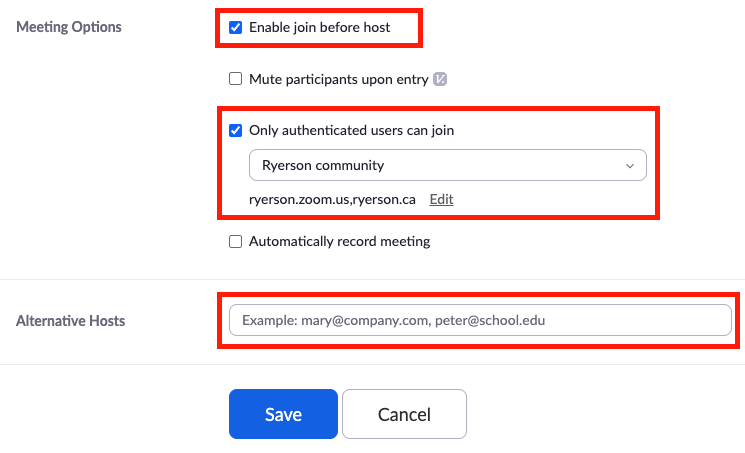
- Required setting: Under meeting options, ensure you have selected “Enable join before host” and “Only authenticated users can join.”
- Required setting: Under Alternative hosts, enter the TA/GA email address(es).
- If you don’t have the names of your TAs/GAs yet, you can add them later by editing the meeting.
Important note about "Only authenticated users can join" option
This option will require participants to sign-in to Zoom with their my.torontomu credentials, minimizing the risk of unwanted guests joining the room. Before joining a meeting, your participants must sign in to the Zoom desktop or mobile app using Single Sign On (SSO).
External participants outside of TMU
If you intend on inviting external attendees to your meeting (outside of TMU), do not check this option. If an external guest does not have a TMU email address or TMU Zoom account, they will not be able to join. We recommend leaving the meeting room password as a safe alternative.
-
Click "Save". Copy the Zoom link and provide this link to your TA/GAs and the students. This will be the only link they need for the semester in order to attend the tutorial.
- Log in at torontomu.zoom.us (external link)
- Launch the meeting using the meeting link provided by the professor/instructor.
- In the toolbar at the bottom of the screen, click on “Participants” to see the list. Beside your name you should see “(host).”
- If the professor/instructor has set up the waiting room, you will see students arrive at the top-right of your screen. You will need to admit the students into the meeting.
- You may have been asked to record the sessions. This may happen automatically. If so, a warning will pop up when you start the session and the same warning will appear for the students as they join the call. If not, you will need to click on “Record” in the toolbar and click “Continue” in the window that pops up.
- At the end of the session, click the “End” button and choose “End Meeting for All.” This will end the session and the recording
Why use this method?
- If there are many tutorial sessions, this is less overhead work for the instructor.
- Since the TA/GA is the creator and host of the meeting, there is no worry that the instructor will accidentally close all simultaneous tutorials.
- The TA/GA will be able to run polls during the meetings.
- As long as the TA/GA adds the instructor as an alternative host for the session, they can still join the tutorials (just be sure to allow the TA/GA to enter first).
Considerations
- The TA/GA's Zoom account will be the owner of any resulting recordings.
- TA/GAs would be required to provide the instructor with a copy of all recordings, then destroy any recordings in their own accounts.
- Instructors should be sure to provide the TA/GA with a list of settings, to ensure all tutorials are set up in the same way.
- The instructor would not have the ability to re-assign a tutorial meeting to another TA/GA if required.
-
Log in at torontomu.zoom.us (external link)
-
Choose “Meetings” from the side navigation on the left, then click the “Schedule a Meeting” button on the right.
-
There are many options when scheduling a meeting.
The instructor should provide you with a list of settings, as well as a naming convention for the meeting title.
Please ensure the following:
- Under topic, make sure to give the session a clear name so you can distinguish between the tutorials easily.
- Enter the date and time of the first meeting and check the box for "Recurring Meeting."
- Select "End Date" and enter the last day of the semester, as shown below.
- Select "End Date" and enter the last day of the semester, as shown below.
- Required setting: Under meeting options, be sure to check “Enable join before host” and “Only authenticated users can join.”
- Required setting: Under Alternative hosts, enter the instructor's email address.
Important note about "Only authenticated users can join" option
This option will require participants to sign-in to Zoom with their my.torontomu credentials, minimizing the risk of unwanted guests joining the room. Before joining a meeting, your participants must sign in to the Zoom desktop or mobile app using Single Sign On (SSO).
External participants outside of TMU
If you intend on inviting external attendees to your meeting (outside of TMU), do not check this option. If an external guest does not have a TMU email address or TMU Zoom account, they will not be able to join. We recommend leaving the meeting room password as a safe alternative.
-
Click "Save". Copy the Zoom link and provide this link to the instructor and the students. This will be the only link they need for the semester in order to attend the tutorial.
This step will make it simple to transfer the tutorial meeting videos to the instructor. Once this shared folder is created, you will just need to upload the Zoom files into the folder... and it's done!
Create the folder
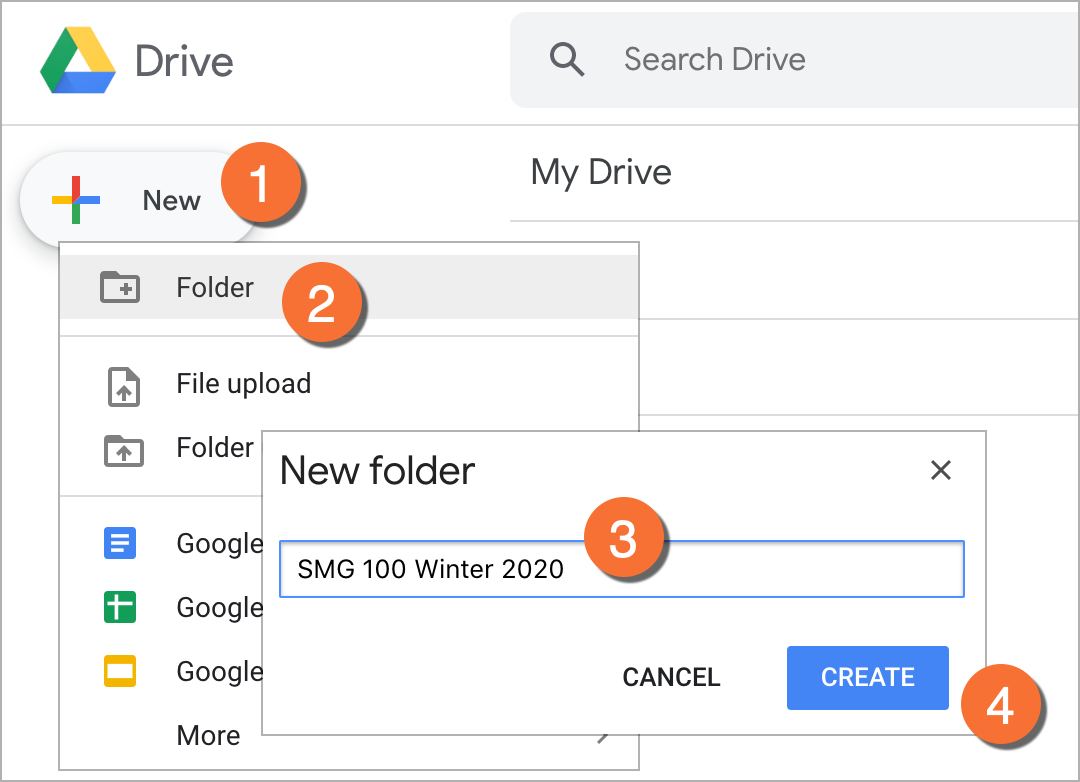
- Click the "New" button in the top-left corner of Google Drive.
- Click "Folder" in the menu.
- Enter a name for the new folder. We recommend using a combination of your course code, term and section number (if appropriate).
- Click the "Create" button at the bottom.
Note: you can create folders within this folder to further organize the content you wish to share with your students.
Share the folder with the instructor
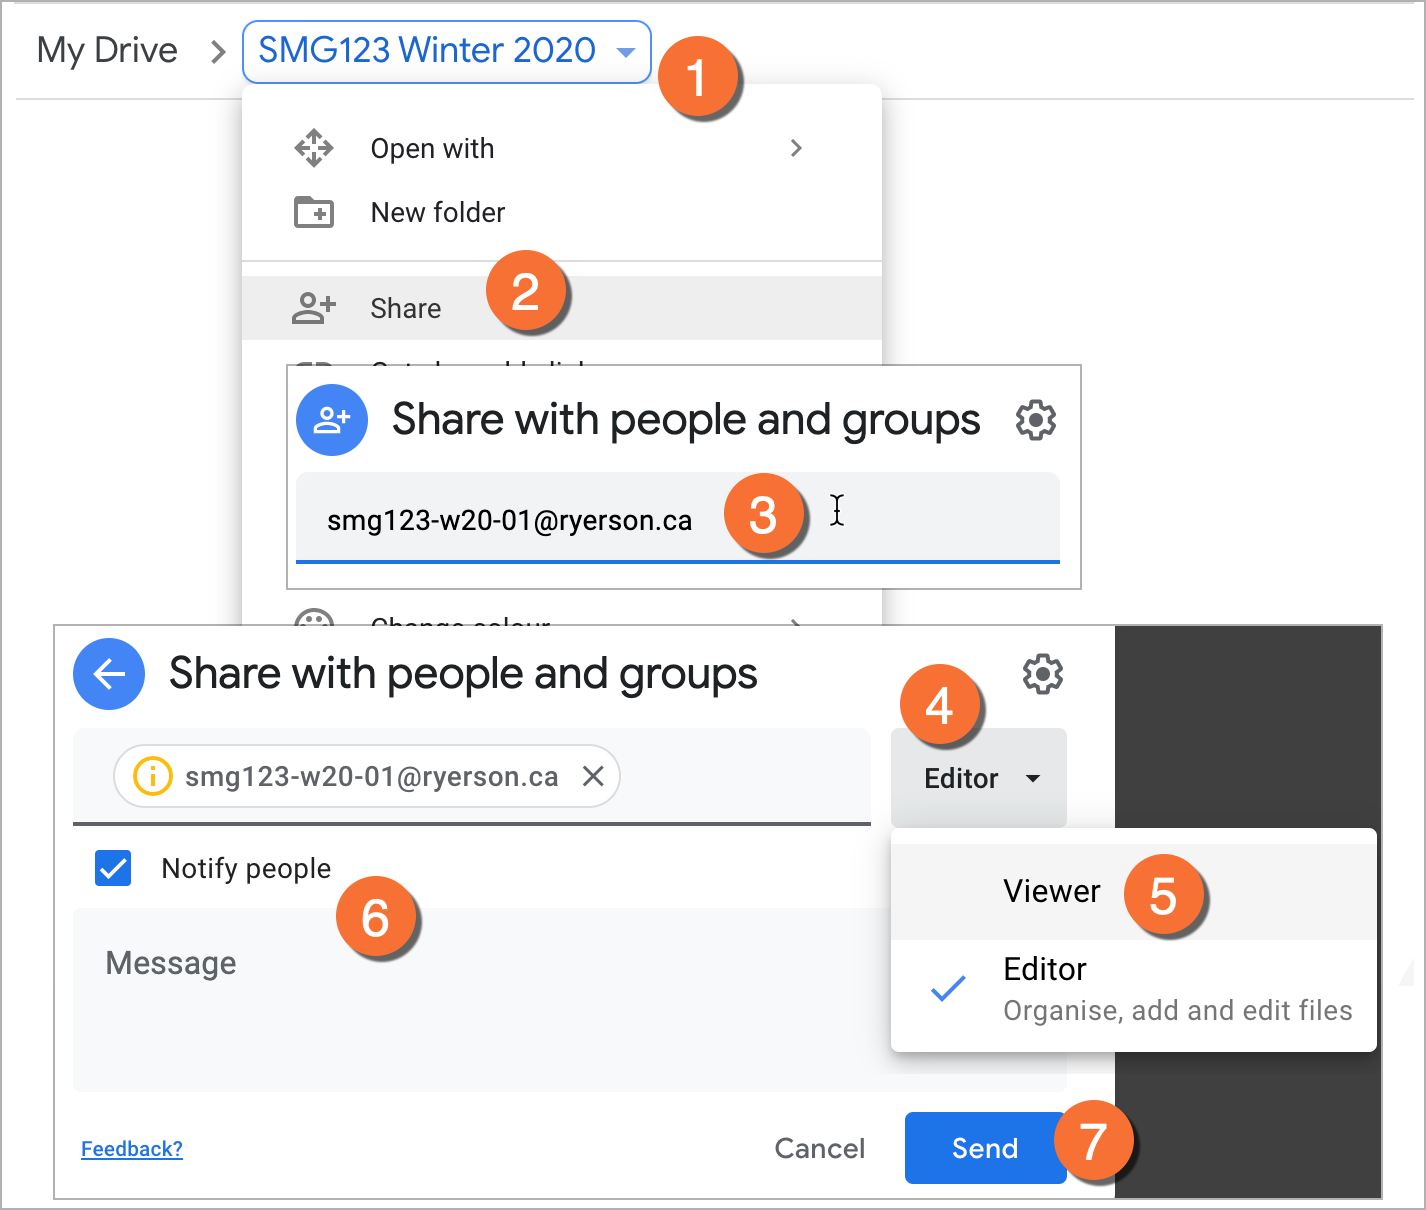
- Go to the top of the main Google Drive window, and click the arrow next to the name of the folder.
- Click "Share" in the menu.
- On the "Share with people and groups" screen, type in the instructor's email address. Hit the "Enter" or "Return" key on your keyboard.
- The window will update with some additional details. Look to the right of the class email address - it should say "Editor".
- Include a brief message to the instructor to let them know that this is the folder for the tutorial session videos for your group.
- Click the "Send" button to proceed with the changes.
- Log in at torontomu.zoom.us (external link) or your Zoom app. Since you created the meeting, it will be listed in your upcoming meetings.
- In the toolbar at the bottom of the screen, click on “Participants” to see the list. Beside your name you should see “(host).”
- If you have set up the waiting room, you will see students arrive at the top-right of your screen. You will need to admit the students into the meeting.
- You may have been asked to record the sessions. If you set up the meeting to automatically record, a warning will pop up when you start the session and the same warning will appear for the students as they join the call. If not, you will need to click on “Record” in the toolbar and click “Continue” in the window that pops up.
- At the end of the session, click the “End” button and choose “End Meeting for All.” This will end the session and the recording.
Download all of the meeting files from Zoom
- Wait for the email confirmation from Zoom that your recording is ready. If you selected to have a transcript generated from the audio, this will take a bit longer - a second email will be sent to let you know once this is ready.
- Go back to https://torontomu.zoom.us/ (external link) (you may need to sign in again)
- Click on “Recordings”
- You will likely see that your recording is still processing. This could take several minutes.
- Once it is done, click “More”, where you can download the files.
- From there, you can edit them (optional) and then delete them from the cloud.
When you download the files, you will also get a “.vtt” file. This is a closed caption file that can be uploaded with the video to either Google Drive or D2L.
Rename your Zoom recording files after downloading! It's worth taking the time to rename the recording file to reference the course code and tutorial, as well as the date or week.
Upload the meeting files to the shared Google Drive
Once you have all of the files from Zoom, upload them into the folder you created. Since each session may result in a number of files, you may want to create a sub-folder inside the main folder for each session.
- Privacy Considerations for virtual classes and virtual proctoring
- (google doc) Students Notice of Recording (external link)
- (google doc) Terms of Conduct, Privacy, and Engagement (Sample) (external link)
- (google doc) Protecting your Zoom session: 7 privacy and security tips for instructors (external link)
![]()
Zoom does not support concurrent meetings
Zoom does not allow a user to host multiple meetings at the same time. If the host attempts to have concurrent meetings by scheduling two or more meetings at the same time, you and any alternative hosts may experience various issues or warnings. These issues will occur even if you designate an alternative host or enable the "join before host" option.
For more information, please read Can I Host Concurrent Meetings? (external link)